
 9 MIN READ
 UPDATED MAY 1, 2026
1. Open Vesting Templates
- On the sidebar menu of the TGA Platform, select Token Grants > Vesting Templates
2. Create a vesting schedule
- Click Create Vesting Schedule button on the top right of the screen
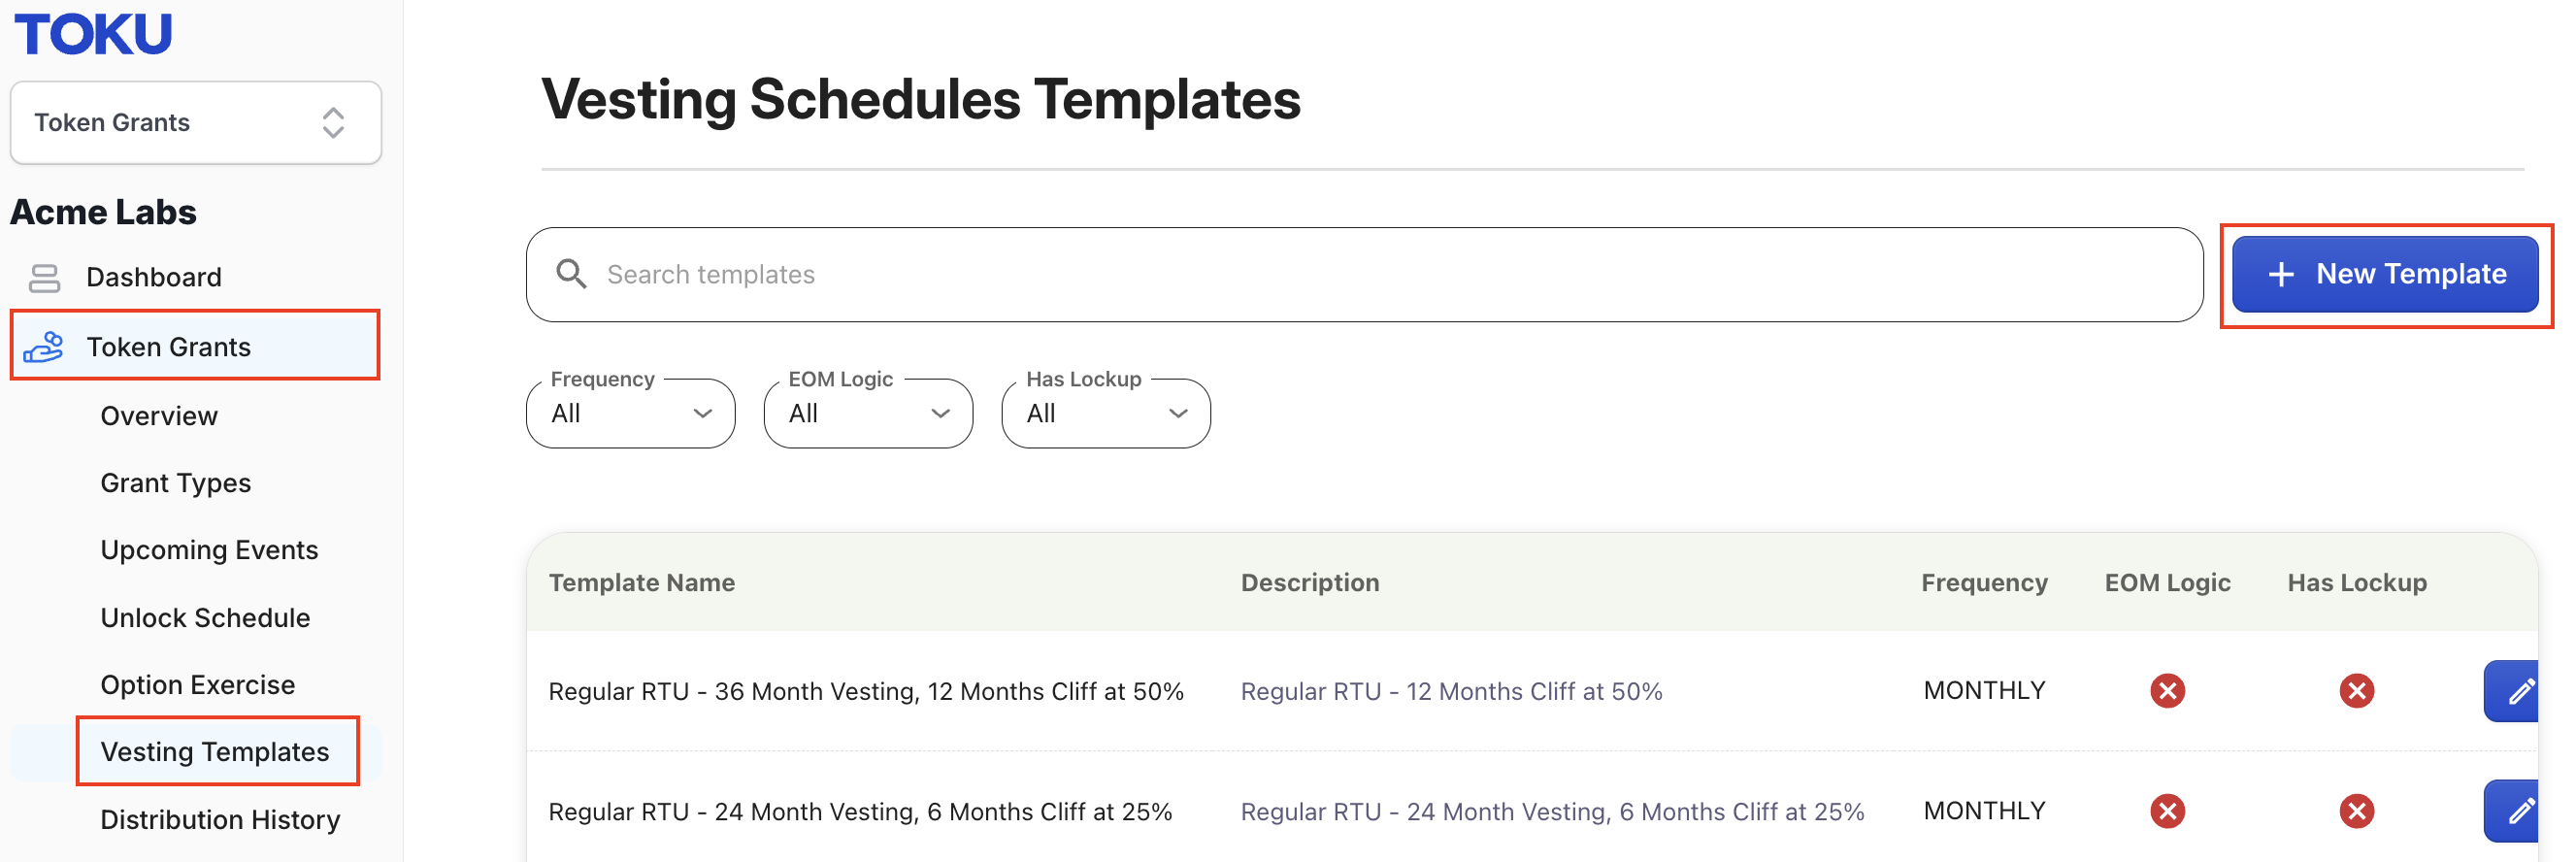
3. Name the template
- Name your vesting template with a clear, descriptive name that indicates its terms.
- Examples:
- "Regular RTU - 36 Month Vesting, 12 Months Cliff at 50%"
- "Regular RTU - 24 Month Vesting, 6 Months Cliff at 25%"
- "Fiat Denominated Bonus"
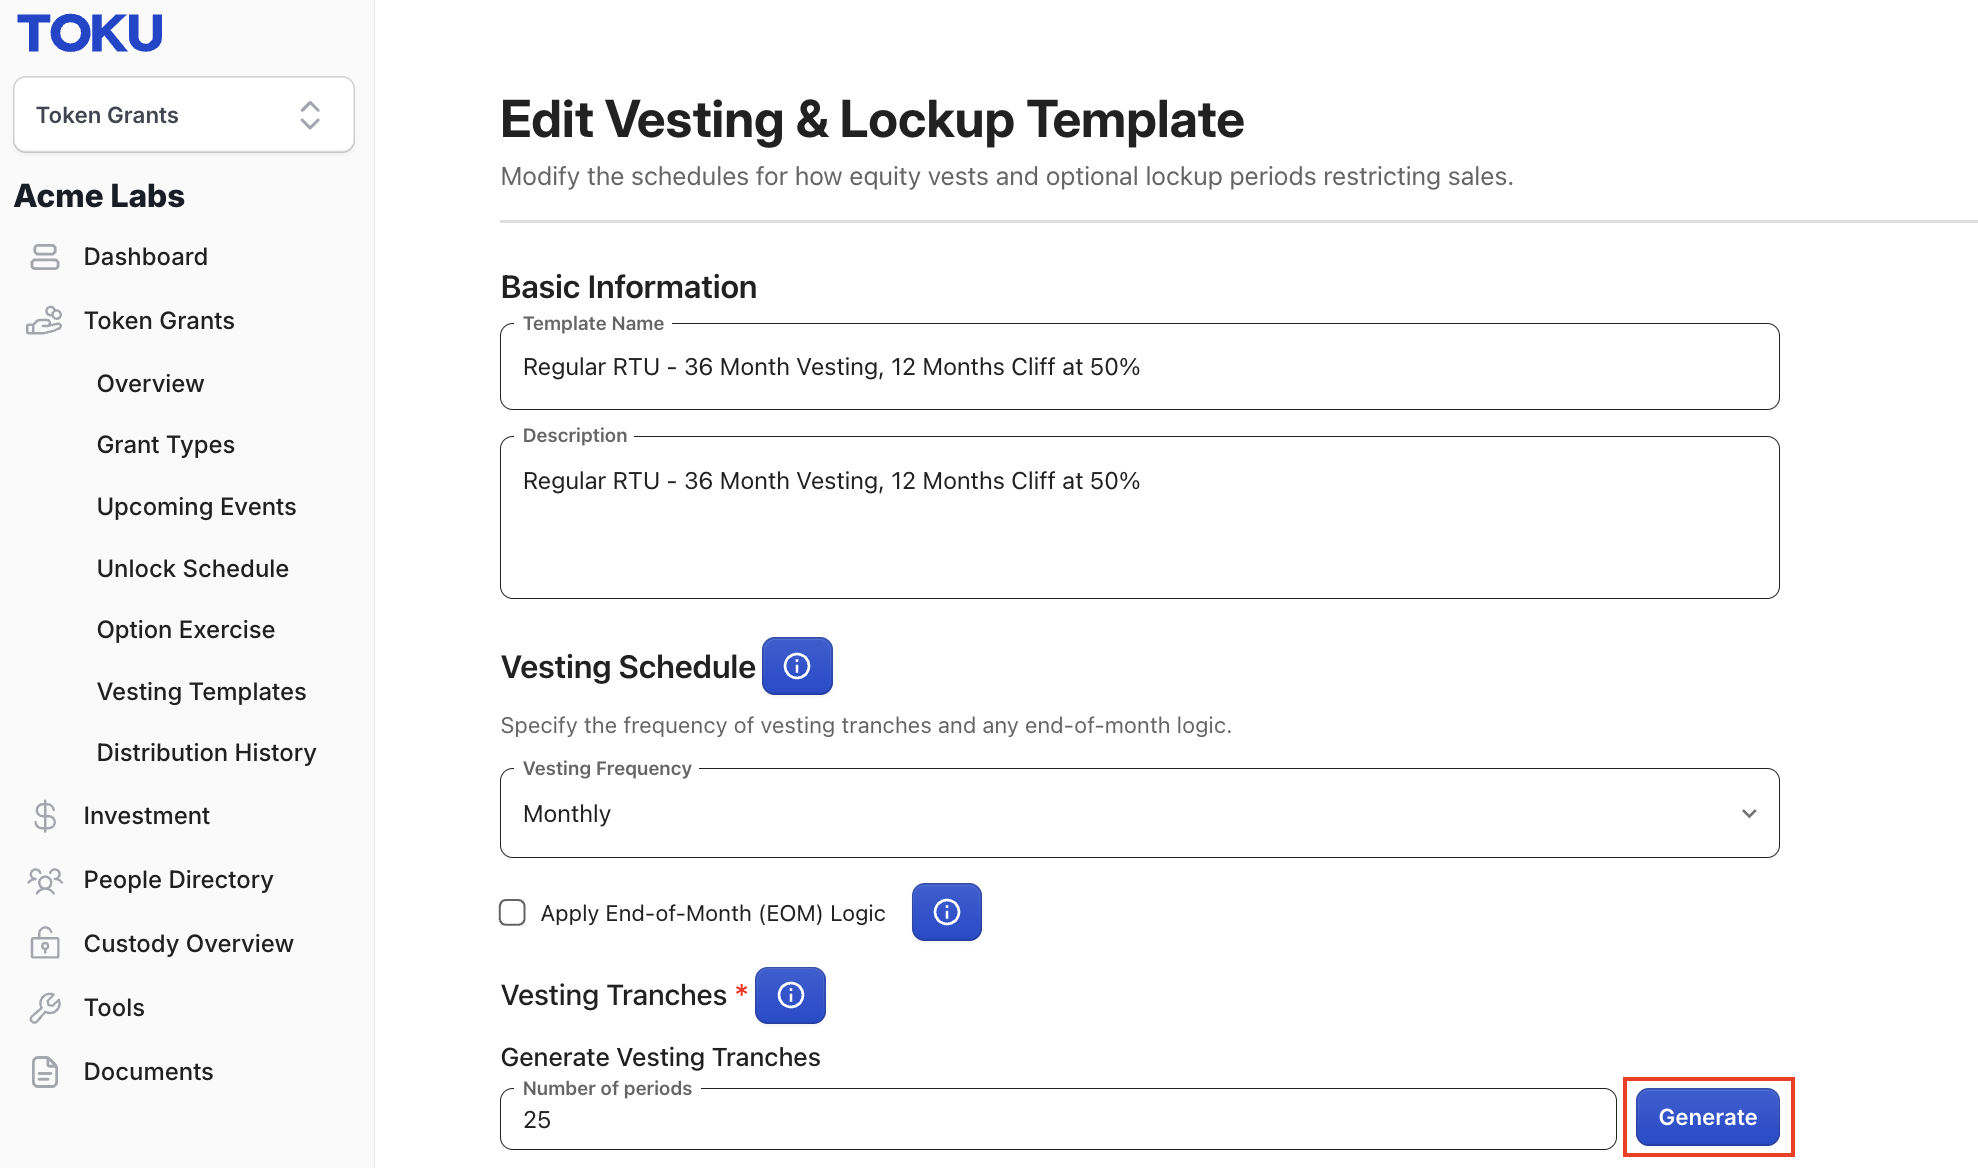
4. Choose vesting frequency
- Choose the vesting frequency from the following options: daily, weekly, monthly, quarterly, semi-annually, or yearly.
- If you need to define vesting events on specific dates rather than a standard frequency, select the Custom option.
5. (Optional) Apply End of Month (EOM) logic
- Check the ‘Apply End of Month (EOM) Logic’ box to control how vesting dates are calculated:
- Enabled: Vesting occurs on the last day of each month (e.g., August 31)
- Disabled (default): Vesting occurs on the same calendar day as the vesting start date. For example, if the vesting start date is 15 August, monthly vesting will occur on the 15th of each subsequent month.
6. Generate vesting tranches
- Generate the vesting tranches by inputting the number of periods. The number of periods represents the total number of times tokens will vest, including the cliff payment.
💡 Example: A 3-year grant with monthly vesting and a 1-year cliff would have 25 vesting periods. The cliff payment after 12 month counts as the first vesting period, followed by 24 additional monthly vesting events.
7. Generate
- Once the information above is complete, click the Generate button.
8. Set the first tranche allocation
- The system will generate vesting tranches automatically based on the number of periods specified in Step 6 (refer to the screenshot below). Subsequently, determine the first tranche allocation.
- If the grant includes a cliff, the first tranche typically represents the cliff payment. Specify the allocation as either a weight or percentage (e.g., 50%).
- For grants without a cliff, the first tranche represents the initial vesting event. You can directly enter the percentage allocation.
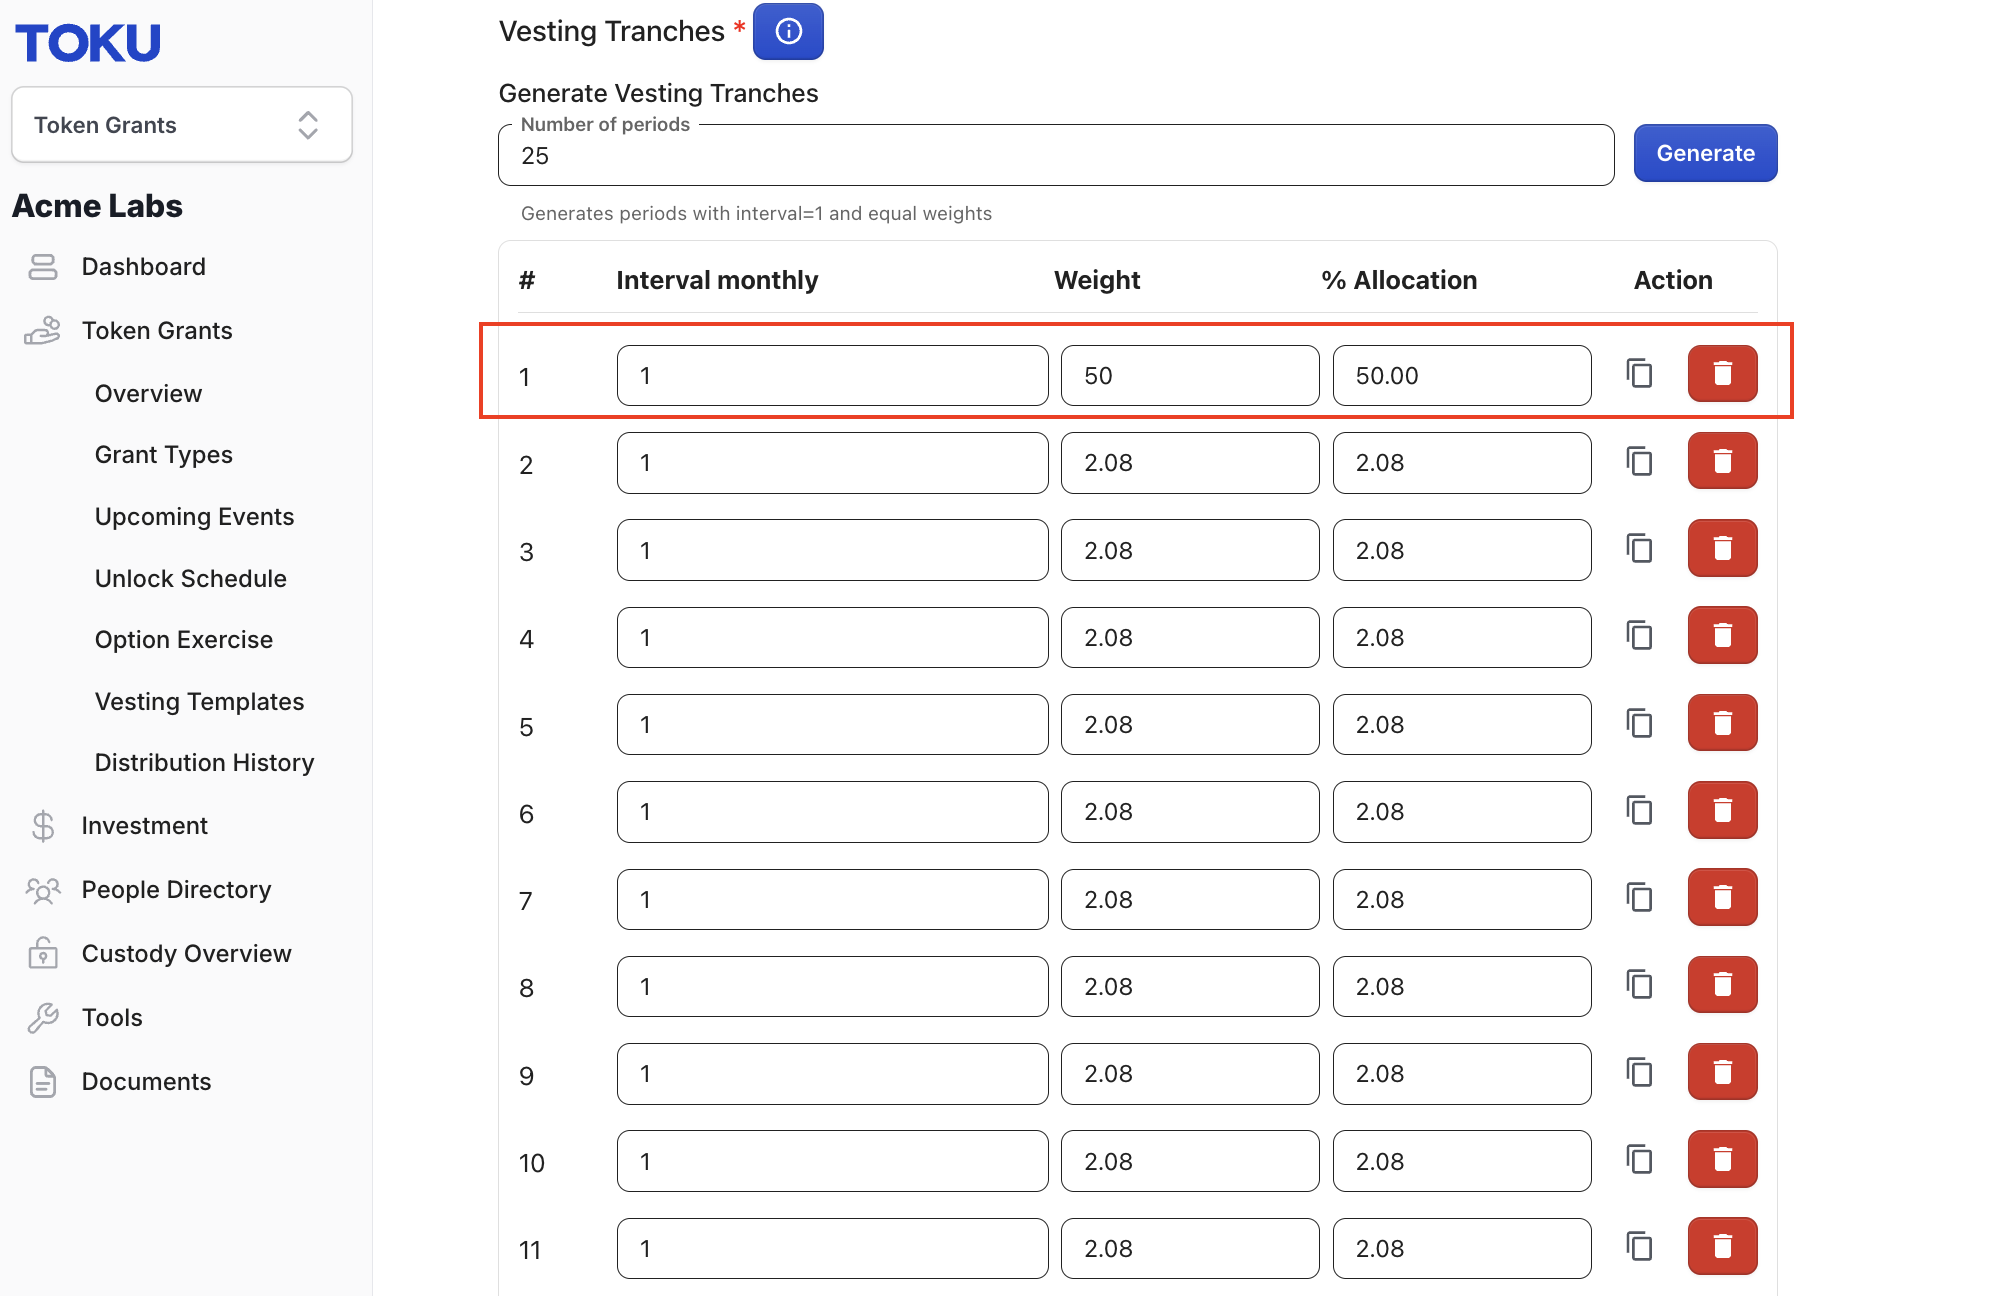
Then, the system will automatically distribute the remaining allocation across subsequent tranches.
9. Update the template
- Click Update Template button at the bottom of the page to save your Vesting Template.
💡 Tips: You can edit, delete, or regenerate vesting tranches only while the vesting template remains unused. Once grants have been issued using this template, the vesting structure is finalized and cannot be changed. If you need to modify the vesting structure after grants have been created, you must create a new template with the updated configuration.
Add unlock schedule (optional)
Lockups are separate from vesting and are typically tied to Token Generation Events (TGE) or other milestone dates. When enabled, this schedule defines the period following vesting during which vested tokens or shares cannot be sold. Lockups are commonly used to stabilize token or share prices after a token listing or IPO.
💡 Difference between Vesting and Unlock:
- Vesting = When tokens are earned
- Lockup/Unlock = When vested tokens can be sold/transferred A token can be fully vested but still locked, meaning the recipient owns it but cannot yet transfer or sell it.
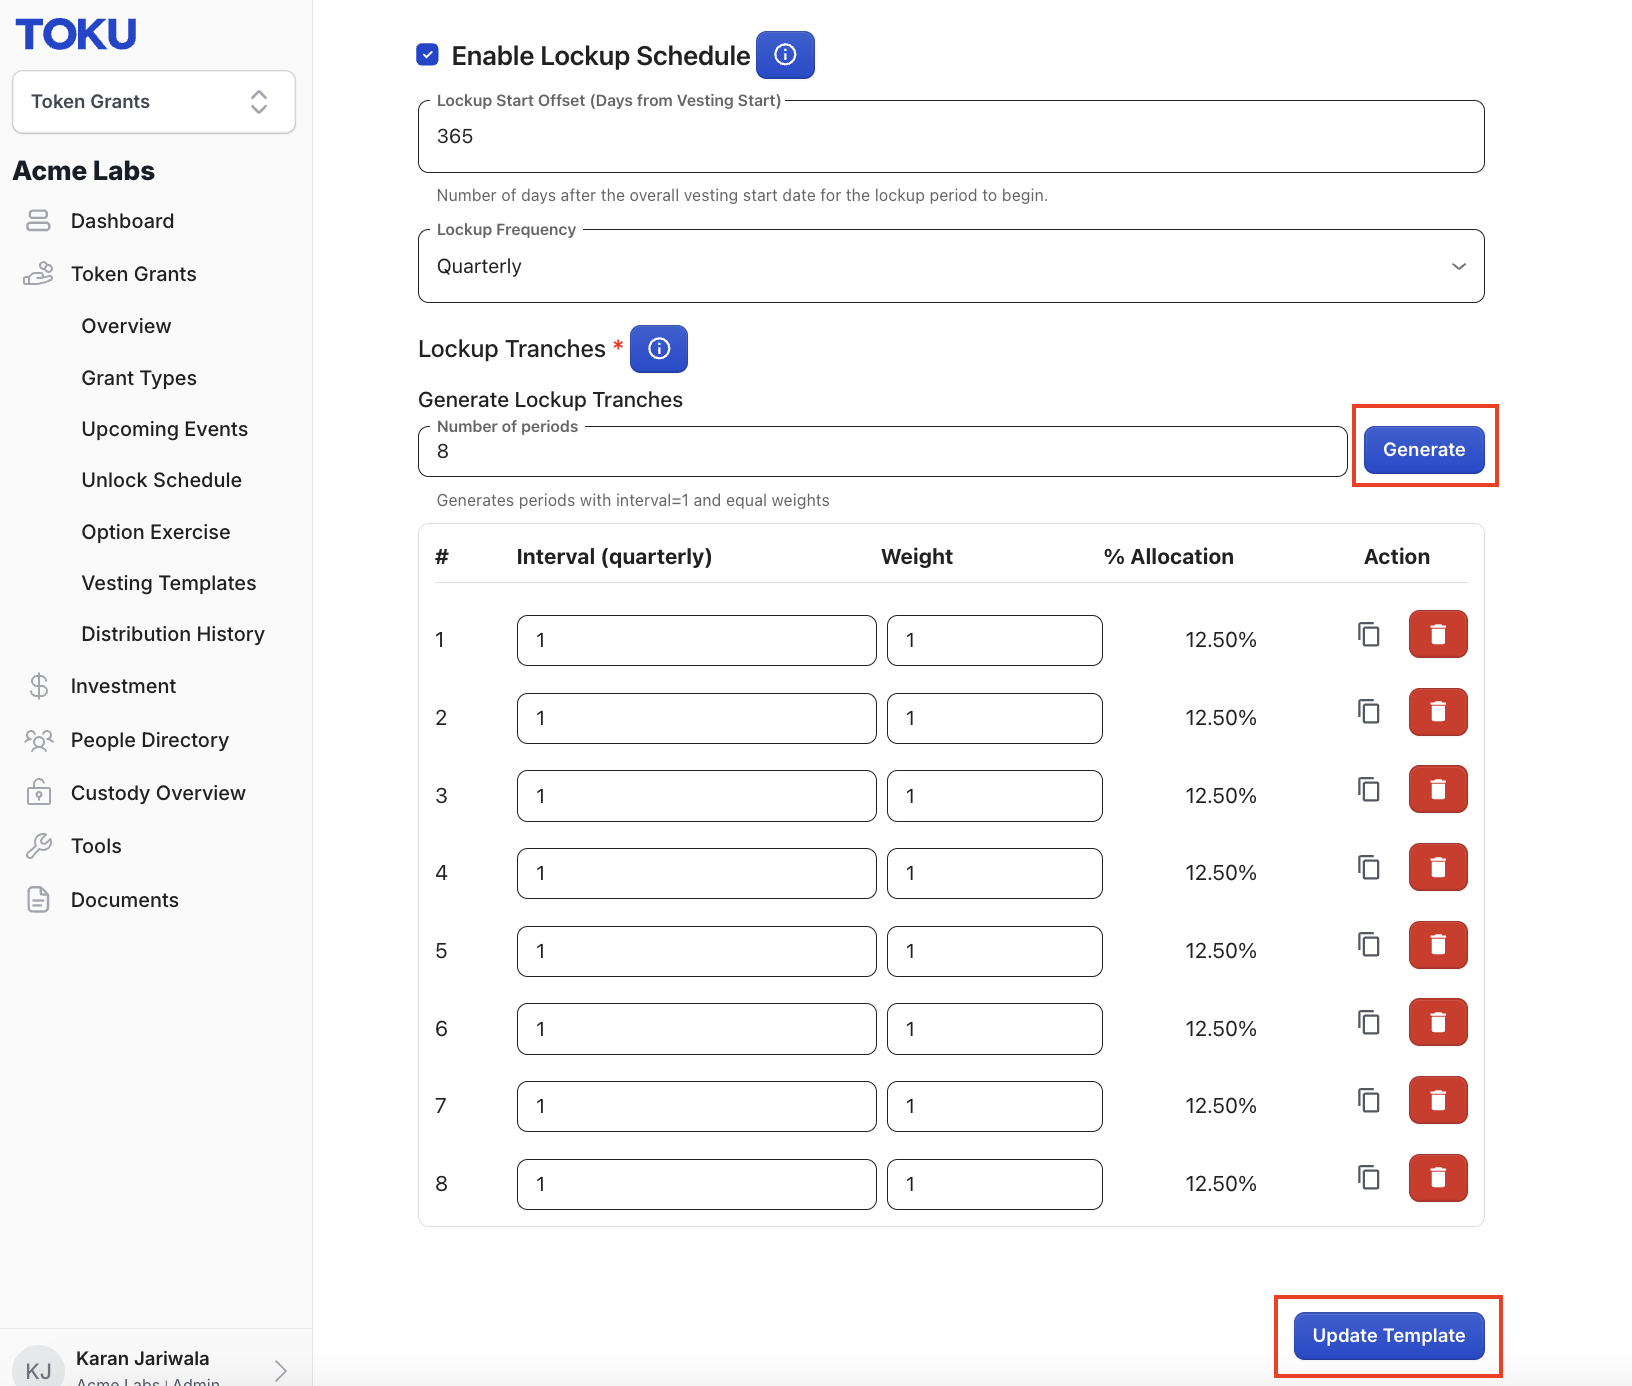
1. Enable lockup schedule
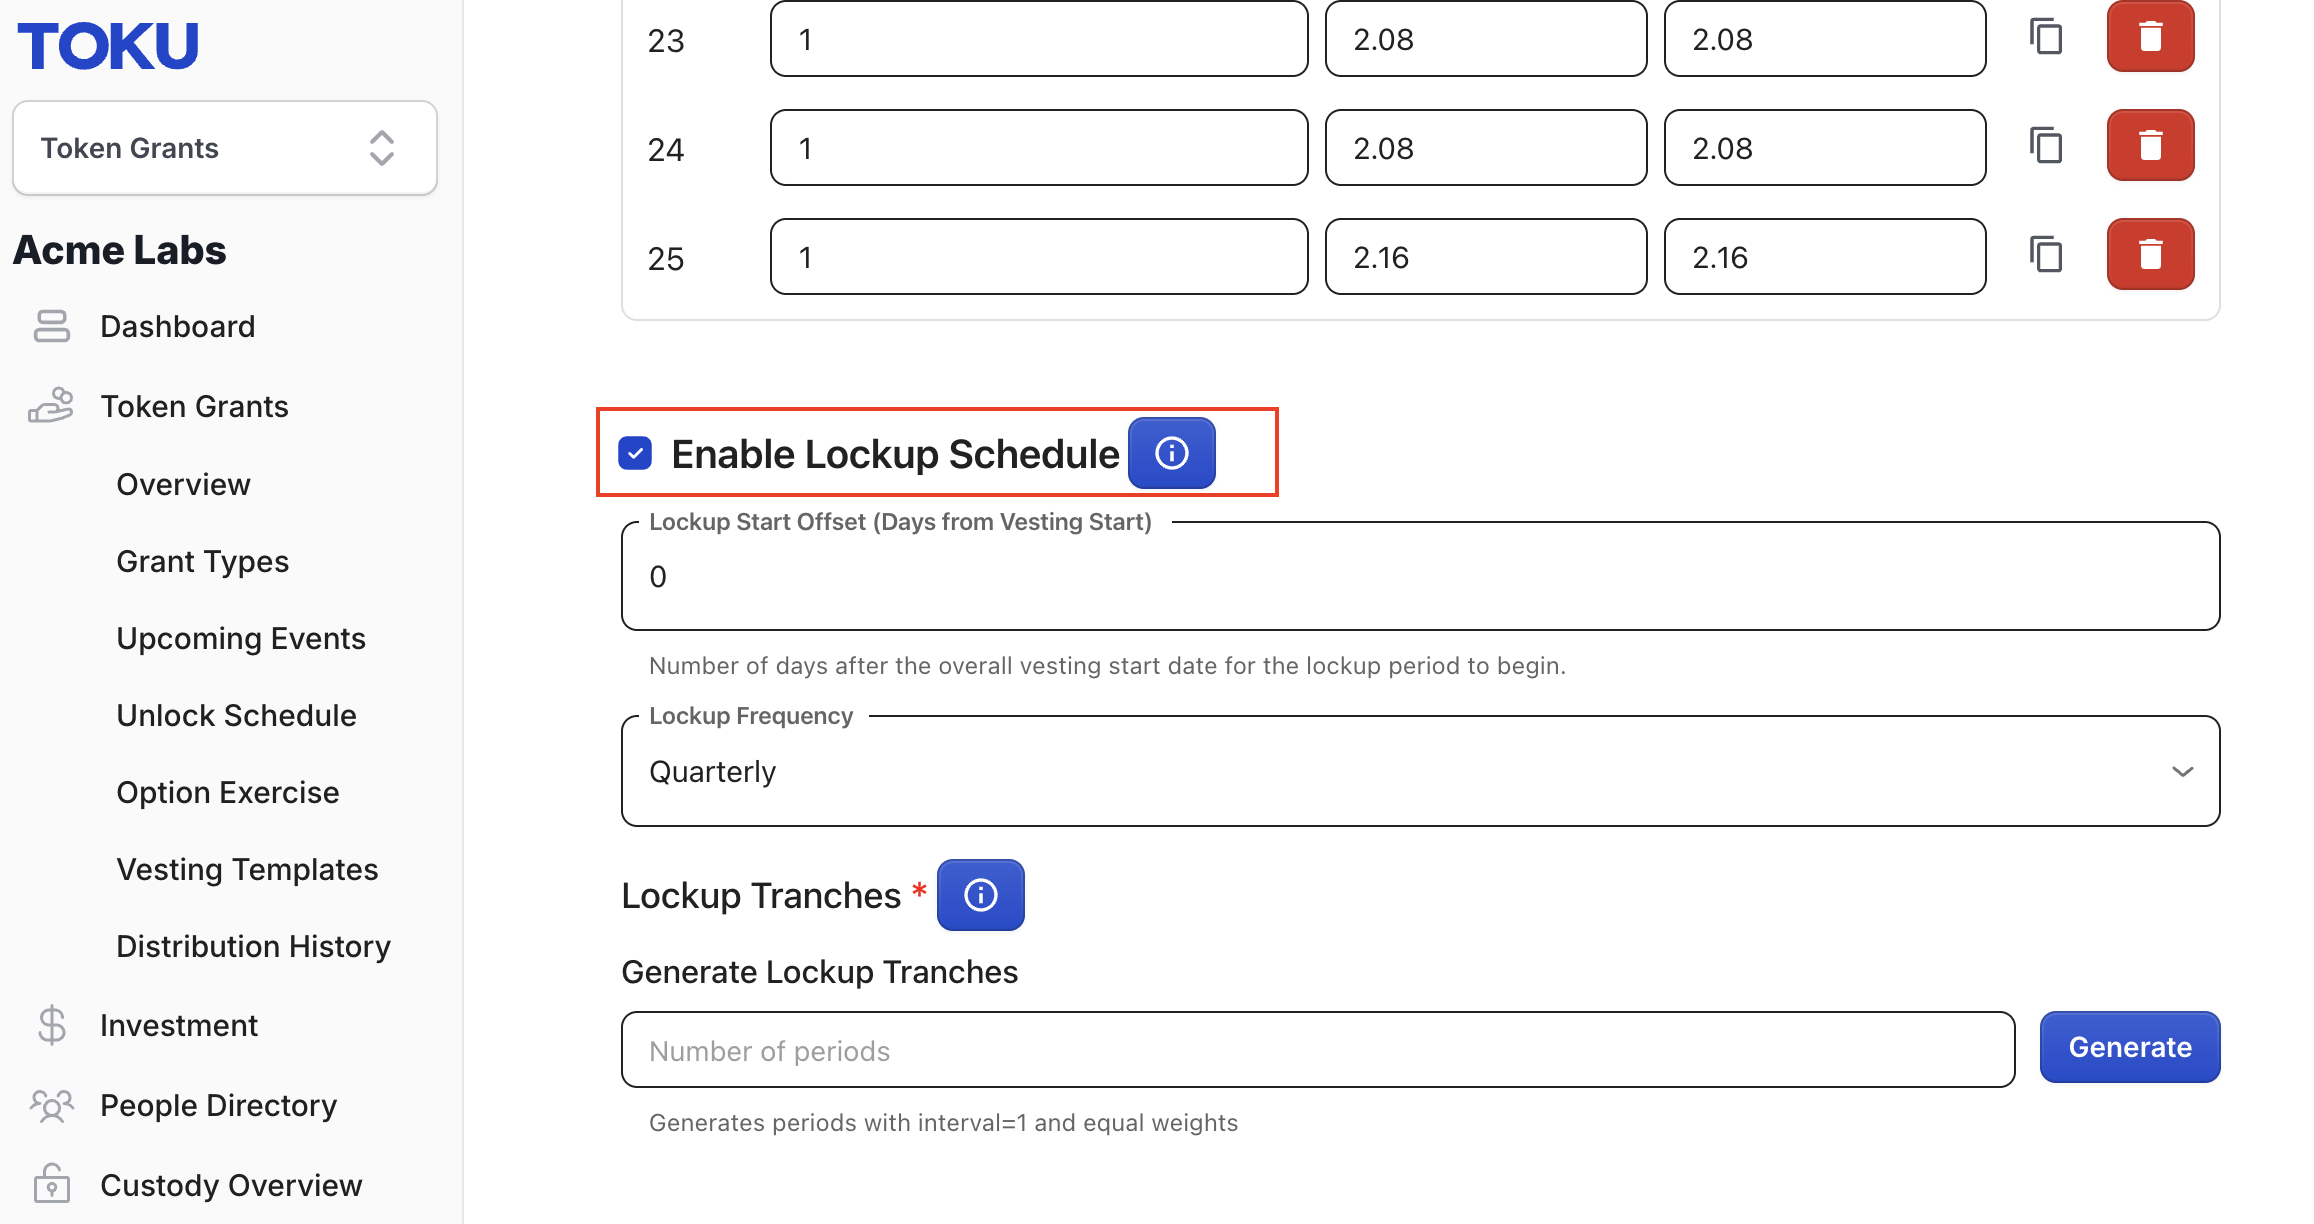
- To enable the Lockup Schedule, check the 'Enable Lockup Schedule' box at the bottom of the page.
2. Set lockup start offset
- Enter the number of days in the Lockup Start Offset field. This determines when the lockup period begins, calculated from the overall vesting start date.
💡 Example: Entering "0" means the lockup period starts on the same day as vesting. Entering "365" means the lockup period begins 365 days after the vesting start date.
3. Choose lockup frequency
- Choose the lockup frequency from the dropdown menu. This defines how often locked tokens are released during the lockup period. Options include:
- Daily
- Monthly
- Quarterly
- Semi-annually
- Yearly
- Custom (Exact Dates)
4. Generate lockup tranches
- Enter the number of periods in the Generate Lockup Tranches field. This represents the total number of times locked tokens will be released.
- Click the Generate button to create the lockup tranches automatically. The system will generate periods with equal weights (interval=1).
5. Edit lockup tranches (as needed)
- Once generated, you can modify the lockup schedule as needed:
- Adjust allocations using the Weight field for each tranche
- Duplicate tranches using the Copy icon
- Remove tranches using the Delete icon
6. Update the template
- Finally, review and verify your complete vesting schedule configuration, cliff allocations, and unlock configuration. Click Update Template button at the bottom of the page to save your Vesting Template.
Step 4: Upload Grants
With recipients added, grant types created, and vesting schedules configured, you're ready to assign grants.
Download the Grant Upload Template
- On the sidebar menu of the TGA Platform, navigate to Tools > Bulk Upload > Grants (V2)
- Click Download Template
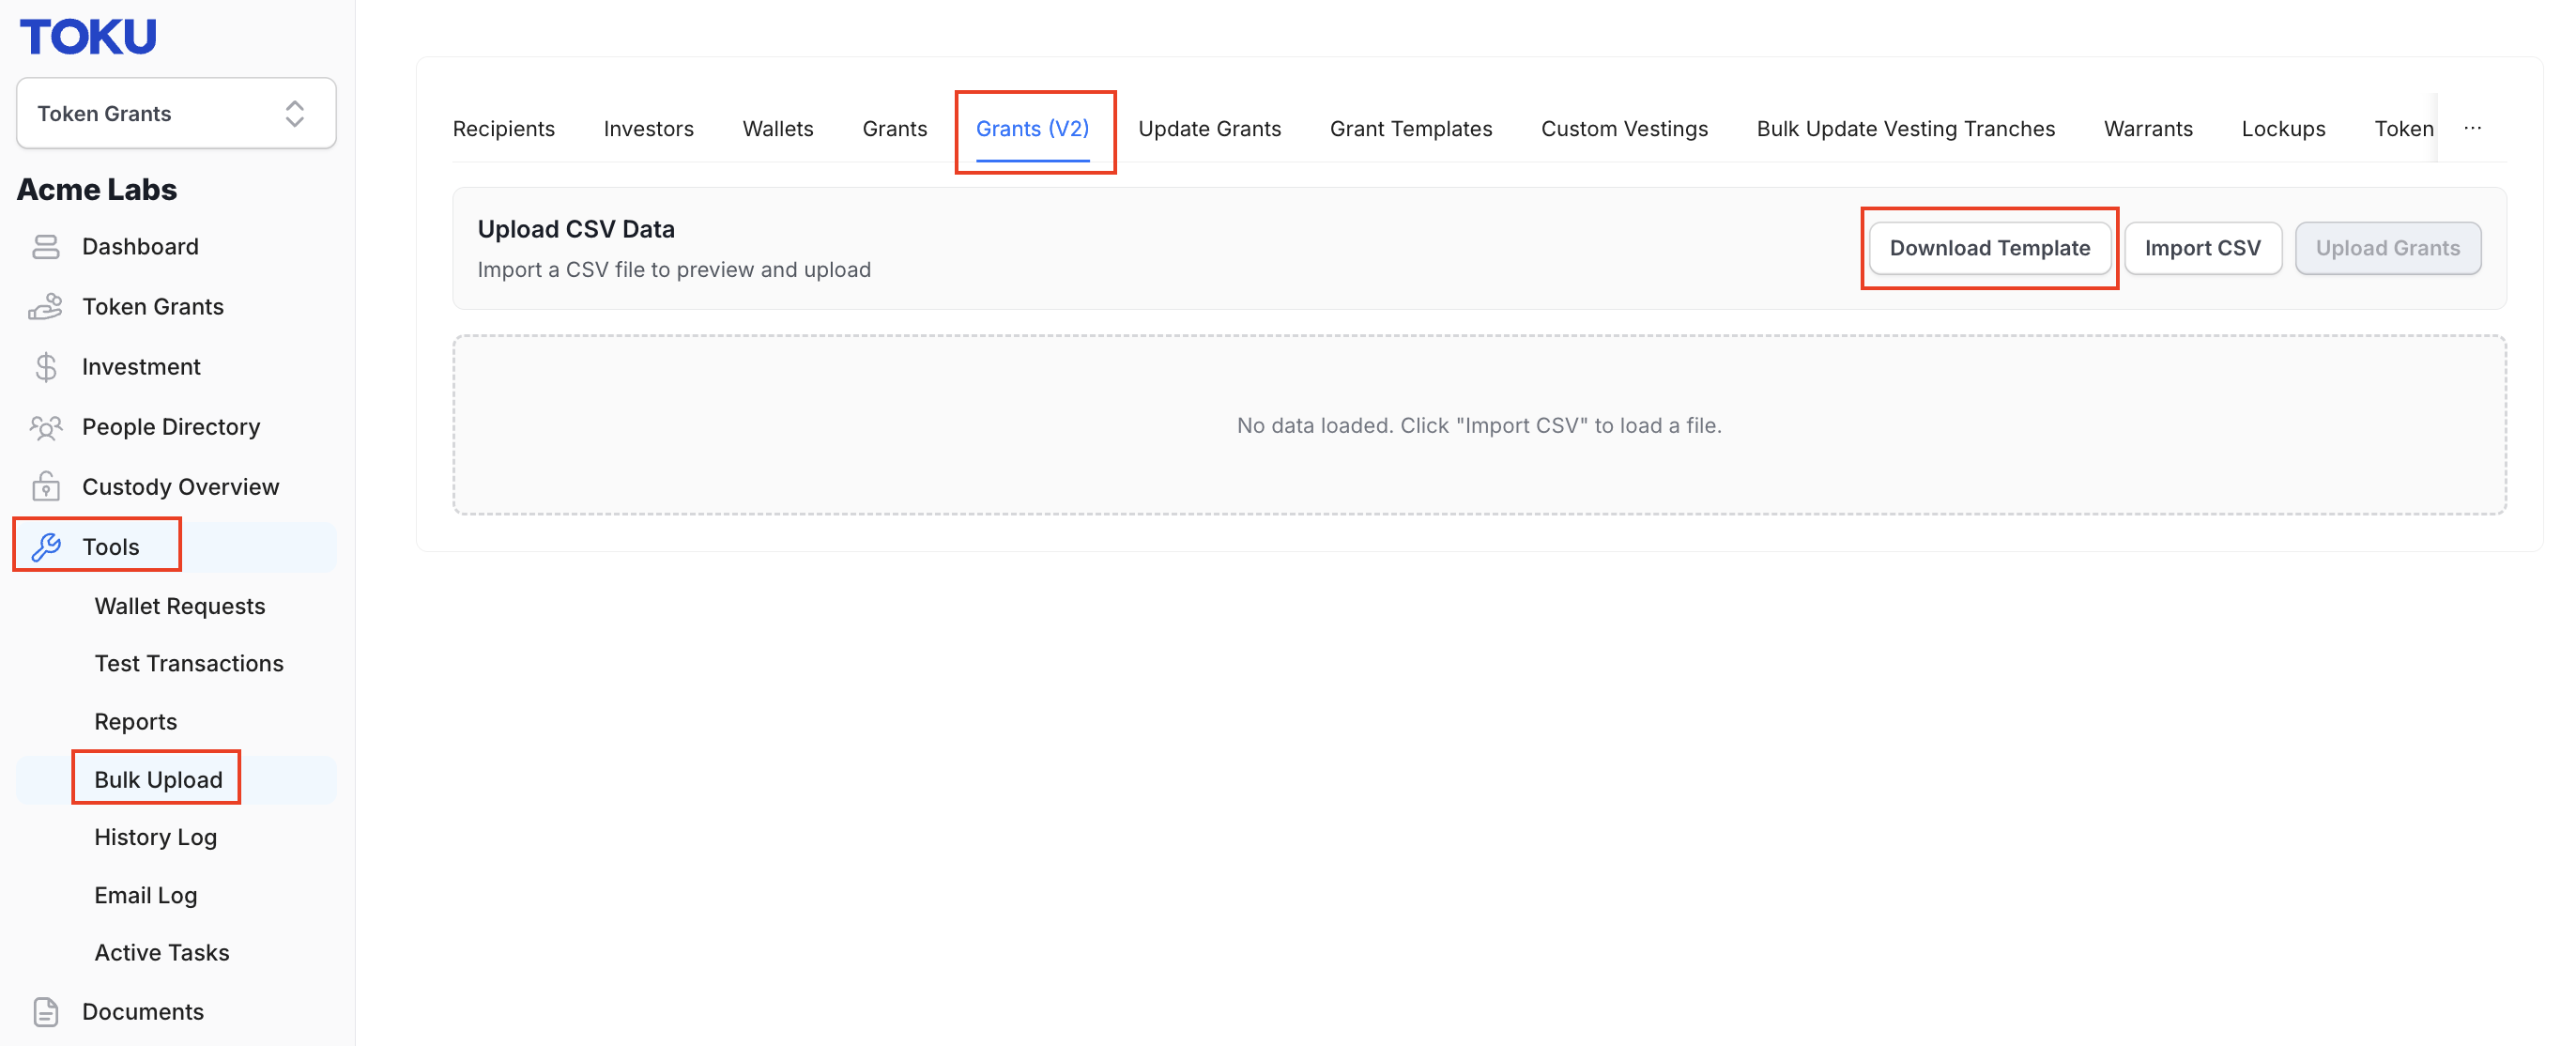
- Complete the downloaded template for each grant you wish to create. The template supports multiple grants in a single upload. Refer to the field descriptions below for guidance on completing each column.
💡 Understanding the Grant Upload Template
| Column | Description | Required / Optional | Example |
|---|---|---|---|
| Recipient personal email address. This must match the existing email address created in Step 1: Add Recipients. | Required | [email protected] | |
| Grant Name | Descriptive name for this grant | Required | "RTU-00001" |
| Grant Description | Additional context | Optional | "Employee grant 2025" |
| Grant Type | The classification of the grant being issued. This must exactly match a grant type previously created in Step 2: Create Grant Type | Required | "2024 Employee Token Grant" |
| Amount | Number of tokens or fiat value | Required | 100,000 |
| Vesting Start Date | When vesting begins | Required | 01-01-25 |
| (Format: DD-MM-YY) | |||
| Off Platform Date | Date tokens were granted off-platform | Optional | 01-01-25 |
| (Format: DD-MM-YY) | |||
| 83B Eligible | Indicates whether this grant is elected for IRS Section 83(b). |
Section 83(b) is a provision of the U.S. Internal Revenue Code that allows recipients of restricted stocks/grants to elect to pay income tax on the fair market value at the time of grant, rather than when the stock vests. This can result in significant tax savings if the stock appreciates in value. | Required | Yes / No | | Tax Reporting | Indicates whether income from this grant must be reported on the recipient's payslip for tax purposes. | Required | Yes / No | | Grant Date | The date when the grant is officially awarded to the recipient / the grant agreement date | Required | 01-01-25 (Format: DD-MM-YY) | | Grant Currency | The currency in which the grant is denominated at the time of issuance. This is usually specified in the grant agreement. | Required | USD, EUR, GBP, etc. | | Price At Grant (Per Unit) | The fair market value (FMV) of one token/share at the time the grant/option is issued. | Optional | 1.25 | | Display Currency | The currency used for displaying grant values and calculations in the TGA platform interface. This should match the currency of the recipient's country of tax residence to ensure accurate tax reporting. | Required | USD, EUR, GBP, etc. | | Grant Template Name | The name of the vesting template to apply to this grant. This must exactly match an existing vesting template previously created in Step 3: Create Vesting Template. | Required | "Regular RTU - 36 Month Vesting, 12 Months Cliff at 50%” |
⚠️ Critical Compliance Requirement: The 83B Tax Reporting field directly impacts tax reporting obligations. Always verify this setting before uploading. Incorrect settings may result in missed reporting requirements and compliance issues.
- Save your completed template in CSV format.
- Return to Tools > Bulk Upload > Grants (V2)
- Click the Import CSV button on the top-right corner of the screen, then select your completed Grant Upload Template file from your computer and click Enter. The system will display a preview of all grants to be uploaded. Review each grant carefully to verify the accuracy of all information
- Once you have verified all information is correct, click the Upload Grants button on the top-right corner of the screen.
- A success notification will appear in the top-right corner of the screen confirming that your grants have been uploaded successfully.
⏱️ Note: Large batch uploads may take 1-2 minutes to process. Please wait for the confirmation notification before navigating away from the page.
- To review and confirm your newly created grants, navigate to Token Grants > Overview. Enter the grant name in the search bar, then click on the grant name in the search results to view full details. Verify that all grant information matches your upload template.
💡 Tip: For bulk uploads, verify a few sample grants to ensure the template was processed correctly
⚠️ Important: As the platform is self-service, you remain responsible for:
- Accurate tax classifications: Verify 83B election and tax reporting requirements
- Correct grant data: Ensure amounts, dates, and recipients are accurate
- Data review: Review all grants before finalization
Best Practice
1. Set Up Once, Use Many Times
The new system is designed for efficiency:
- Create grant types for each category of grant you'll issue
- Build vesting schedule templates for standard terms
- Reuse these templates across multiple grant uploads 2. Maintain Consistent Naming
Use clear, descriptive names to ensure accuracy and maintain organization across your grant management system. This includes:
- Grant types and vesting templates: Create standardized naming conventions for templates to make it easier to select the correct templates during bulk upload.
💡 Why This Matters: During bulk uploads, you must enter template names exactly. Clear, descriptive names reduce errors and make it easier to select the correct template for each grant.
- Grant name: Use a systematic naming structure for individual grants to maintain organization and enable easy tracking and searching.