
 11 MIN READ
 UPDATED APR 7, 2026
This is a complete guide for setting up your Stablecoin Payroll in Workday.
Toku Integration Setup
These steps are required to establish the initial connection to Toku
Create Employee Integrated System User and Integrated System Security Group
Create your Integrated System User and Integrated System Security Group
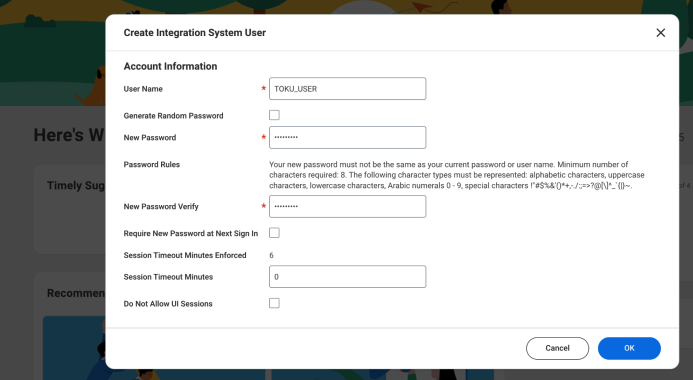
- Create an integrated system user by searching for “Create Integrated System User” task in the search box

- Set an appropriate username and password to create the account (To be shared with us)
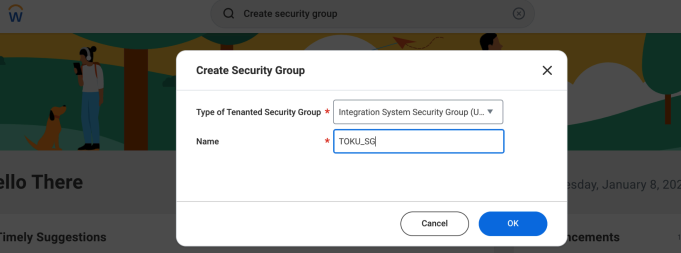
- Create a security group of type “Integration System Security Group (Unconstrained)” by searching for “Create security group” task
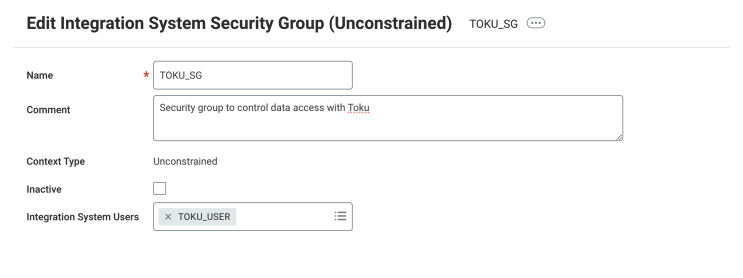
- On the next page about security group details, add “TOKU_USER” in the Integrated System Users field
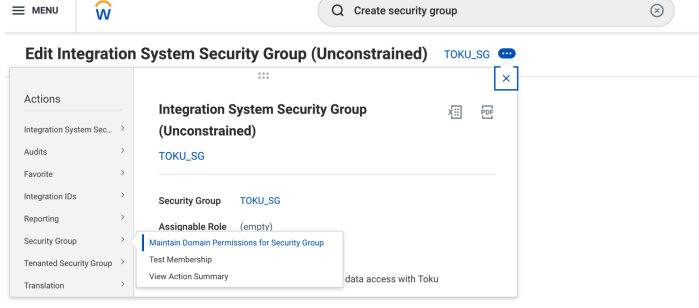
- After creating the group, click on “Maintain Domain Permissions for Security Group”
- On the “Maintain Domain Permissions” page, add the following permissions along with any other permissions needed for the custom report generation in the following steps
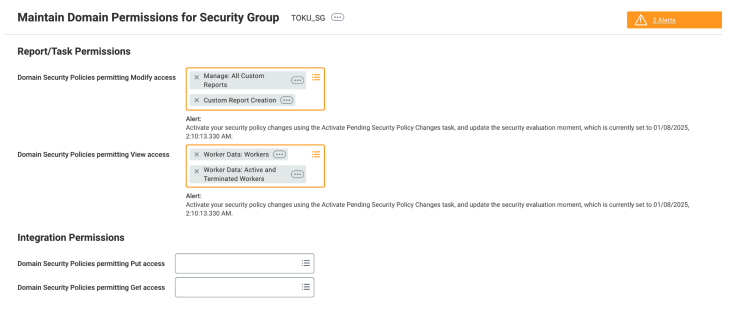
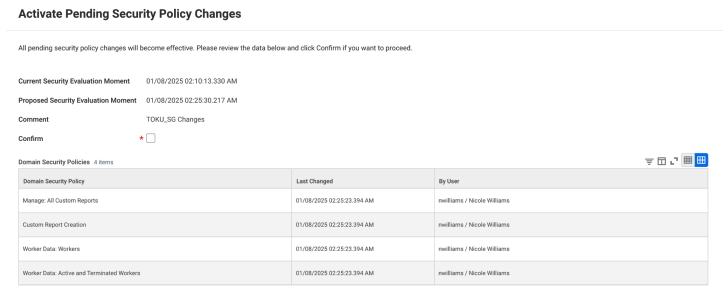
- Final step - After creating and setting up the security group, search for “Activate Pending Security Policy Changes” task and confirm the changes.
Create Employee RAAS Report
Creating Custom Reports with RAAS enabled
Follow the steps below to create RAAS reports within Workday. This will enable you to push the required information needed to onboard employees onto the platform.
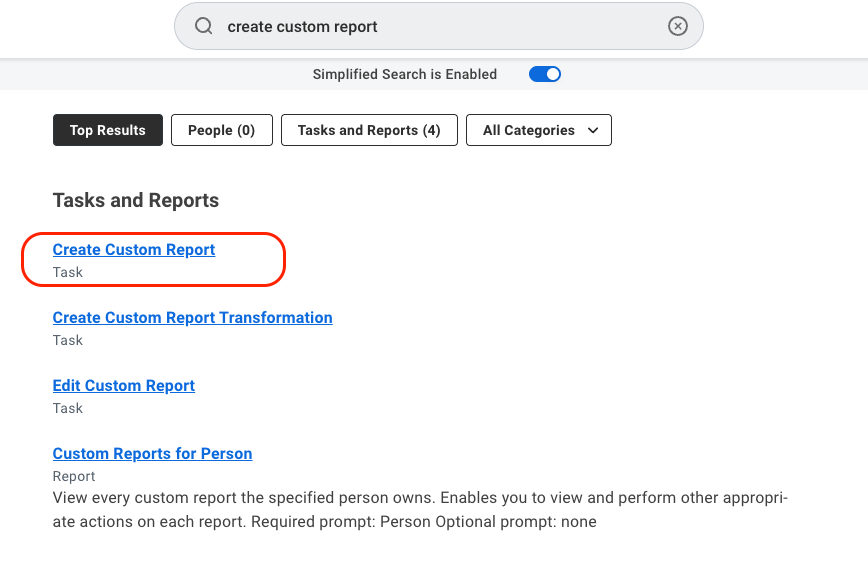
- Search for the “Create Custom Report” task and fill in the details as below. Ensure that the report type is “Advanced” and the “Enable as Web Service” is checked. Select the appropriate data source
- Provide report name as: “TOKU_EMPLOYEE_DEMOGRAPHICS”
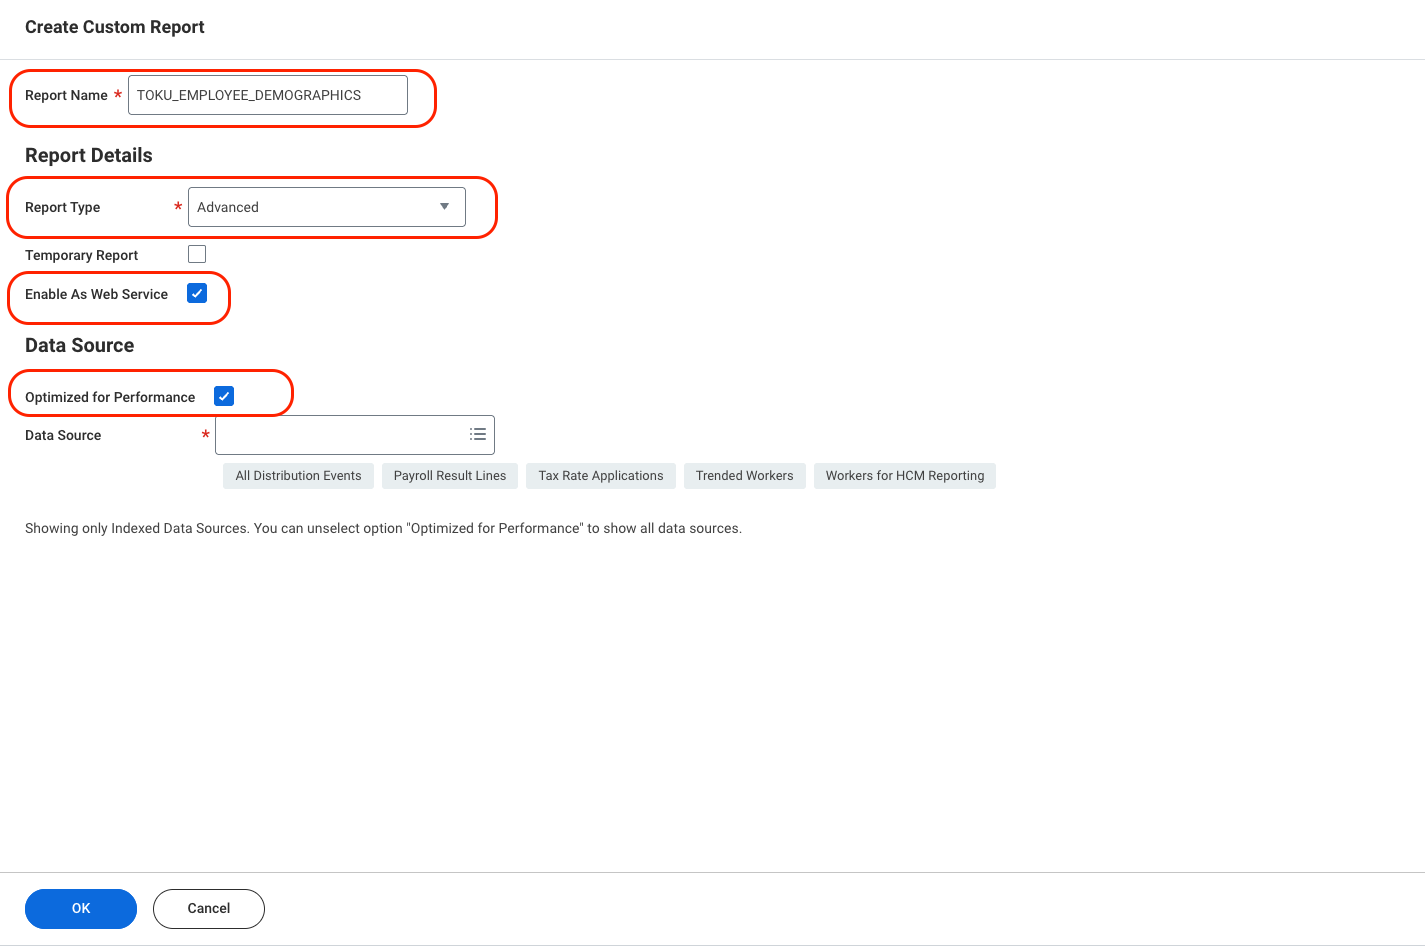
- Finally, choose the Data source as “All Active and Terminated Workers” and click on “OK”

- You will be greeted with a screen (shared below) and now you can setup the fields in the custom report from the fields table
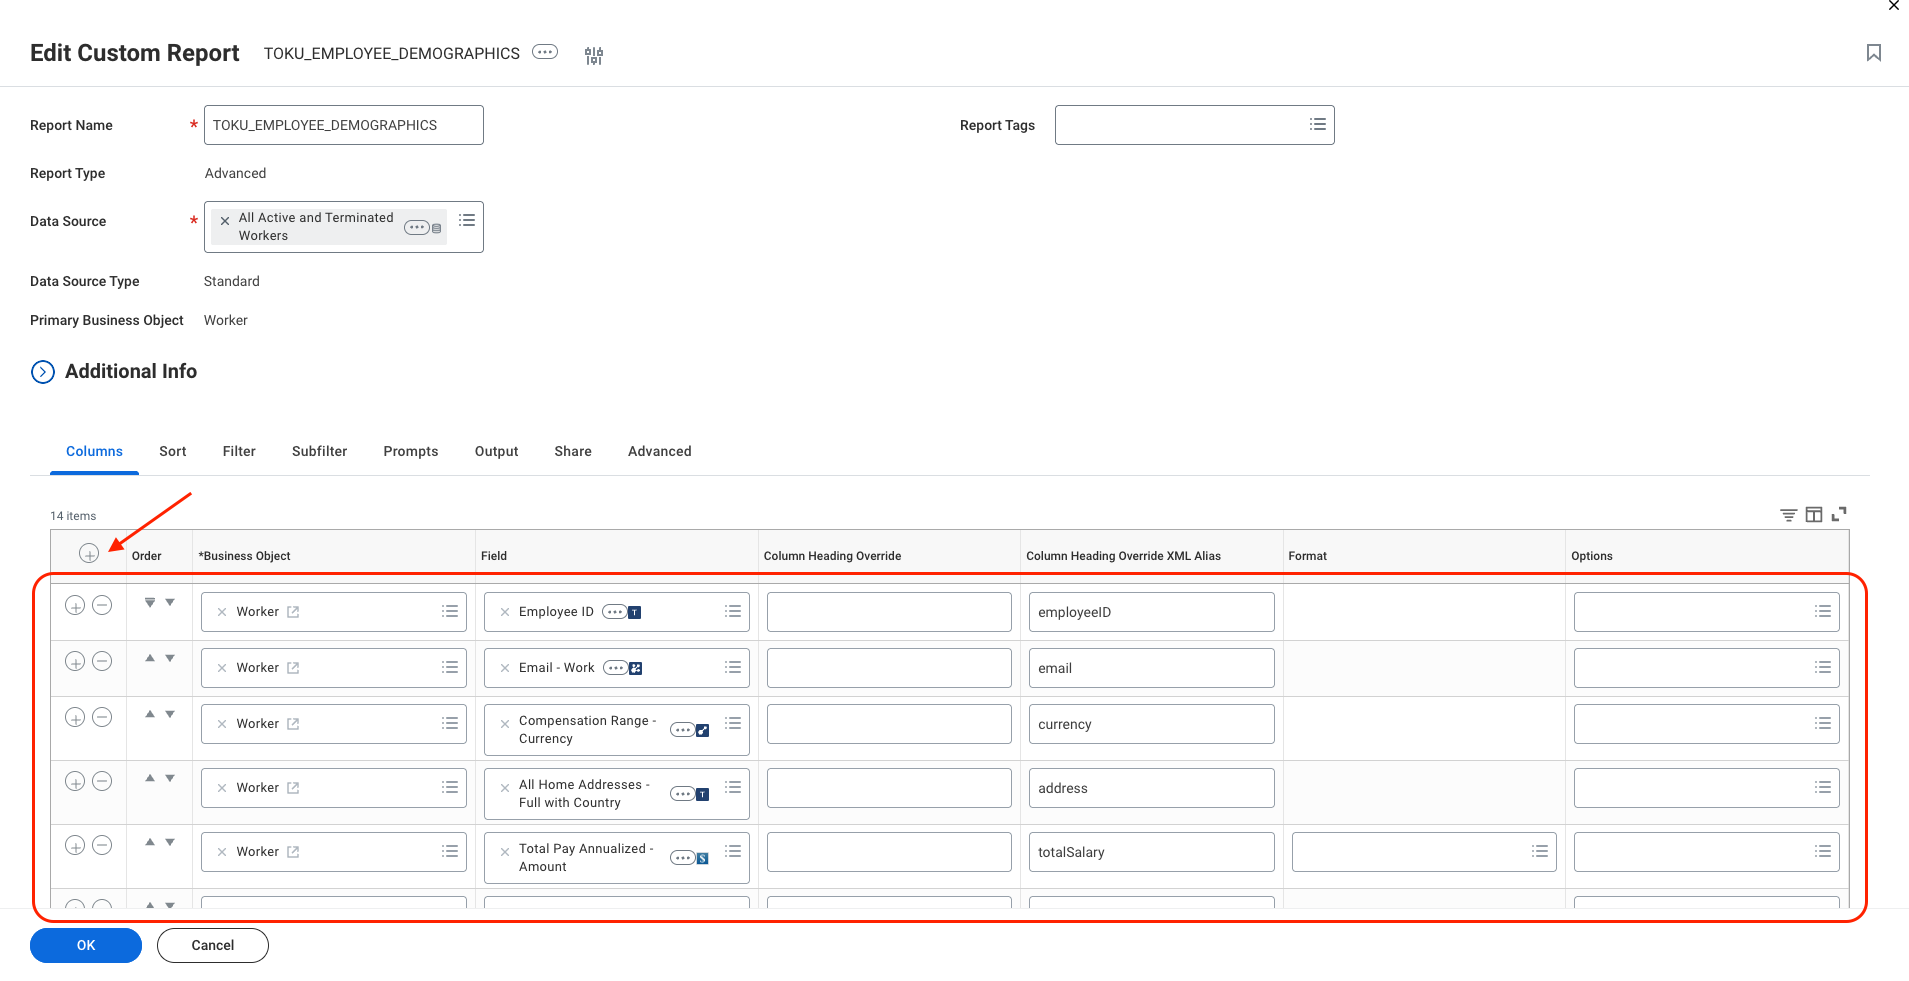
- Complete fields list 1. Field list needed
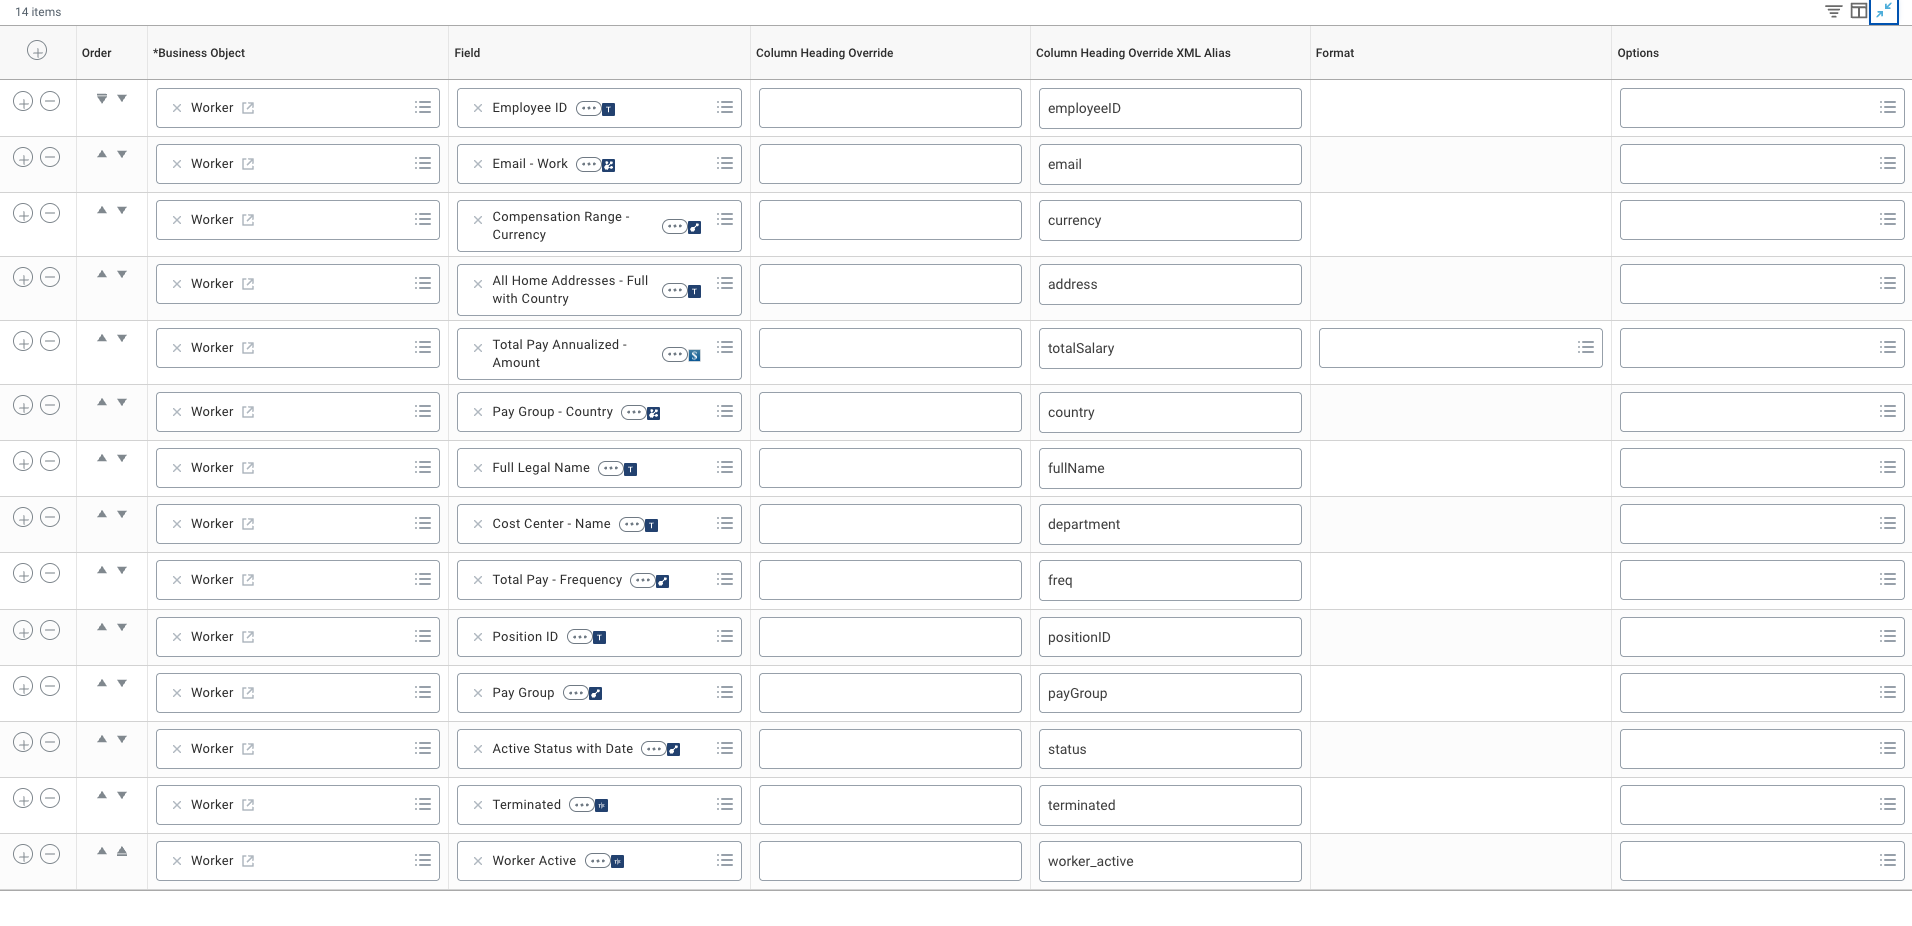
1. Table of fields needed. Required fields are marked with a *.
| Field | Column Heading Override (XML Alias) |
|---|---|
| Employee ID* | employeeID |
| Email - Work* | |
| Compensation Range - Currency* | currency |
| All Home Addresses - Full with Country* | address |
| Total Pay Annualized - Amount* | totalSalary |
| Pay Group - Country* | country |
| Full Legal Name* | fullName |
| Cost Center - Name | department |
| Position ID* | positionID |
| Active Status with Date* | status |
| Terminated* | terminated |
| Worker Active* | worker_active |
| Total Pay - Frequency* | freq |
| Pay Group | payGroup |
- Click on “OK”, once all the fields are added
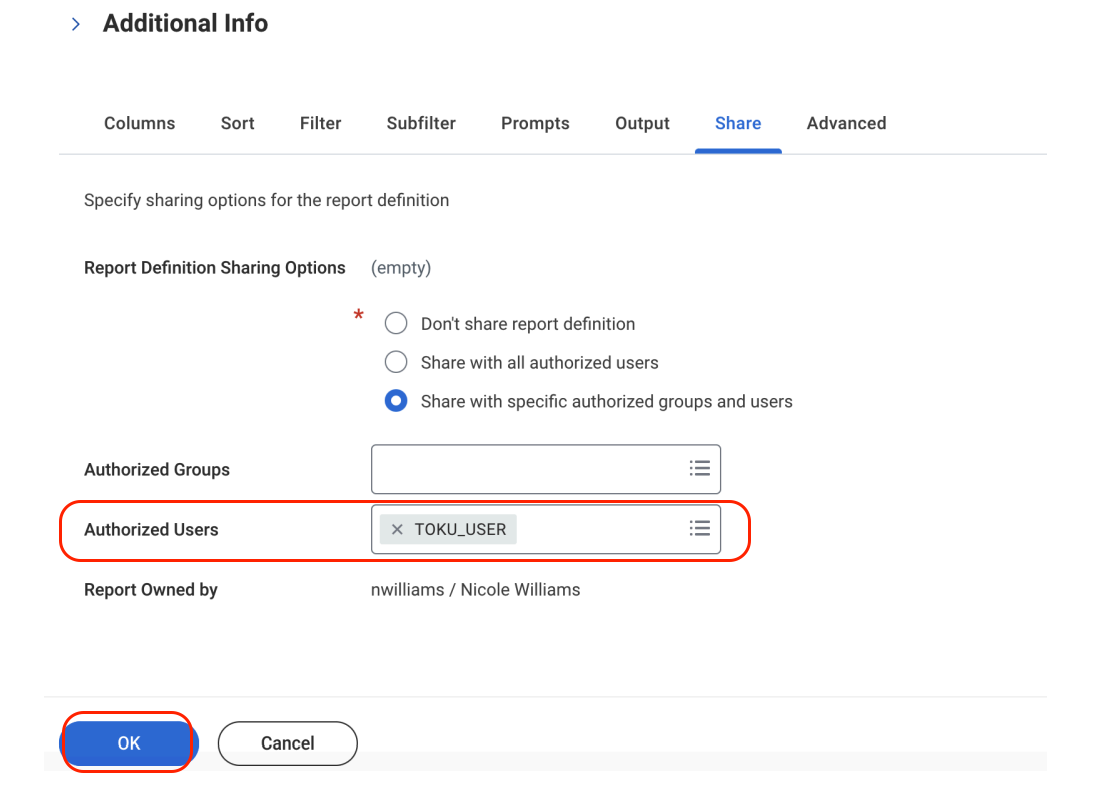
- Add your integrated system user to the Authorized Users of the Share section (For eg. if your integrated system user is TOKU_USER)
- Your custom report is ready!
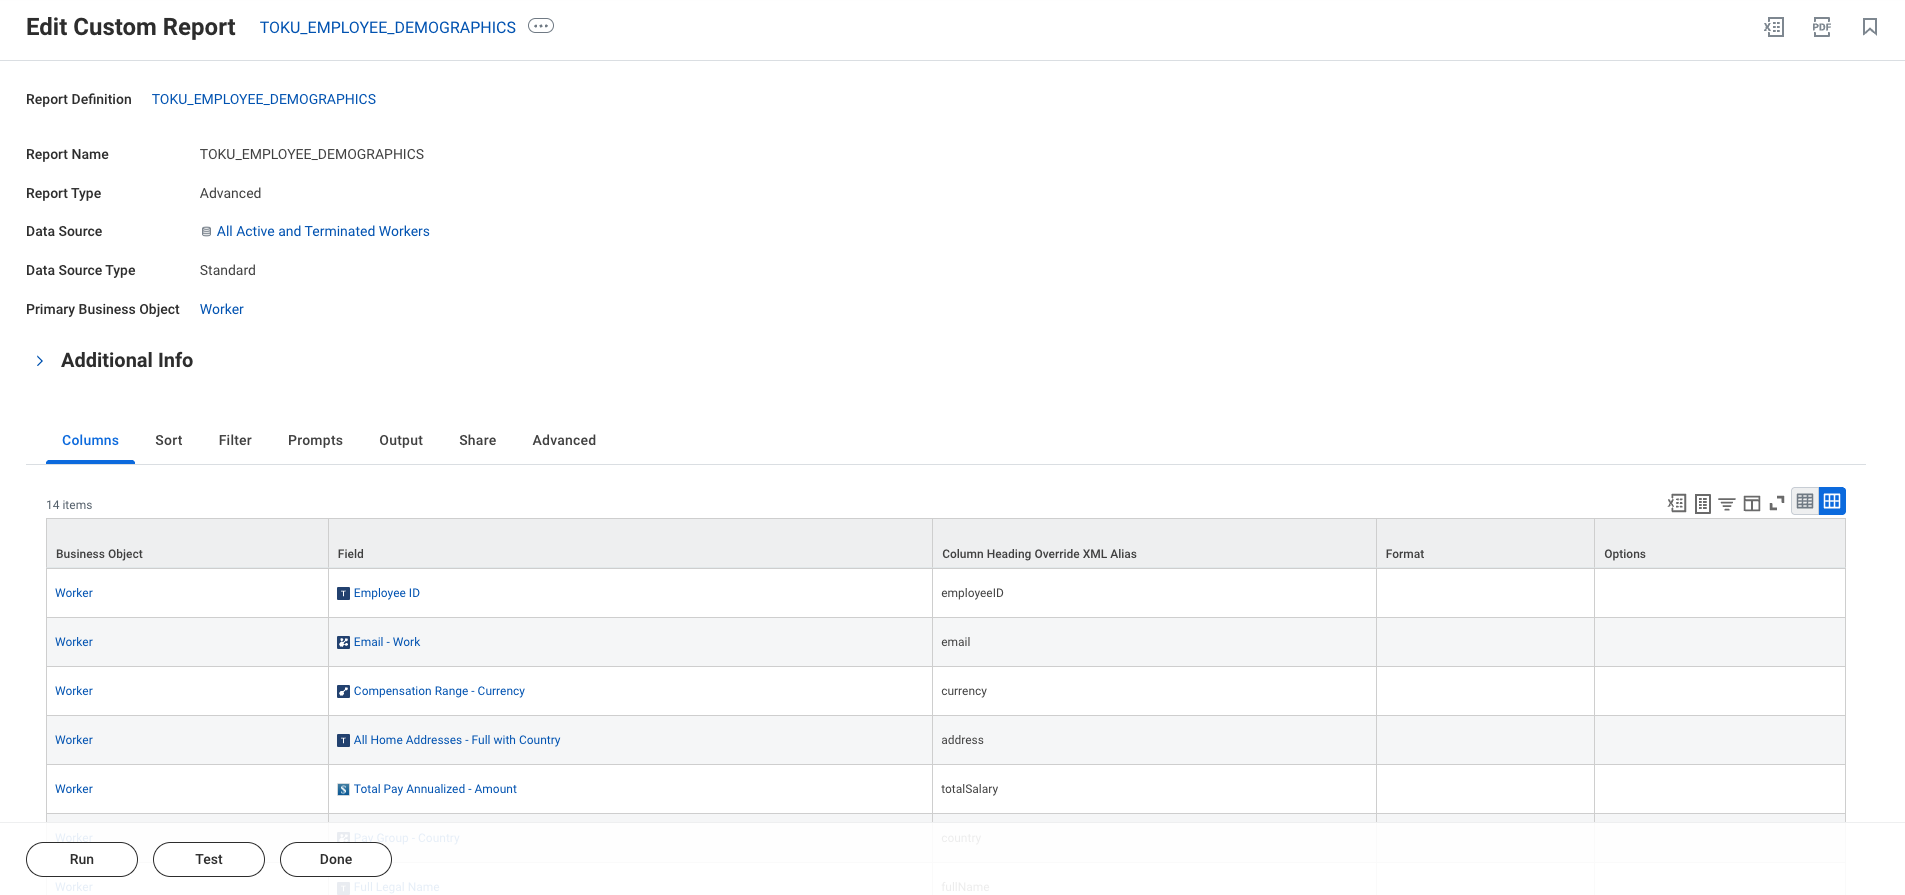
Add Workday credentials to Toku
- Login to Toku
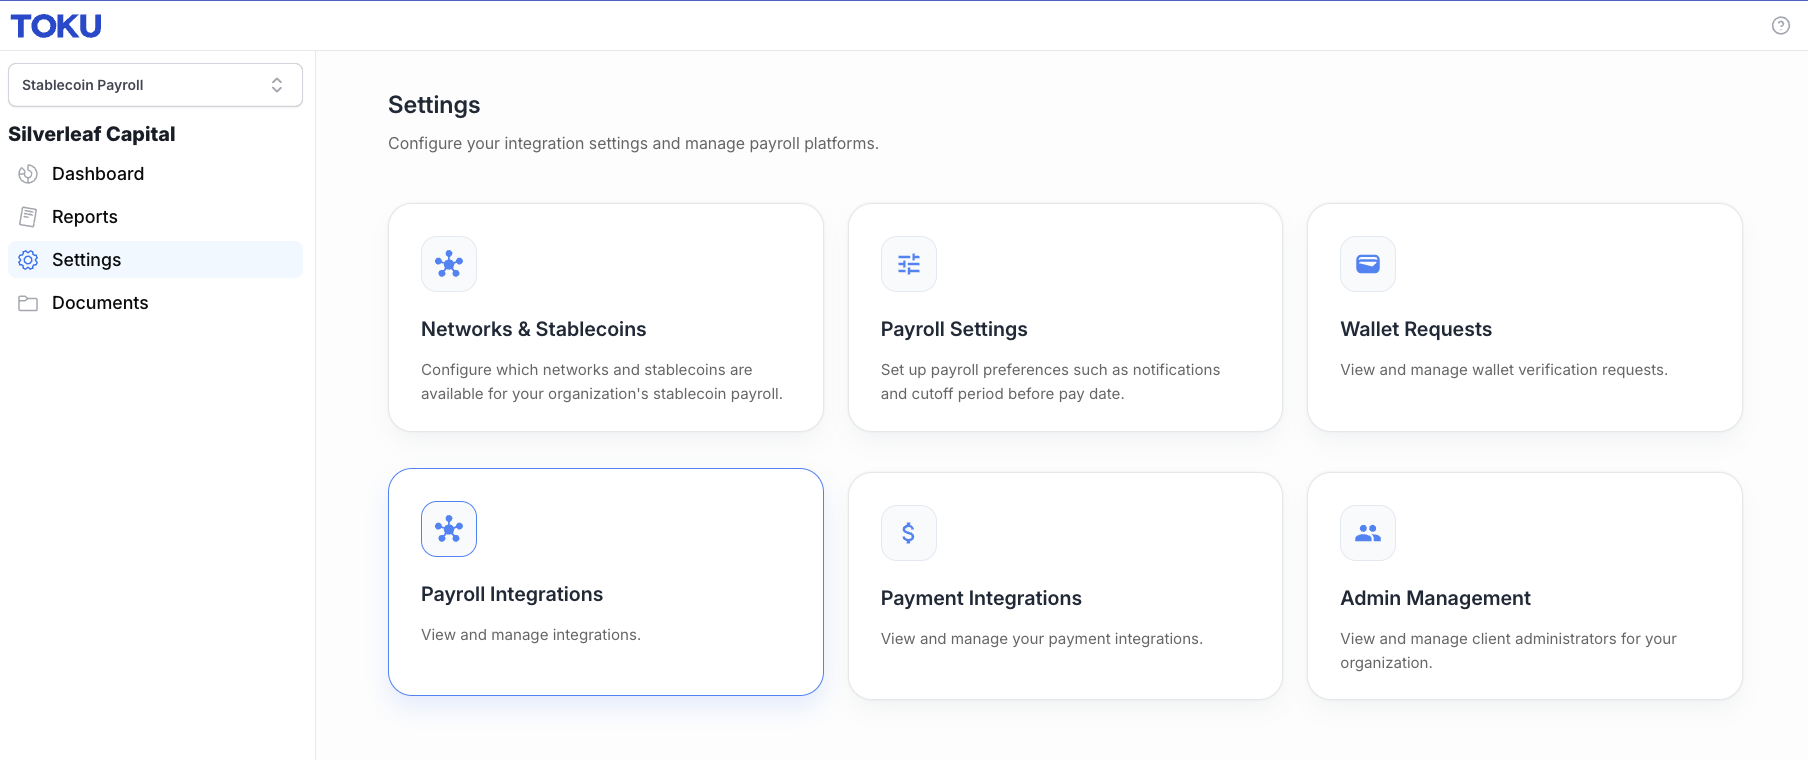
- Navigate to Settings → Payroll Integrations
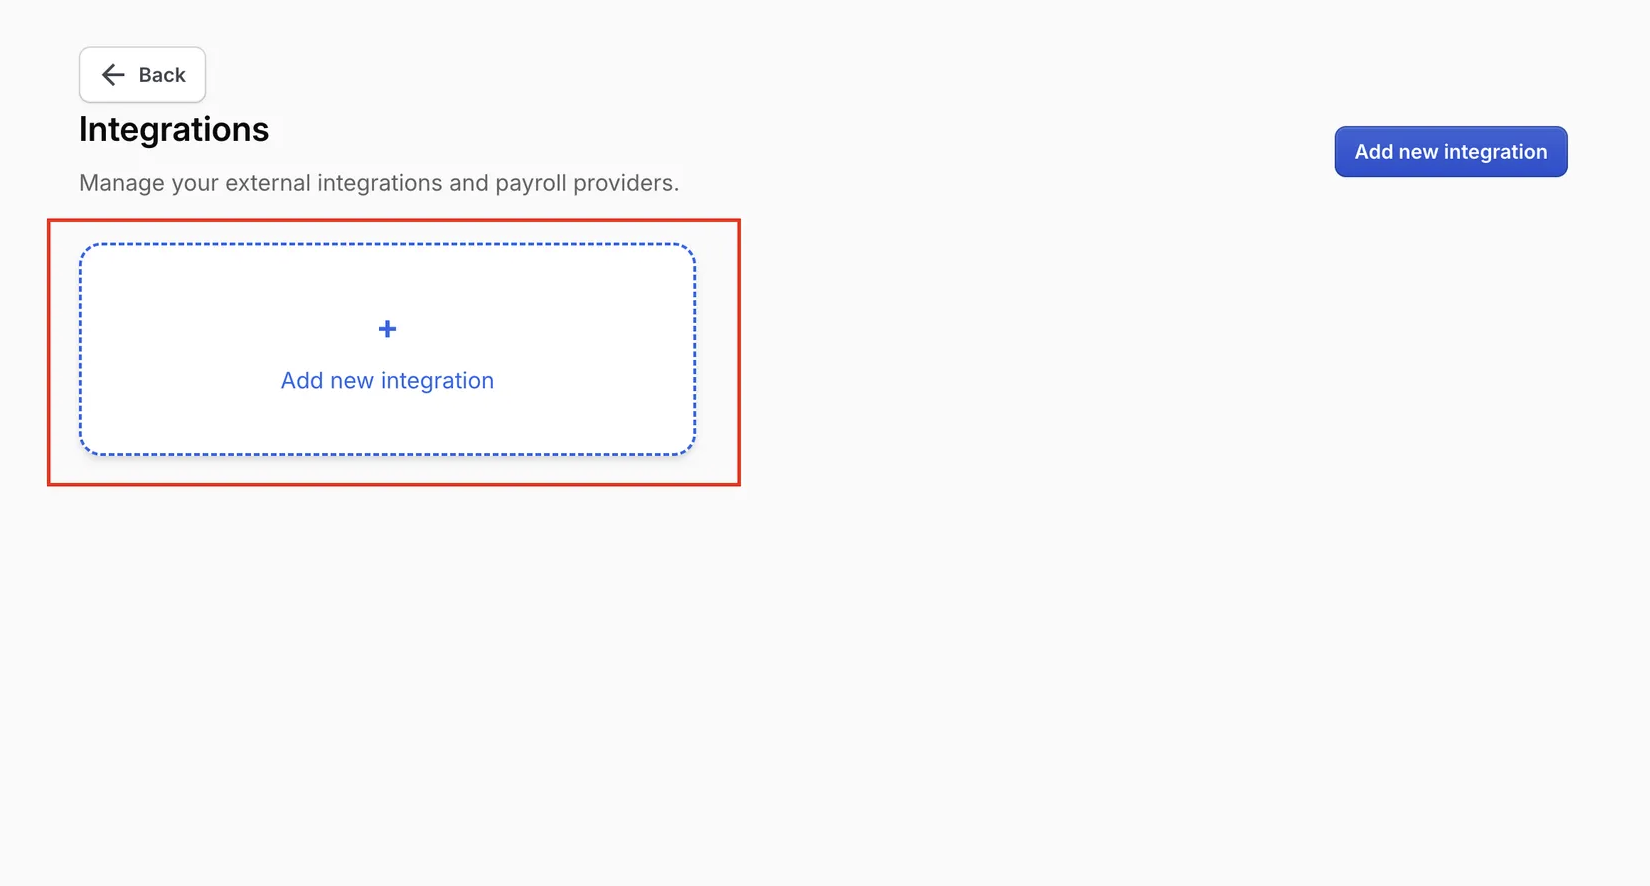
- Select Add new Integration
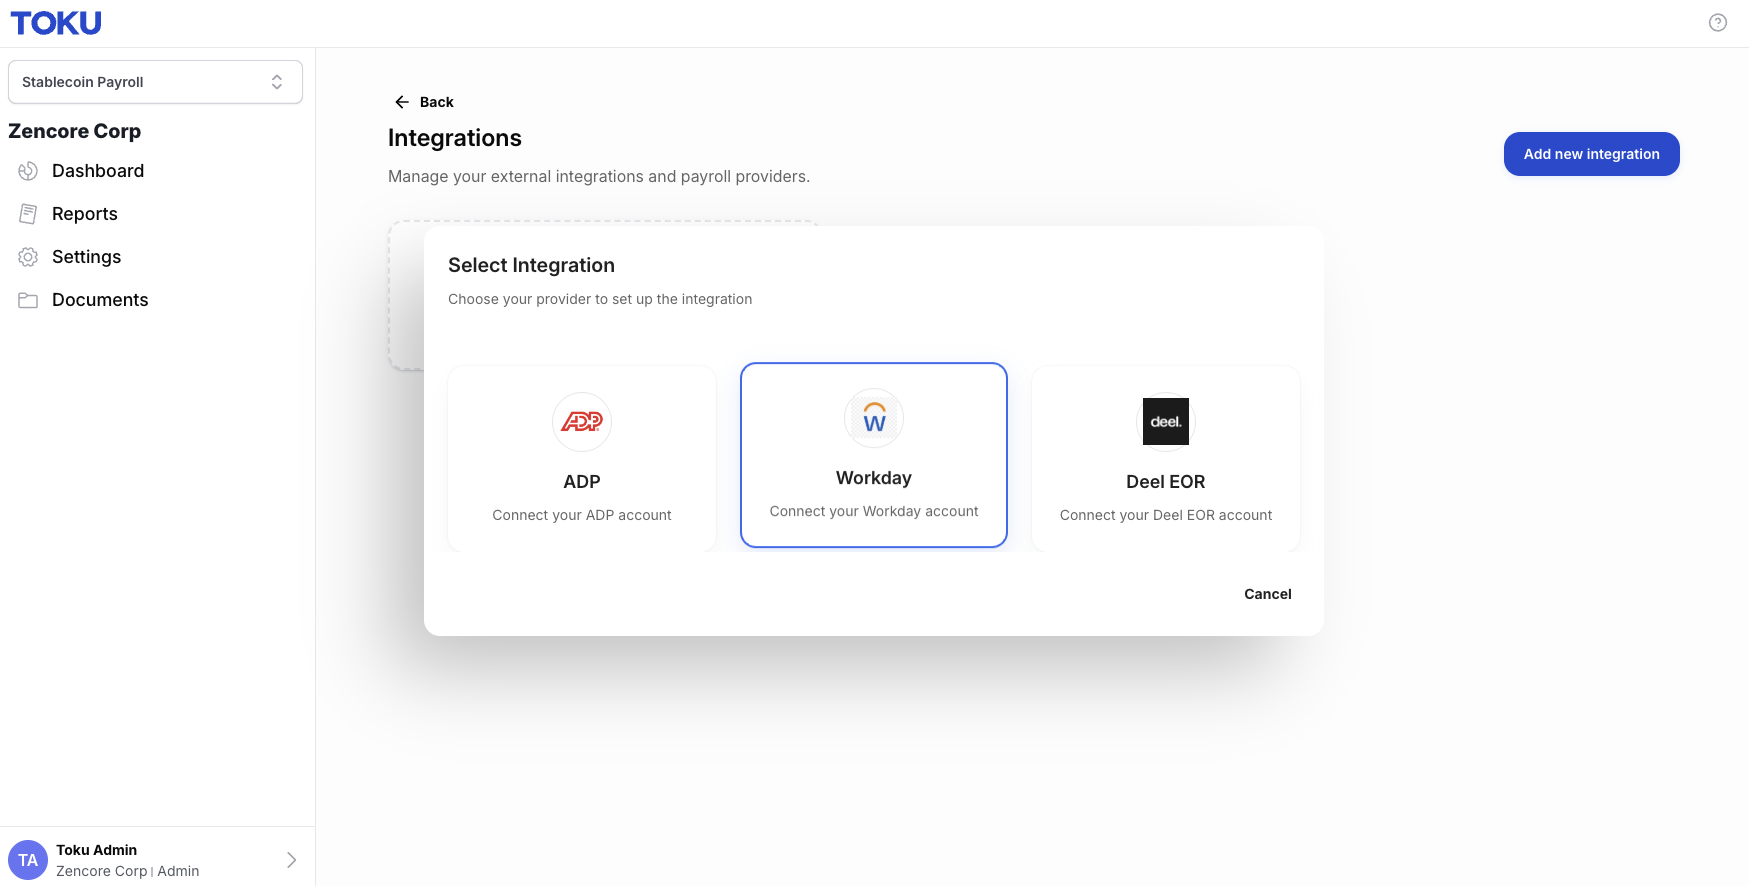
- Select Workday
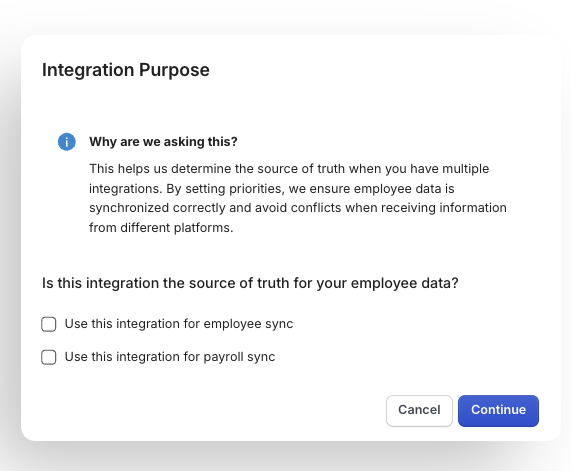
- It opens the Integration purpose pop-up which asks you whether this integration should be the source of truth for your employees sync.
- If you are syncing employees check the first box
- If you are syncing employees and payrolls check both boxes
- Input the following information
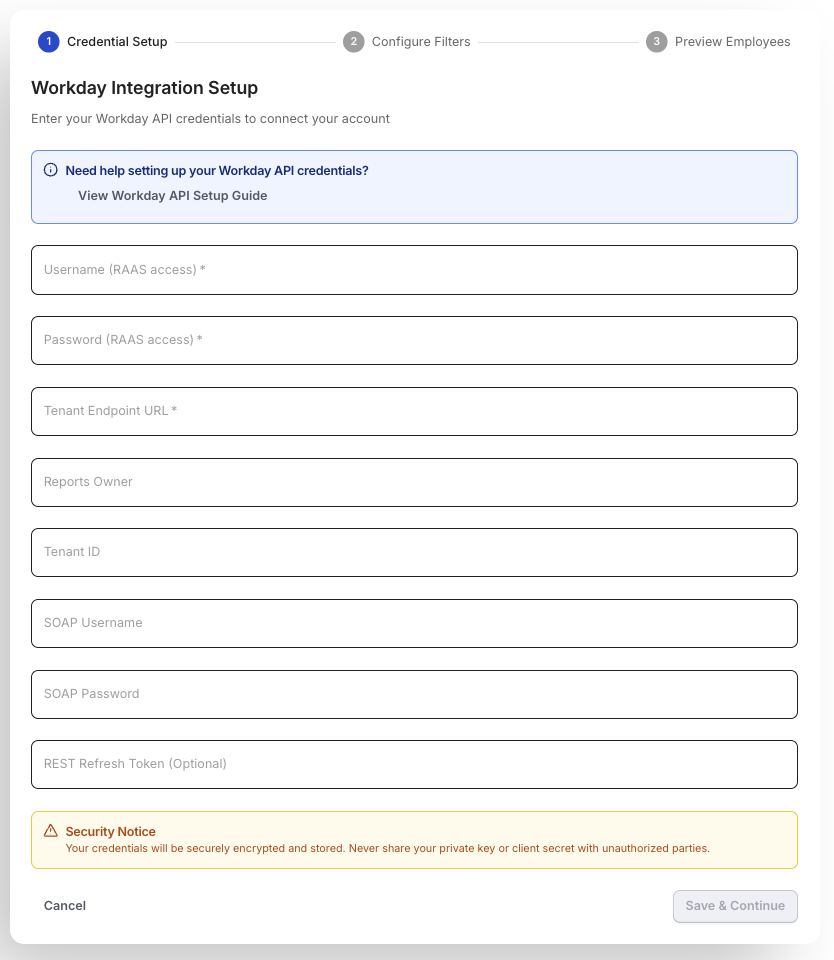
- Username (Required)
- Password (Required)
- Tenant endpoint URL (Required)
- RAAS Report owner (Required)
- Tenant ID (Required)
- SOAP Username (Payroll Sync Only)
- SOAP Password (Payroll Sync Only)
- REST Refresh Token (Payroll Sync Only)
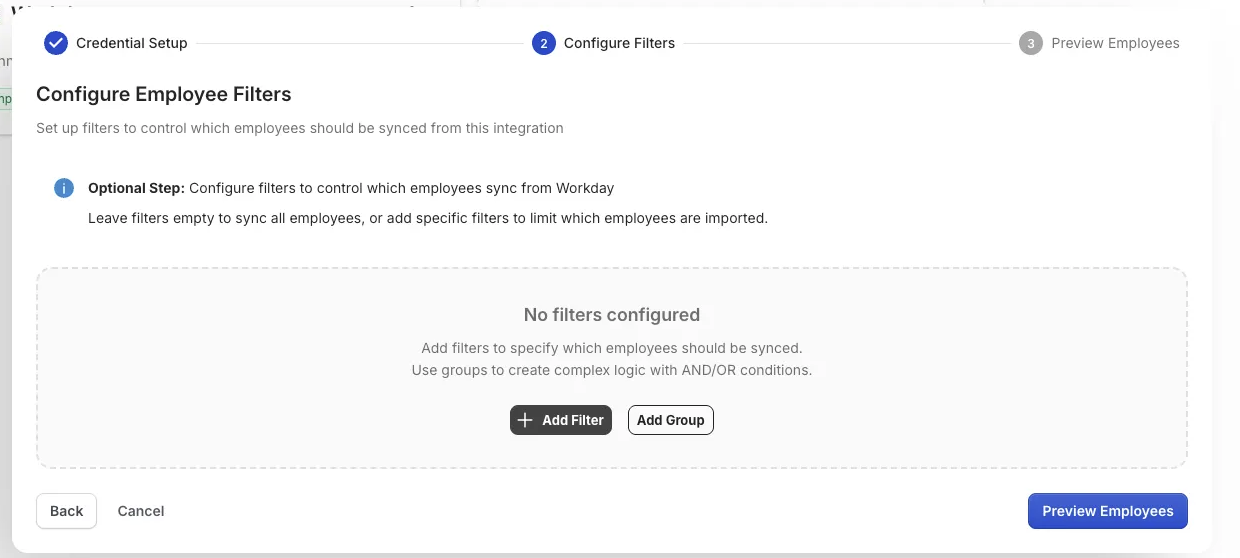
- Configure filters if required. Otherwise, simply click on preview employees.
- You will see a preview of the employee synced from Workday. This means that the connection to your Workday tenant is successful.
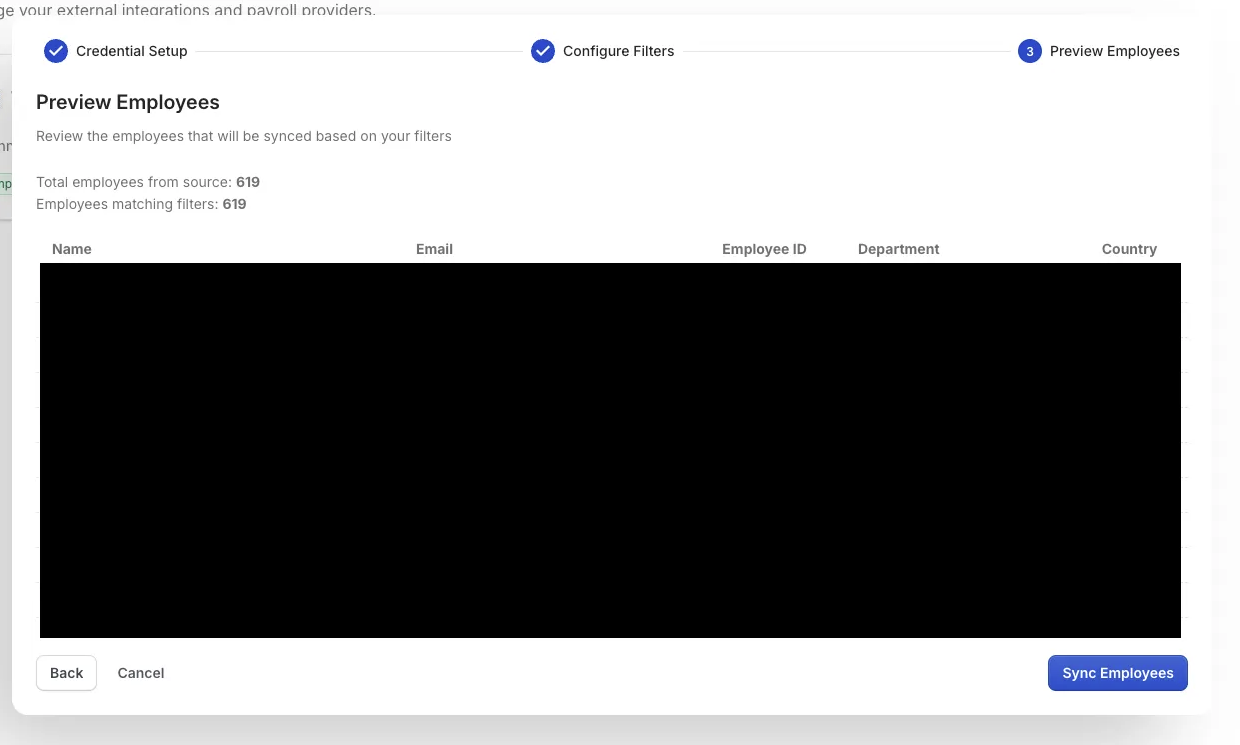
- Click “Sync Employees” This process may take some time to create profiles for all employees.
💡 If Workday is your source of truth for employee sync only, your setup is now complete. Some organizations use Workday to sync employee data but rely on a different provider for payroll. If this describes your setup, you're done here.
If Workday also handles your payroll data, continue with the steps below.
Create Payroll Integrated System User and System Security Group
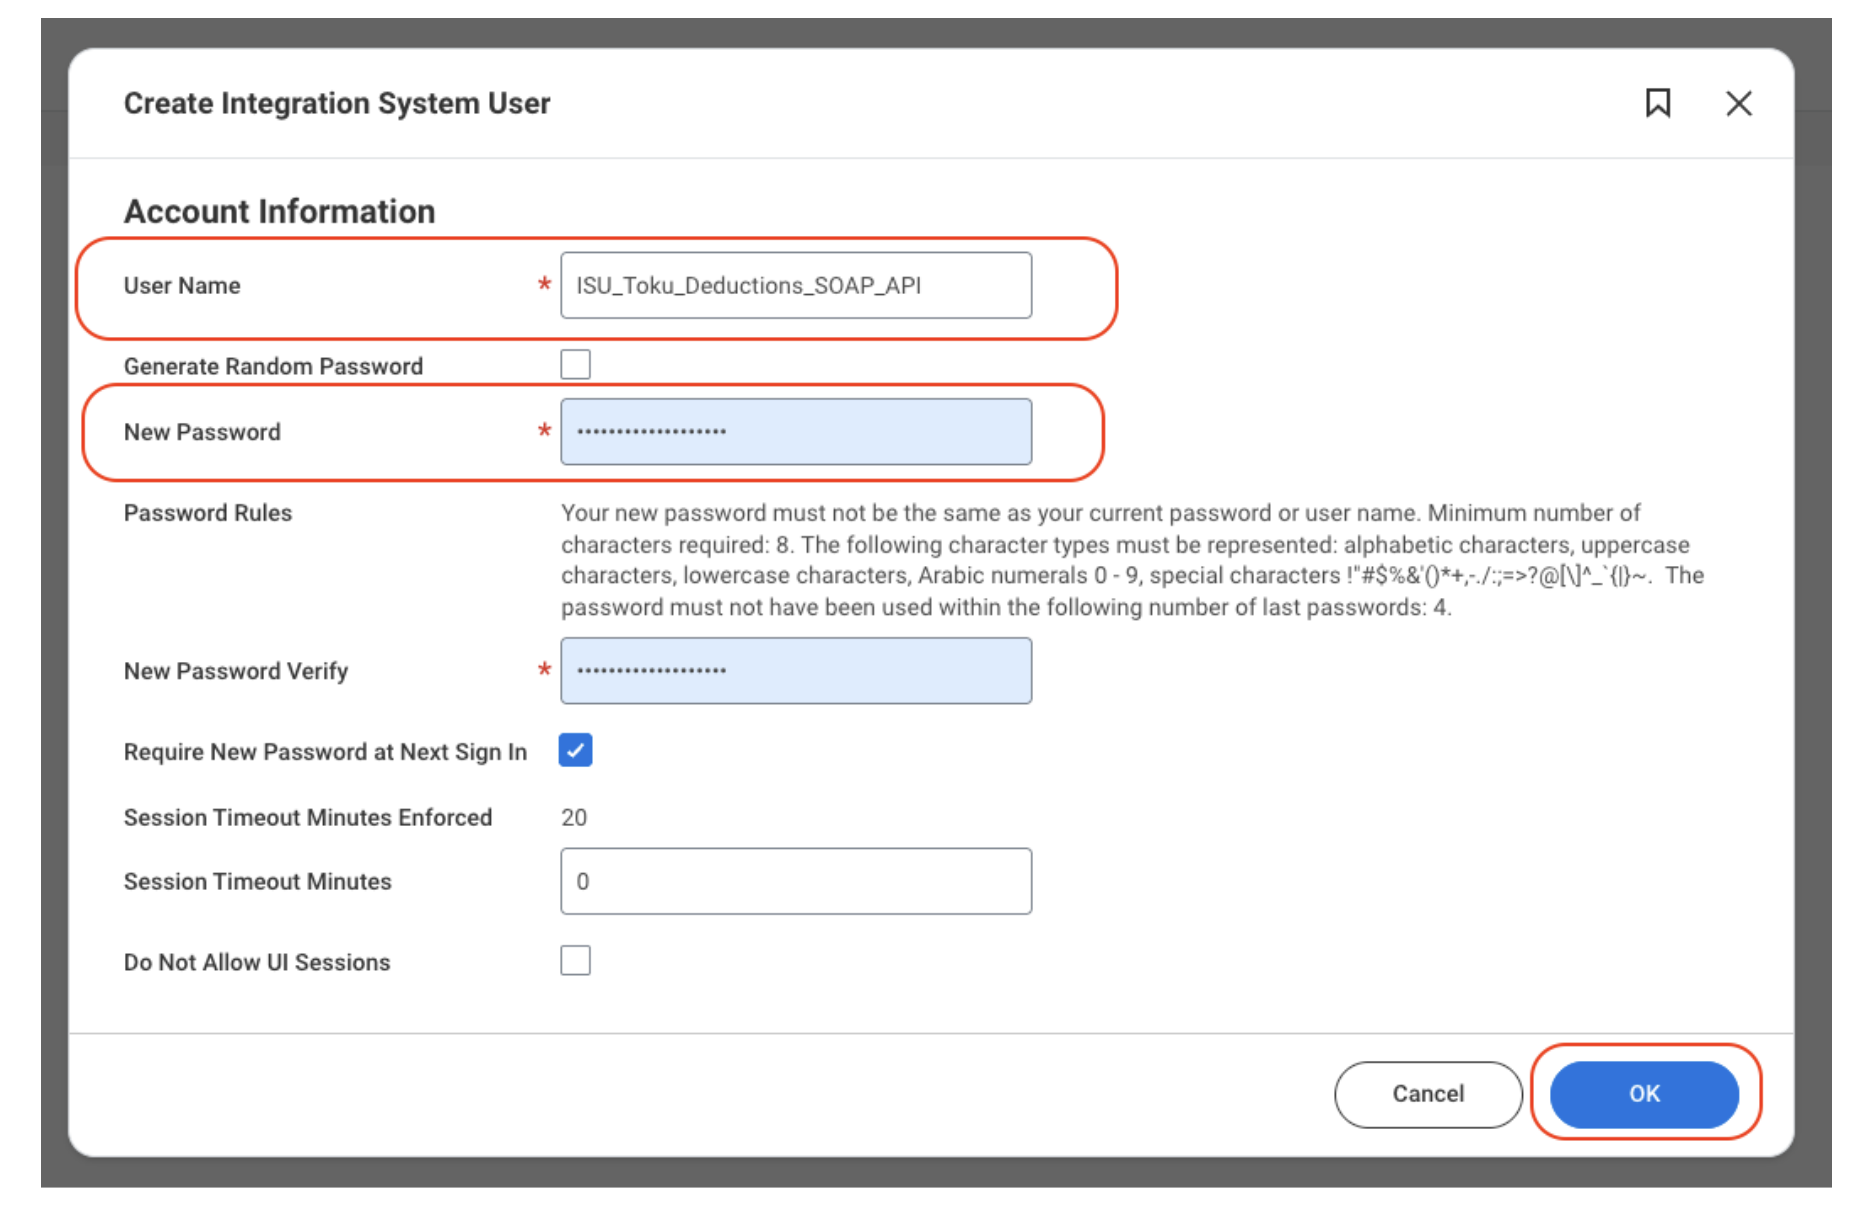
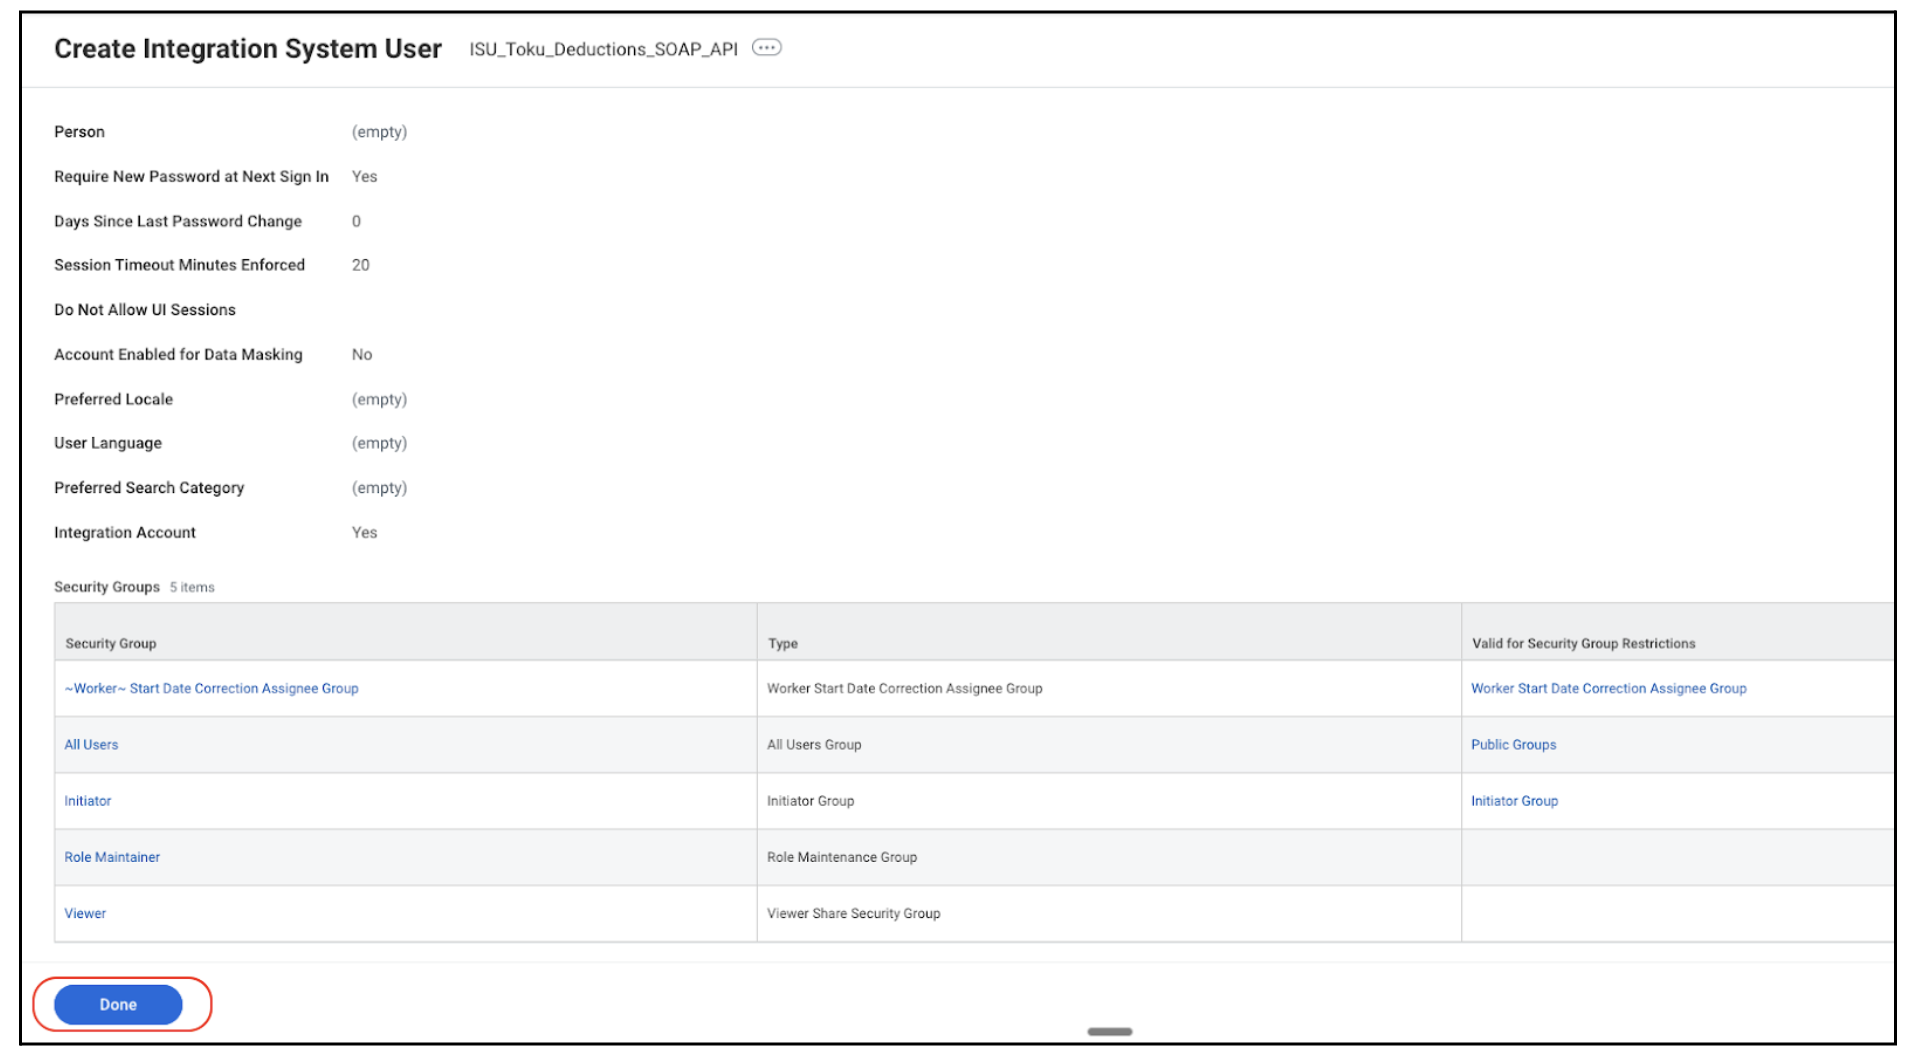
Create a new integrated system user - search for “Create integrated system user”
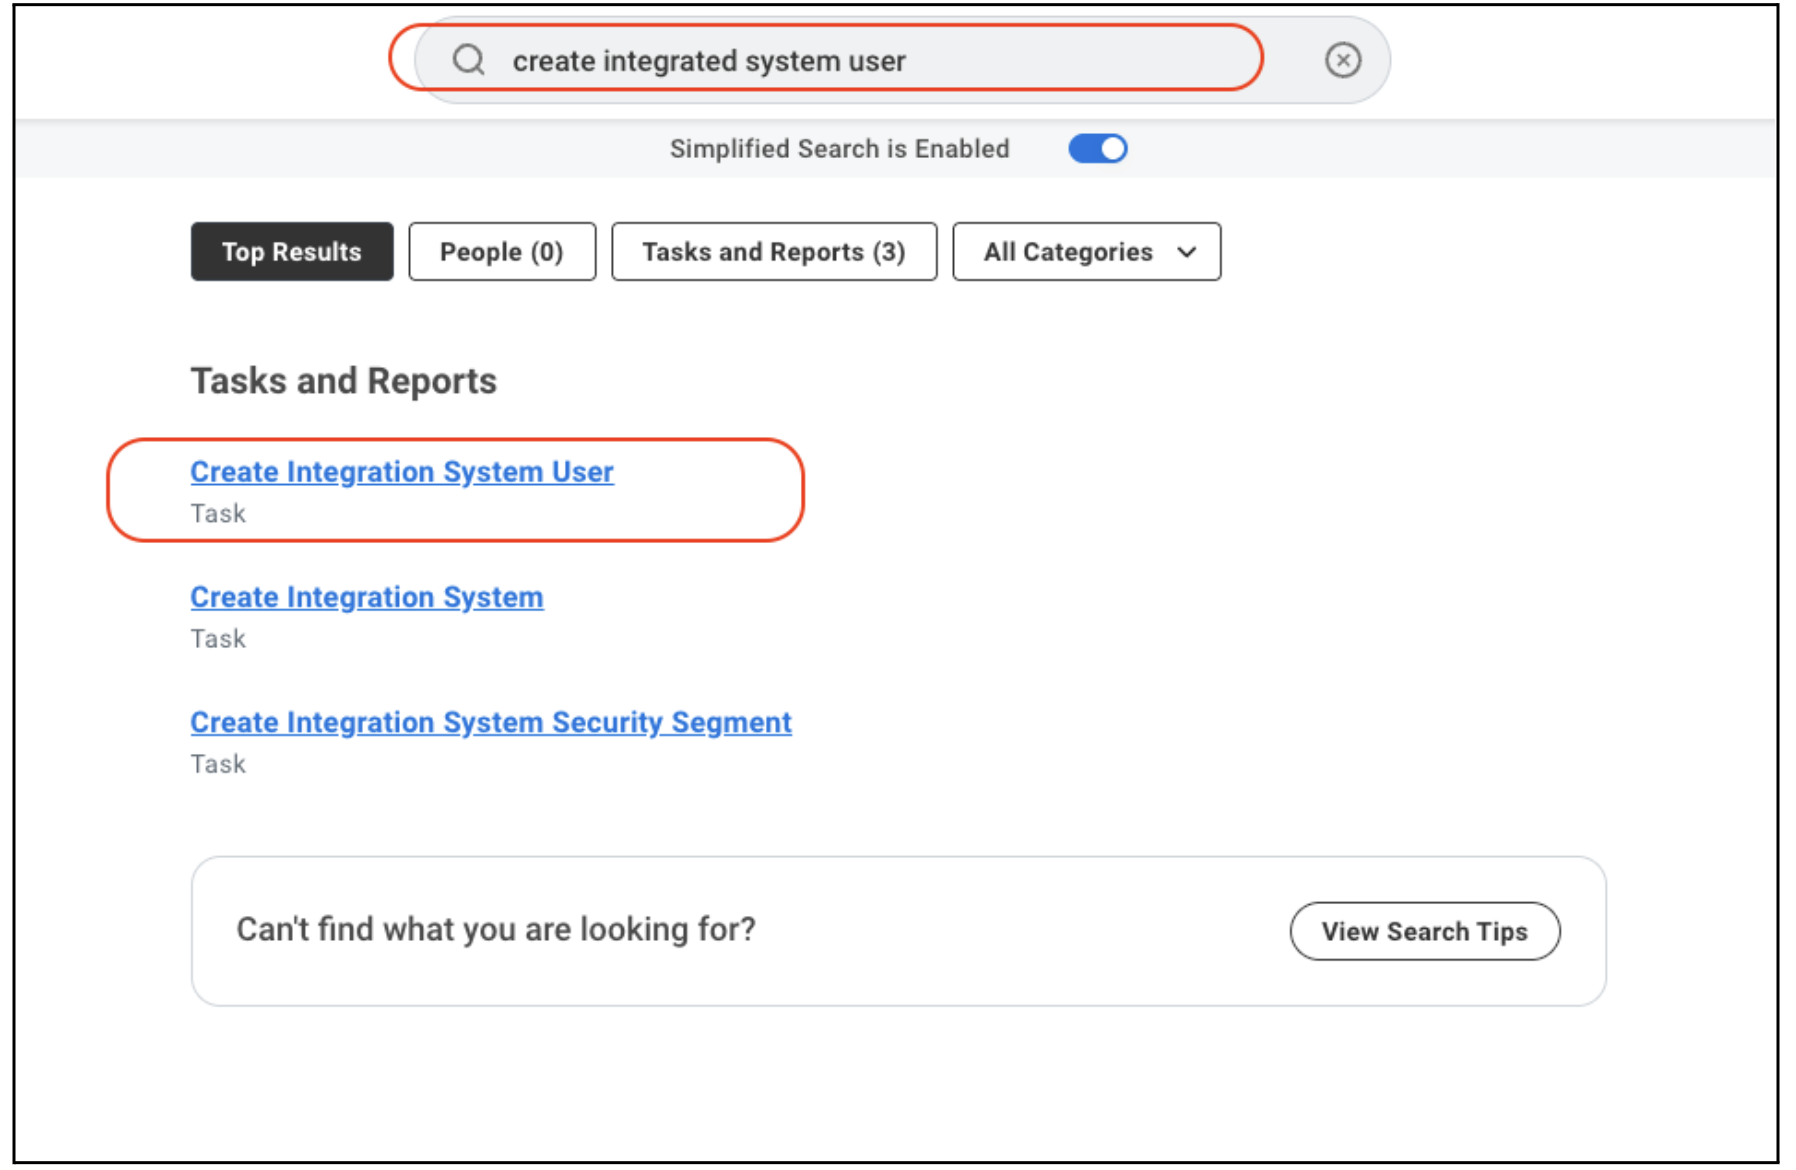
Choose a username and password (To be shared with us for the SOAP setup by the client)
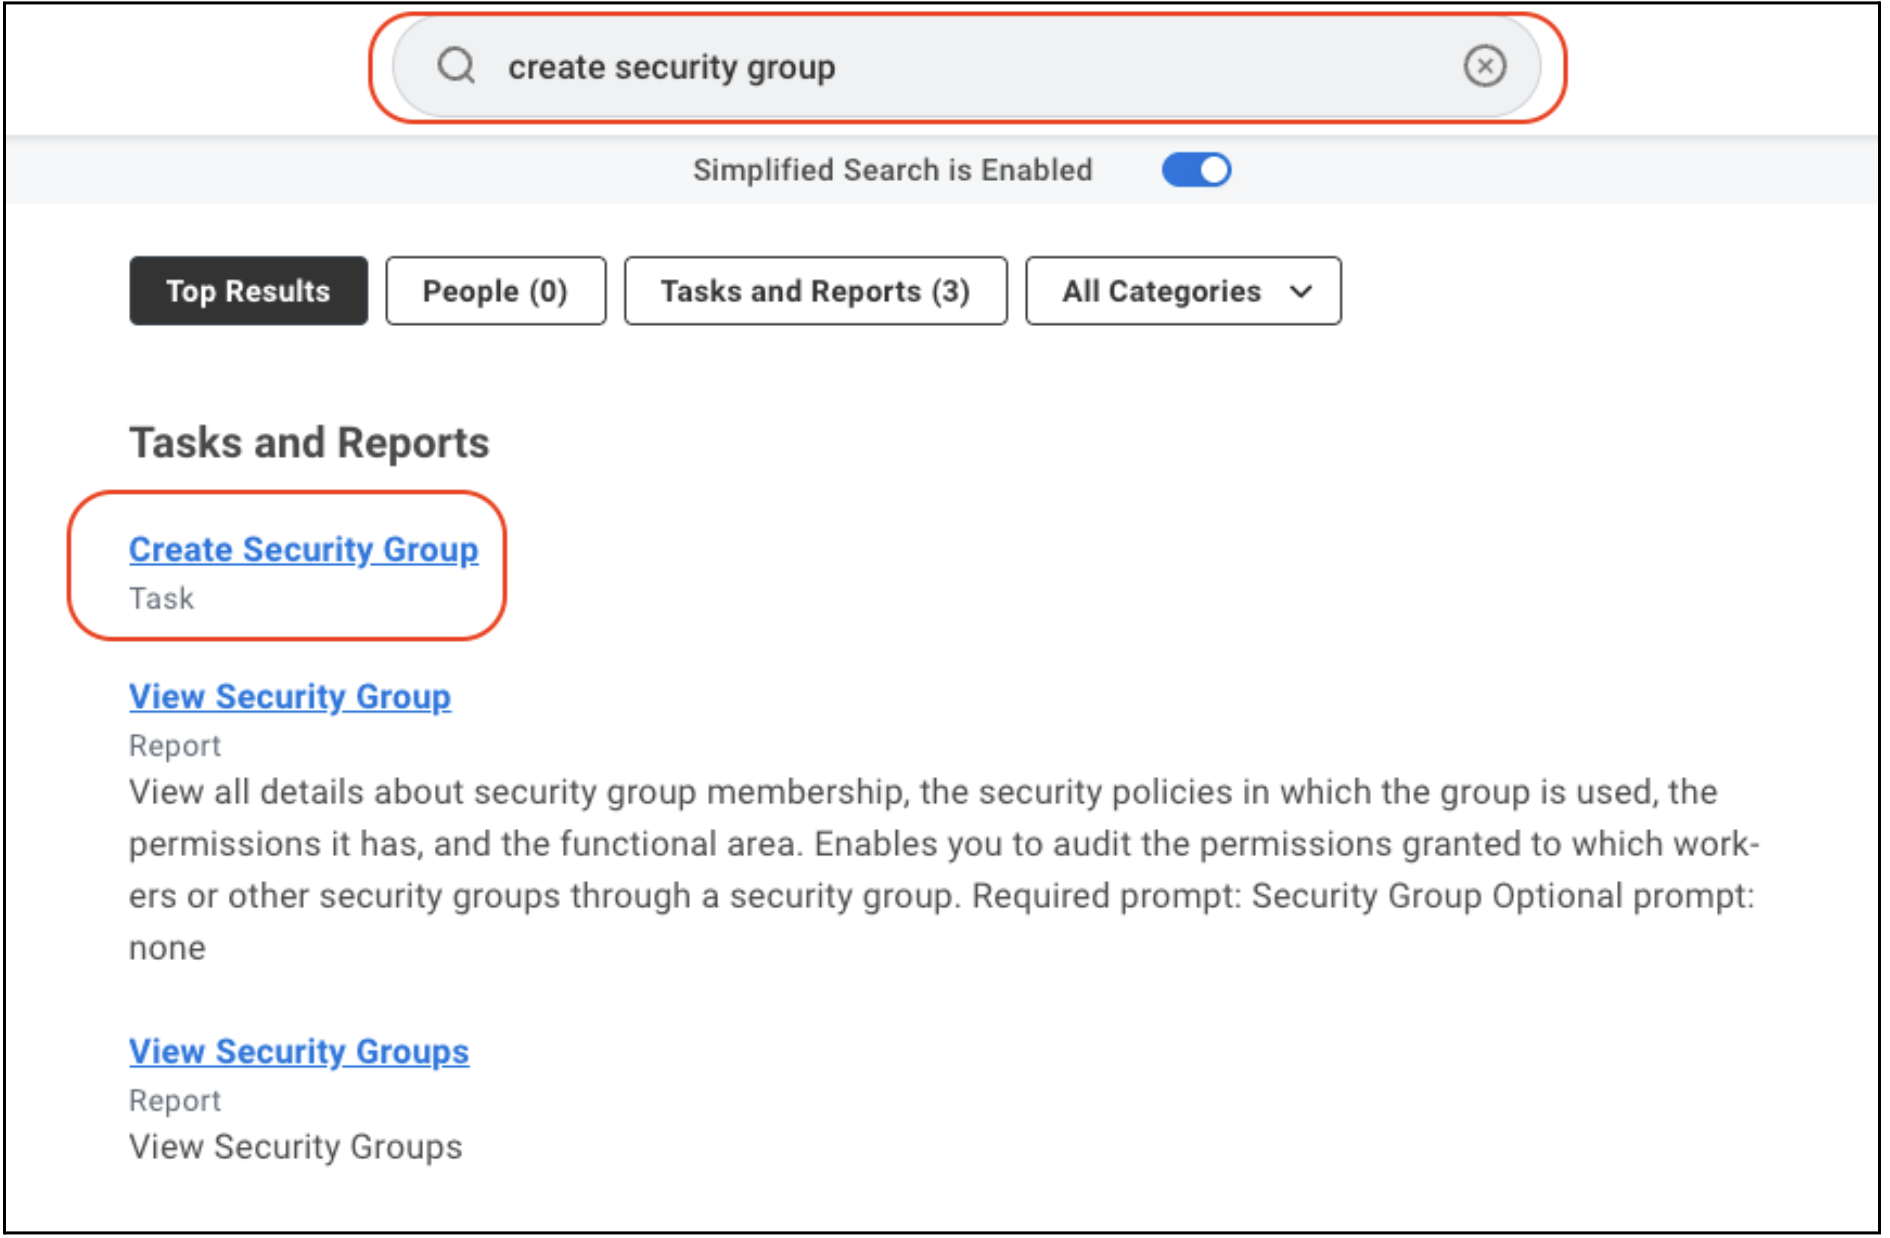
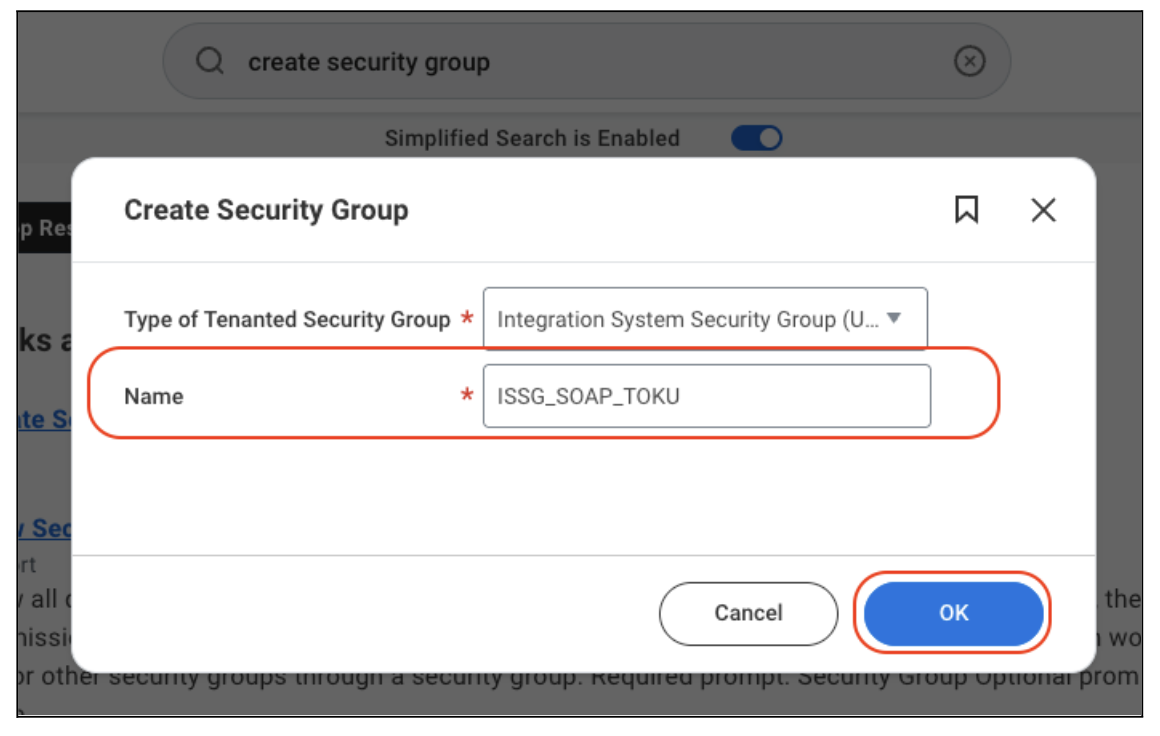
Create a Security group - search “Create security group”
Select “Integration system security group (unconstrained)
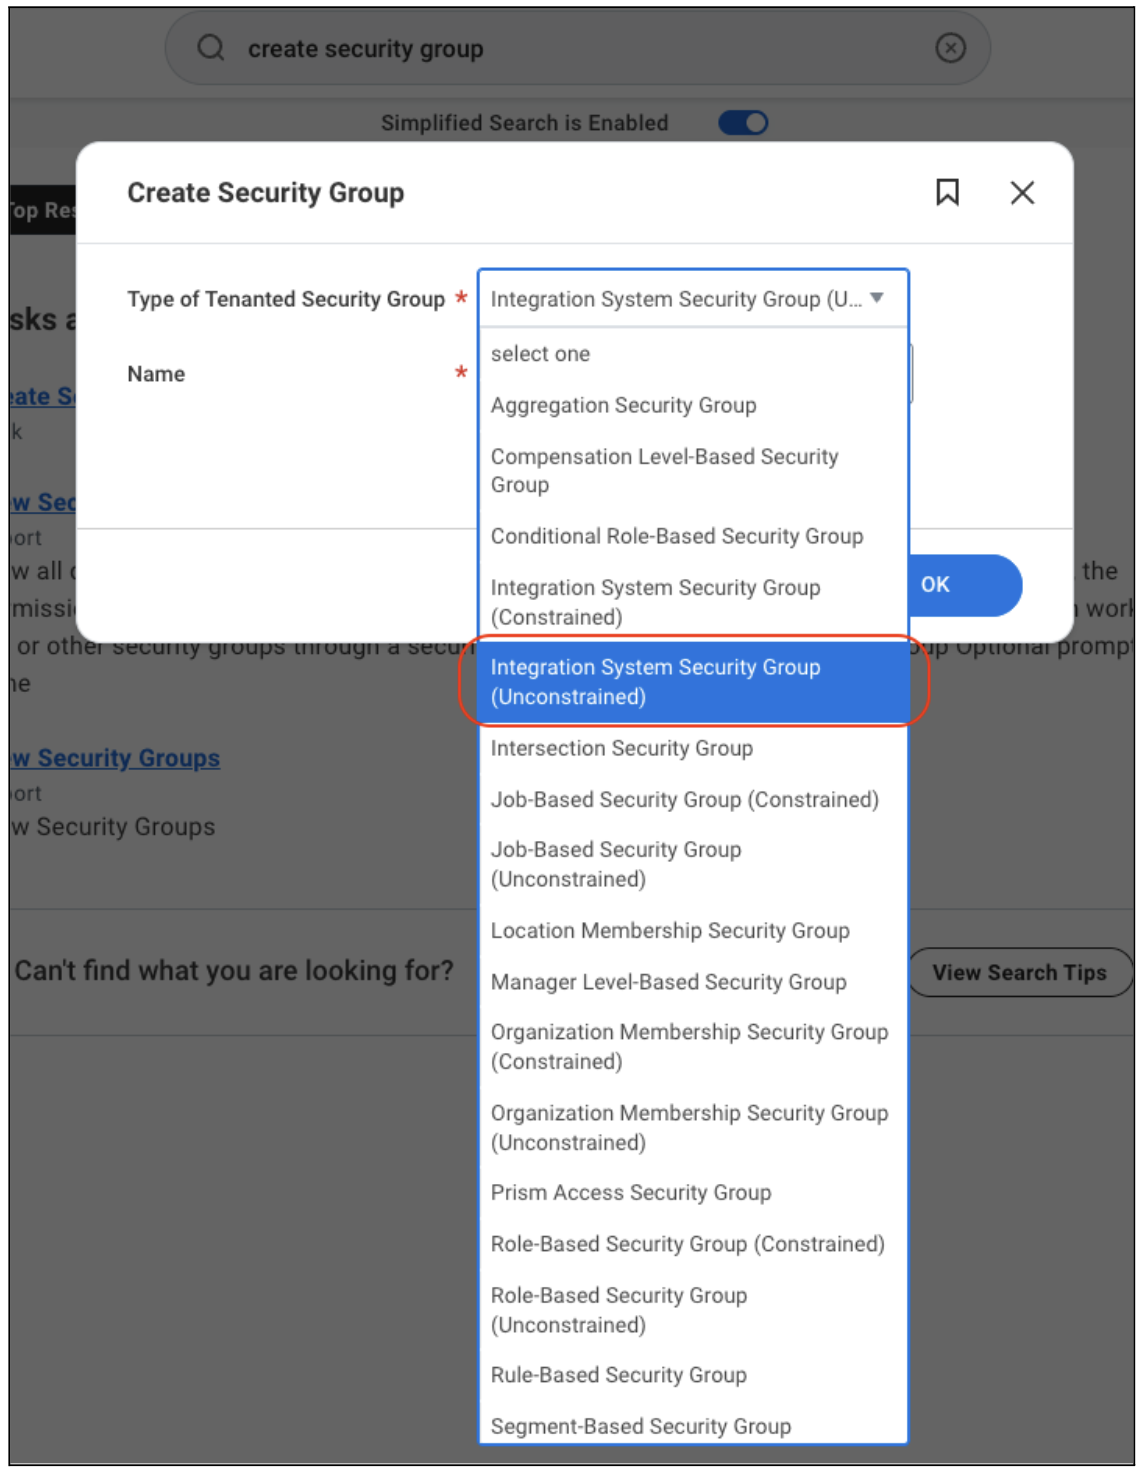
Choose any name for your Security group and click on “OK”
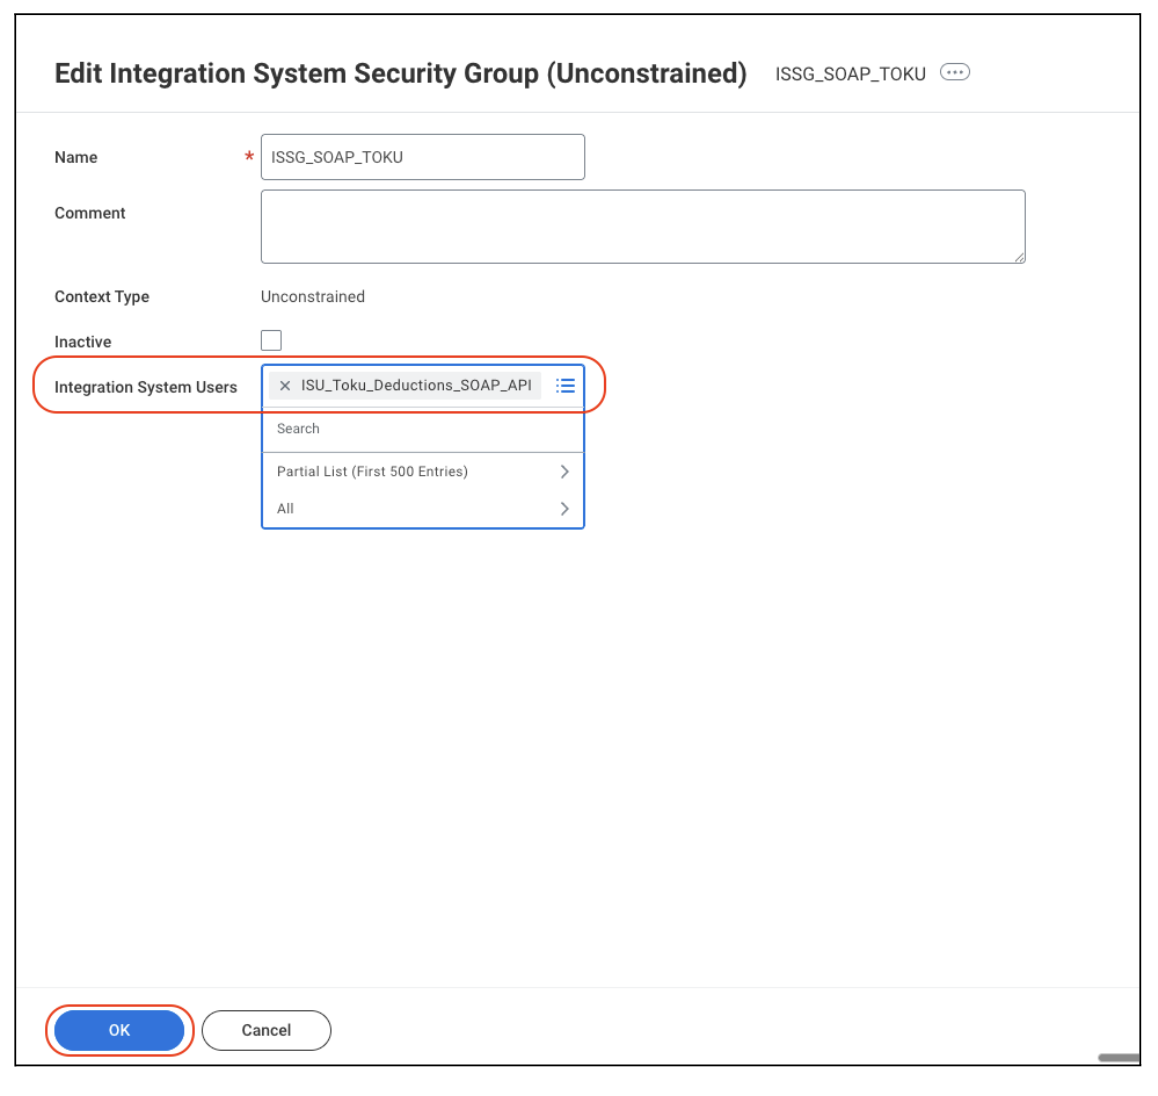
Assign your integrated system user to this security group and click on “OK”
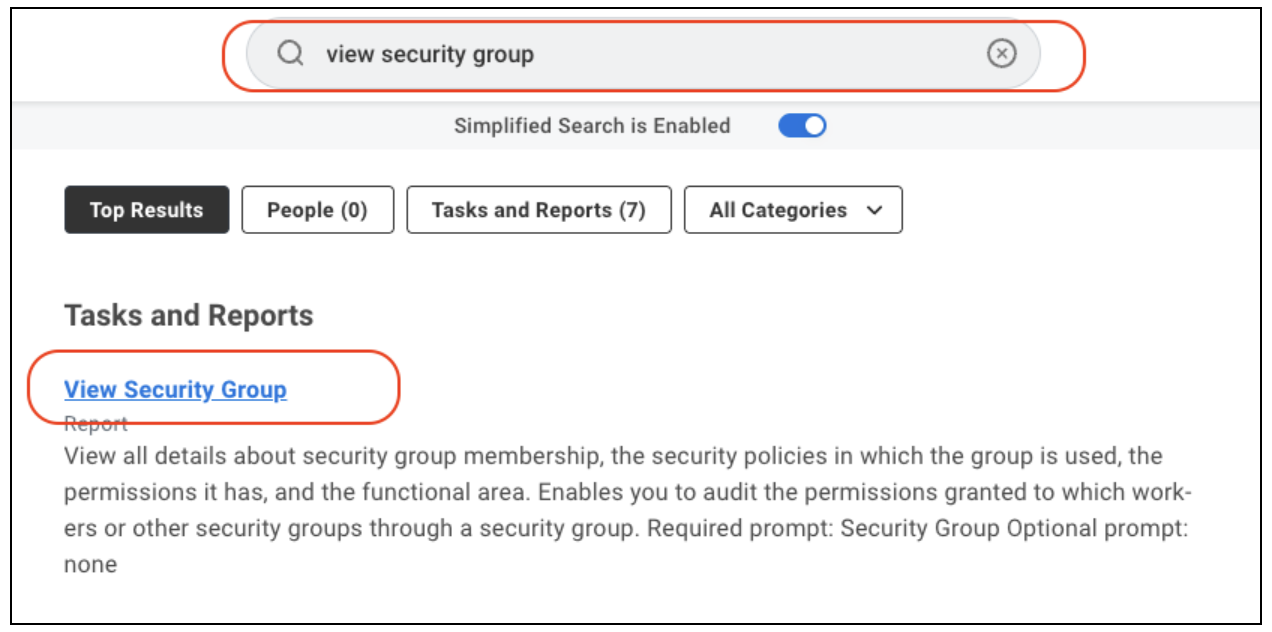
Search for “View security group”
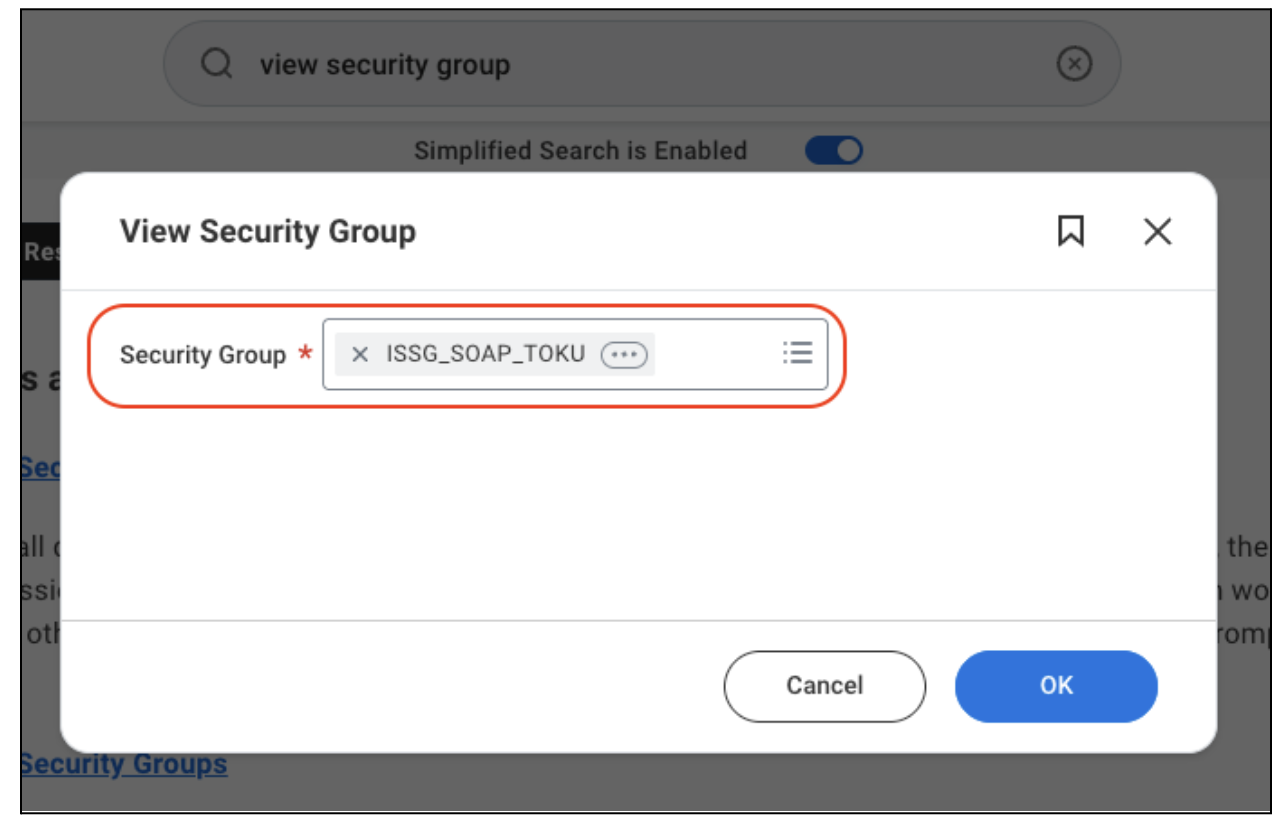
Choose your group and click on “OK”
Click on the 3 dots and go to security group option
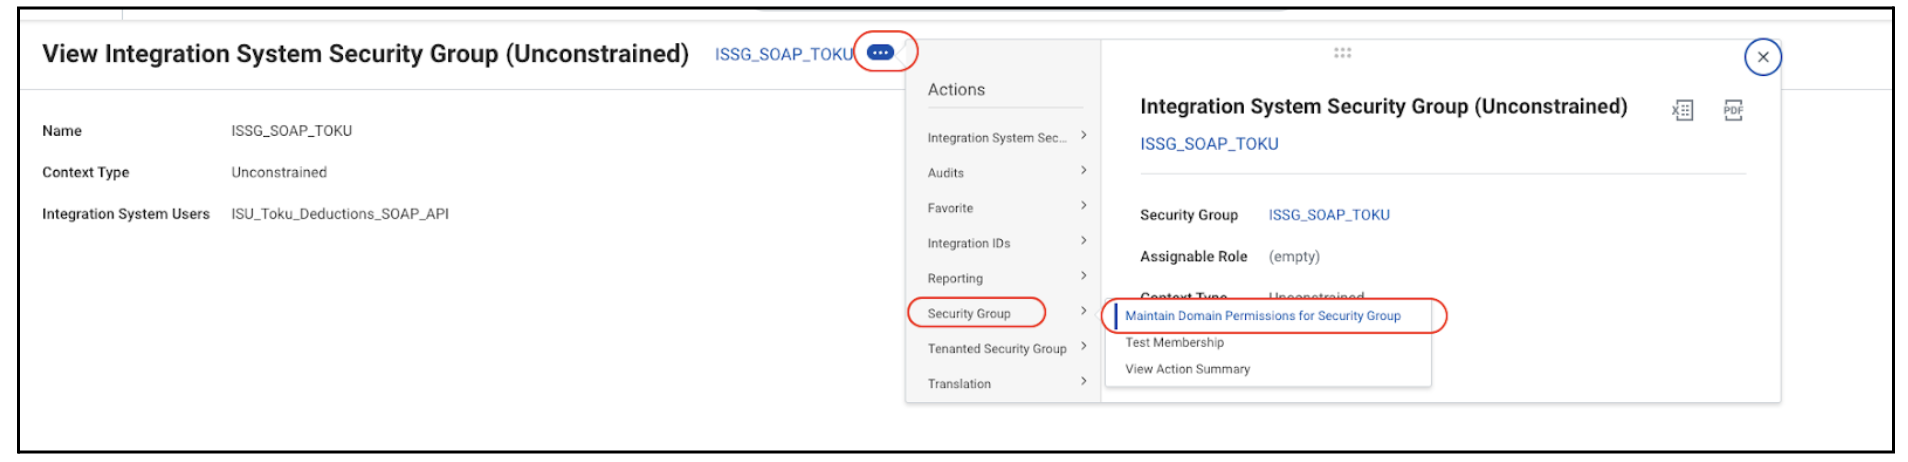
A) We need to add two types of policies:
- Domain Security Policies permitting Modify access
- Reports: Payroll Input
- Worker Data: Payroll (Payroll Input Workbooks)
- Worker Data: Payroll Interface (Payroll Input by Batch ID)
- Worker Data: Payroll Public API (Payroll Input)
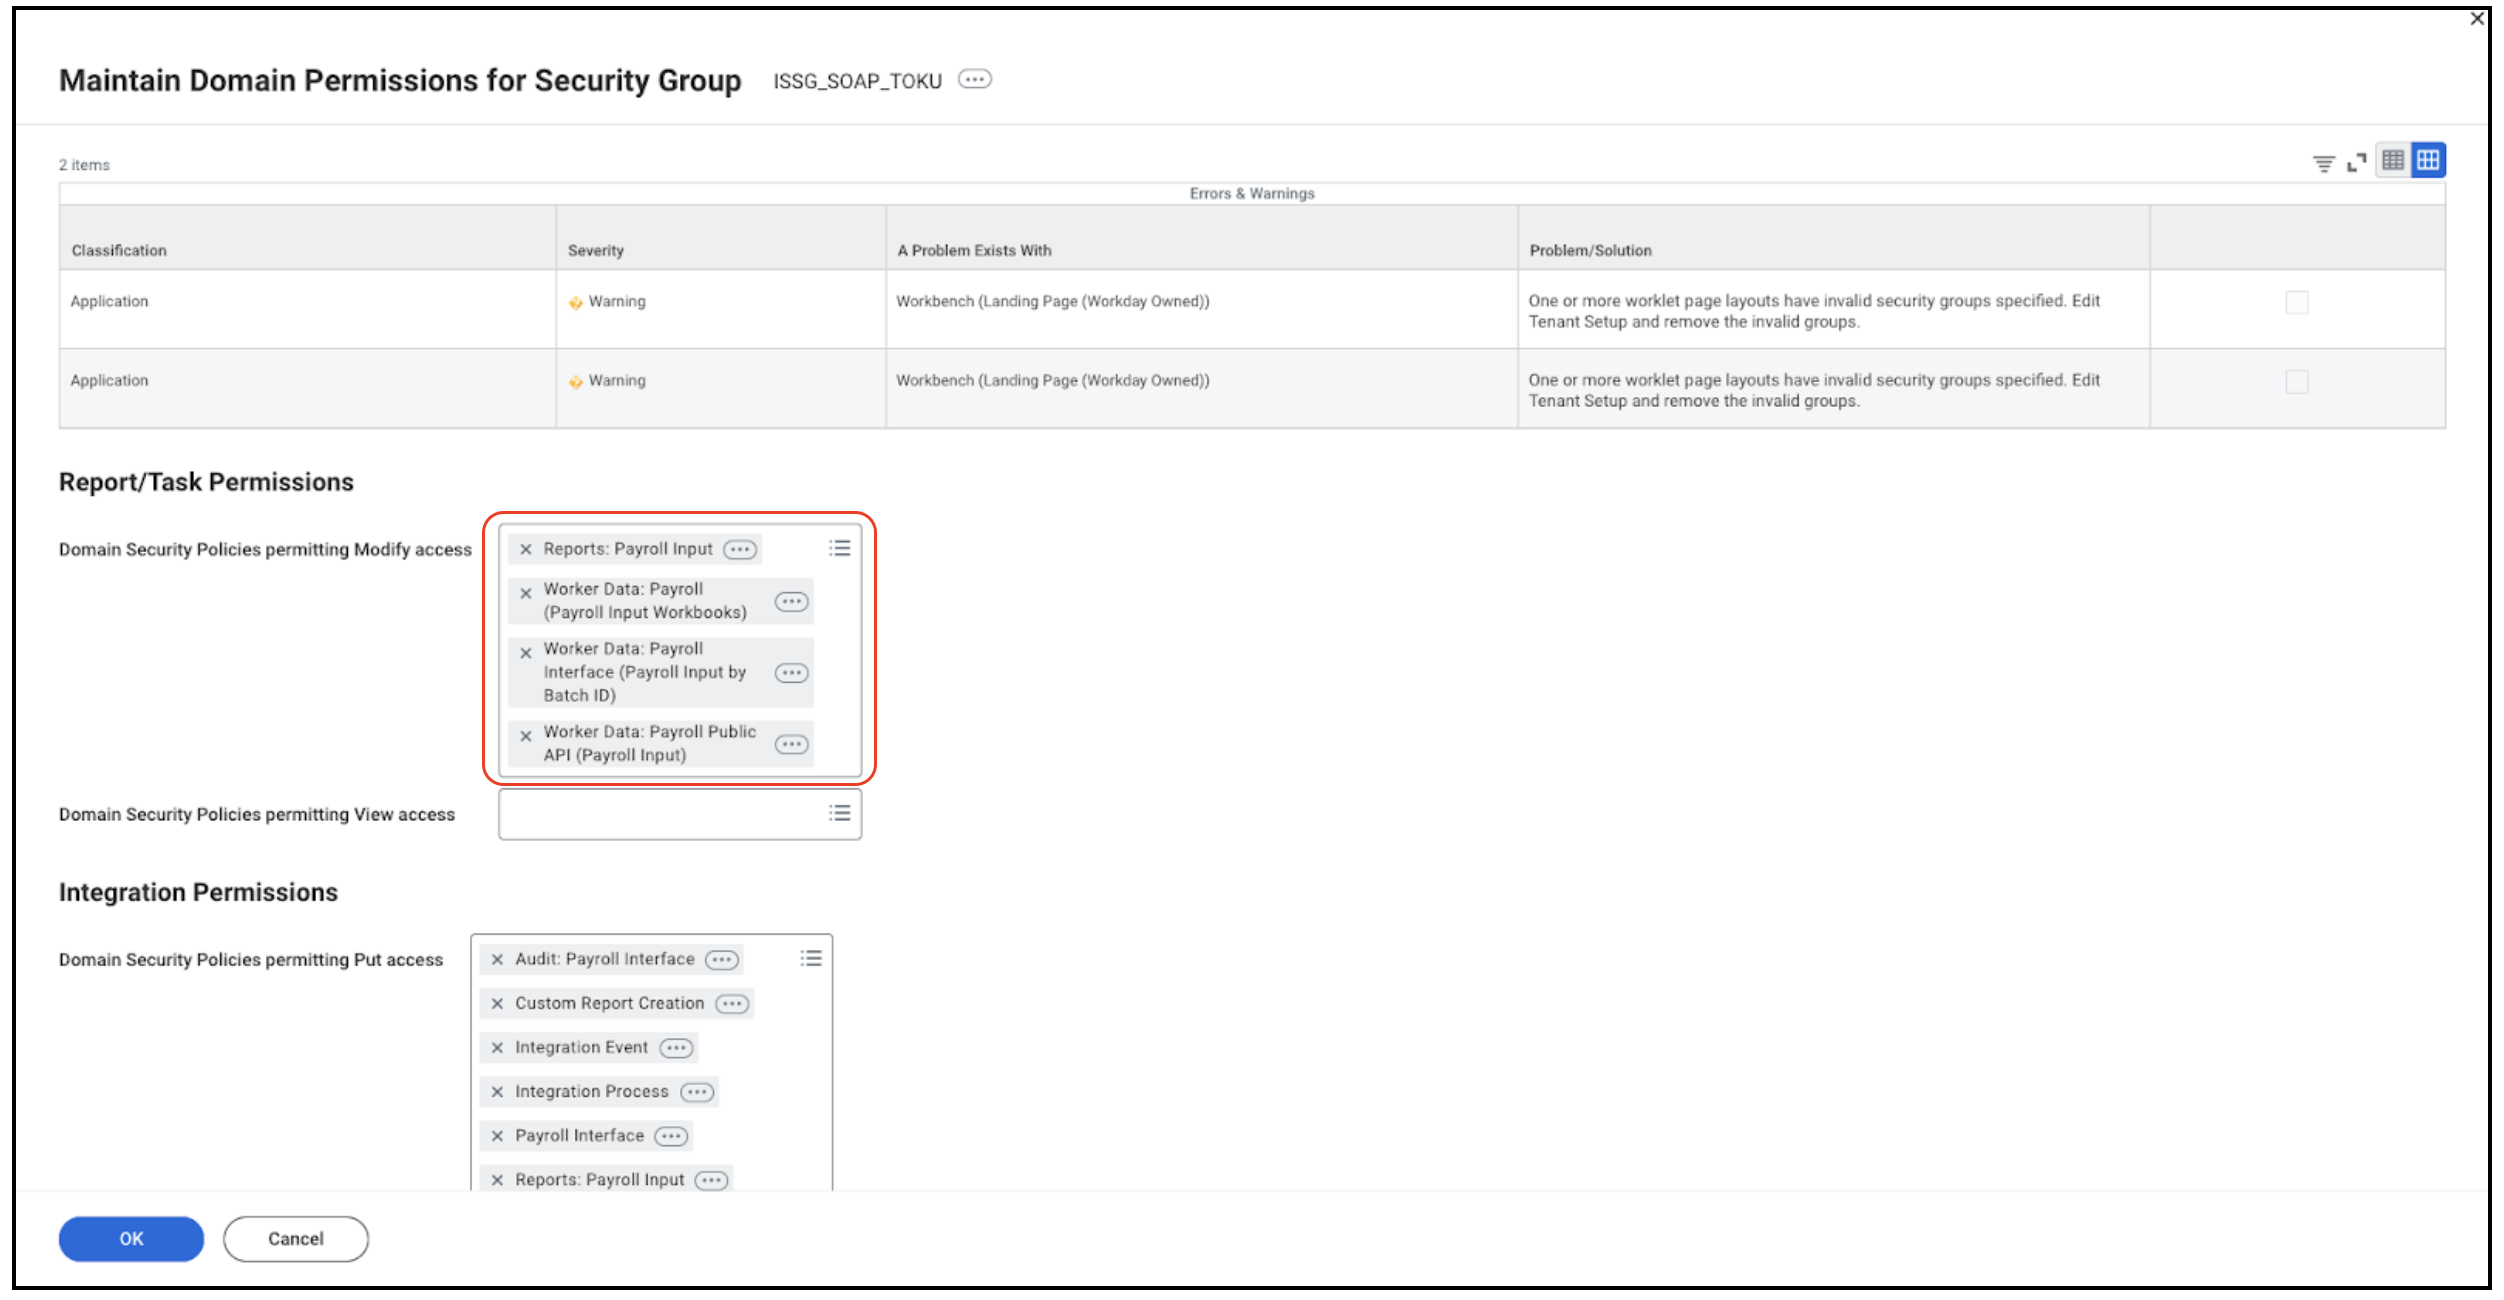
- Domain Security Policies permitting Put access
- Audit: Payroll Interface
- Custom Report Creation
- Integration Event
- Integration Process
- Payroll Interface
- Reports: Payroll Input
- Set Up: Payroll
- Set Up: Payroll (Calculations - Payroll Specific)
- Set Up: Payroll Interface
- Set Up: Payroll Interface (Update Pay Period Status)
- Worker Data: Compensation
- Worker Data: Payees
- Worker Data: Payroll
- Worker Data: Payroll (Payroll Input Workbooks)
- Worker Data: Payroll Interface
- Worker Data: Payroll Interface (Additional Payroll Data)
- Worker Data: Payroll Interface (Payroll Input by Batch ID)
- Worker Data: Payroll Public API (Payroll Input)
- Worklet: Payroll
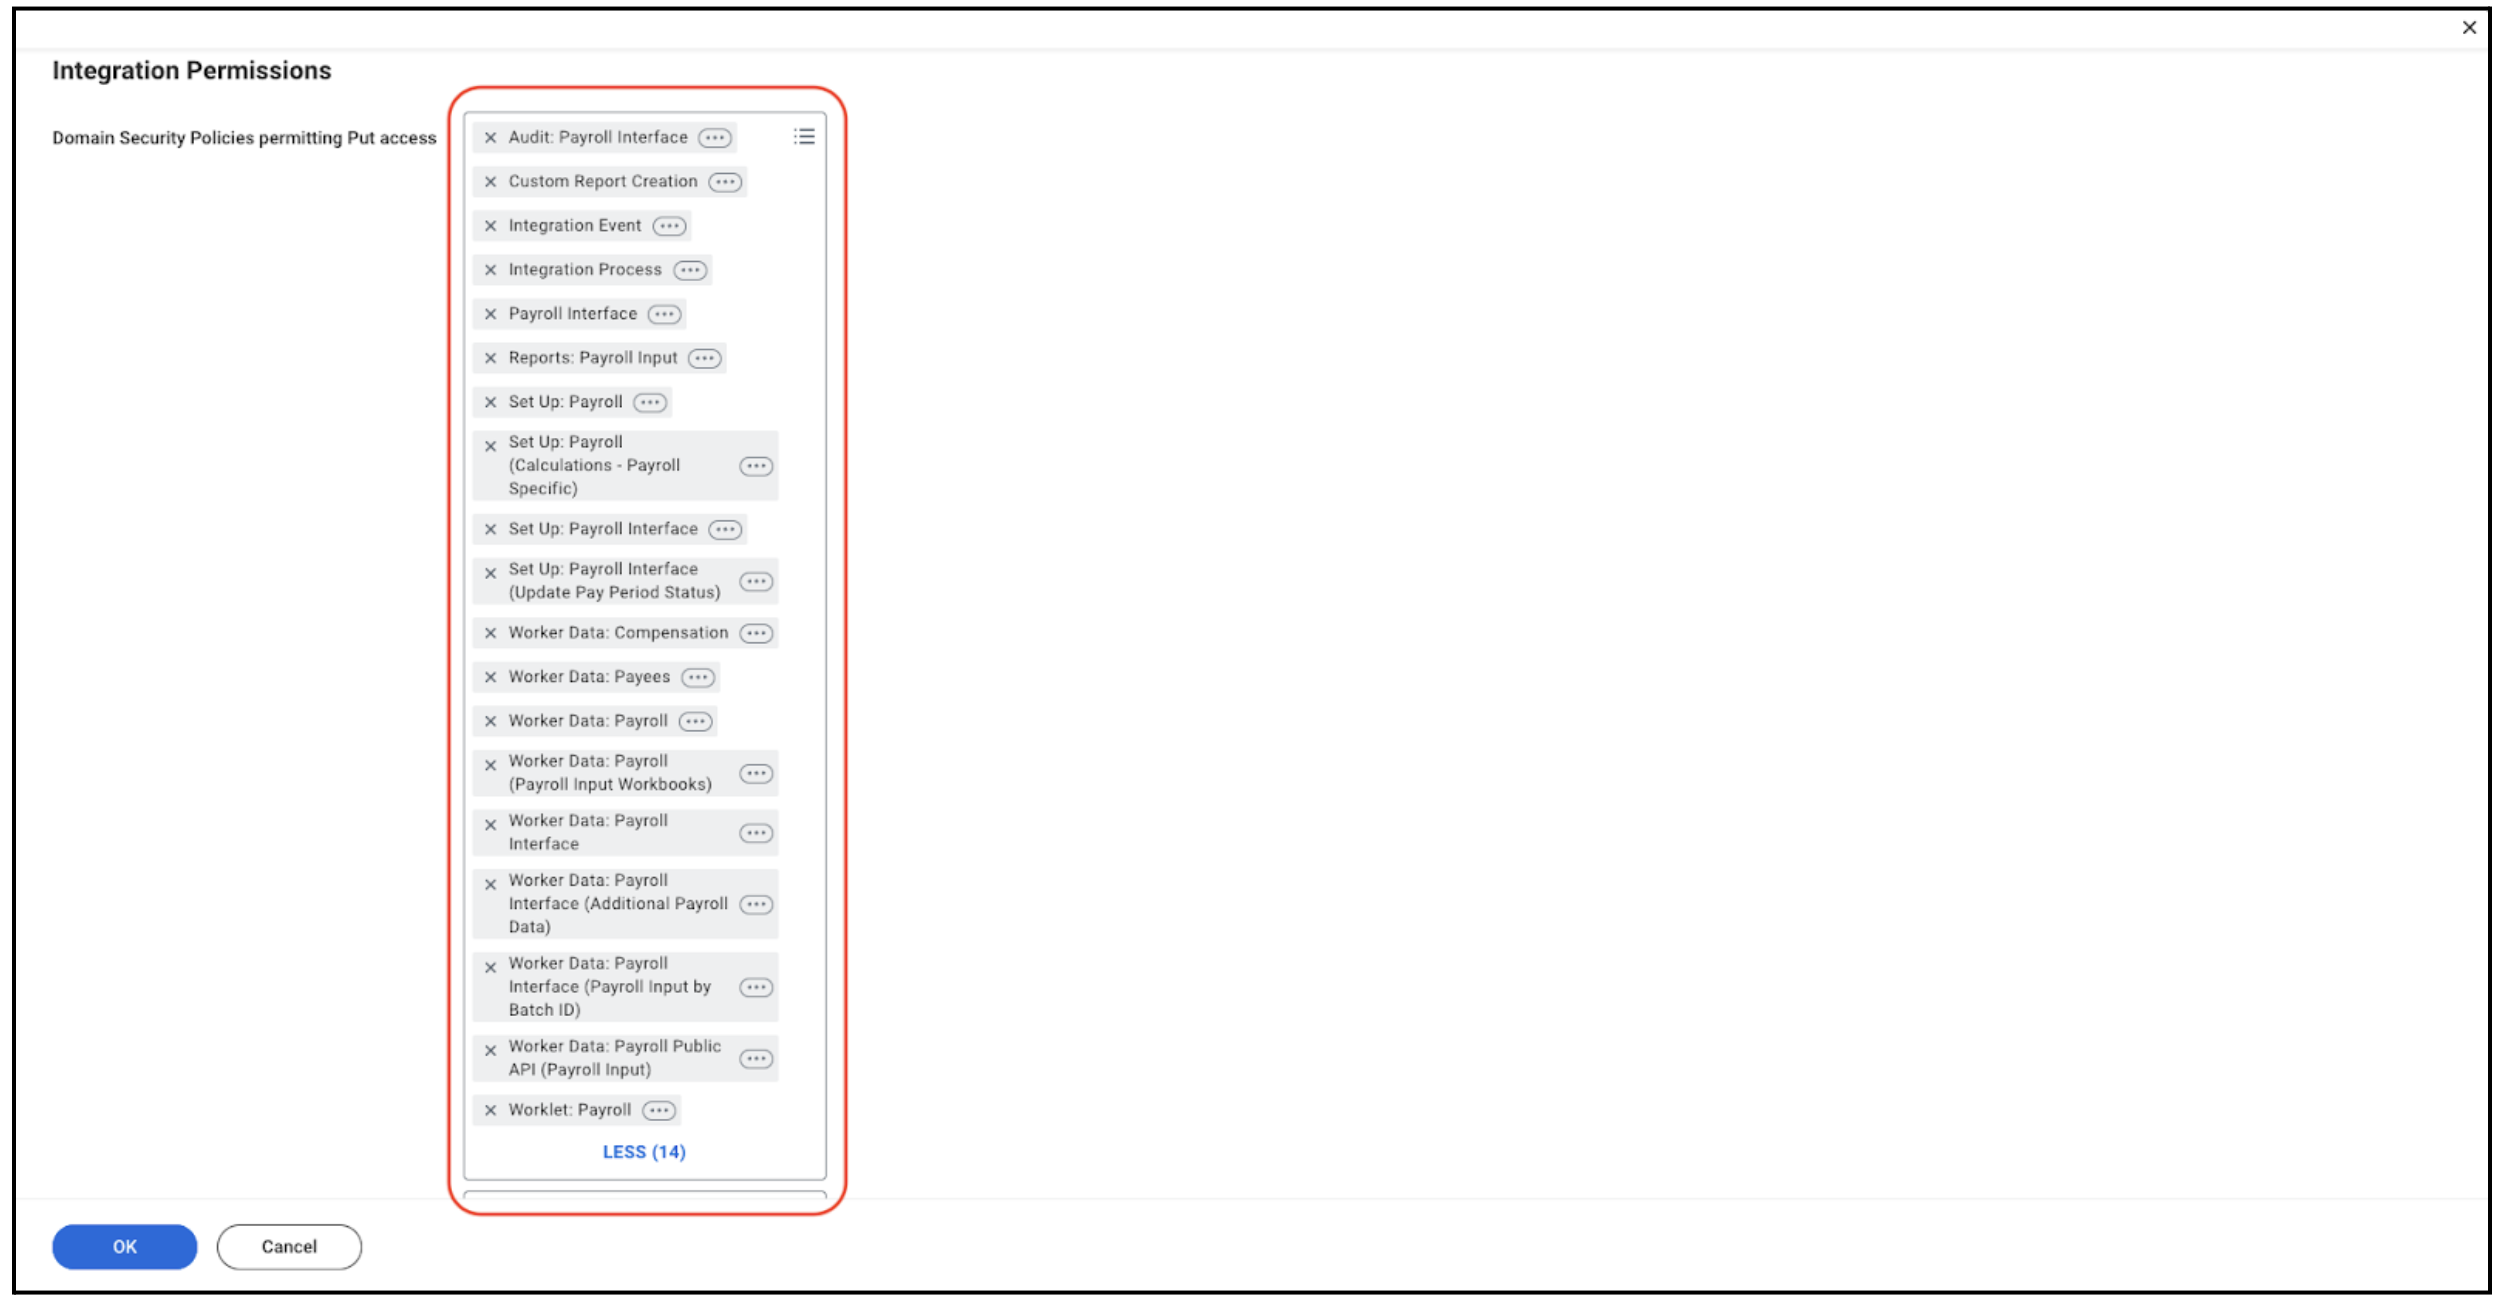
B) We need to add the group to the business process of “Payroll Interface Data”
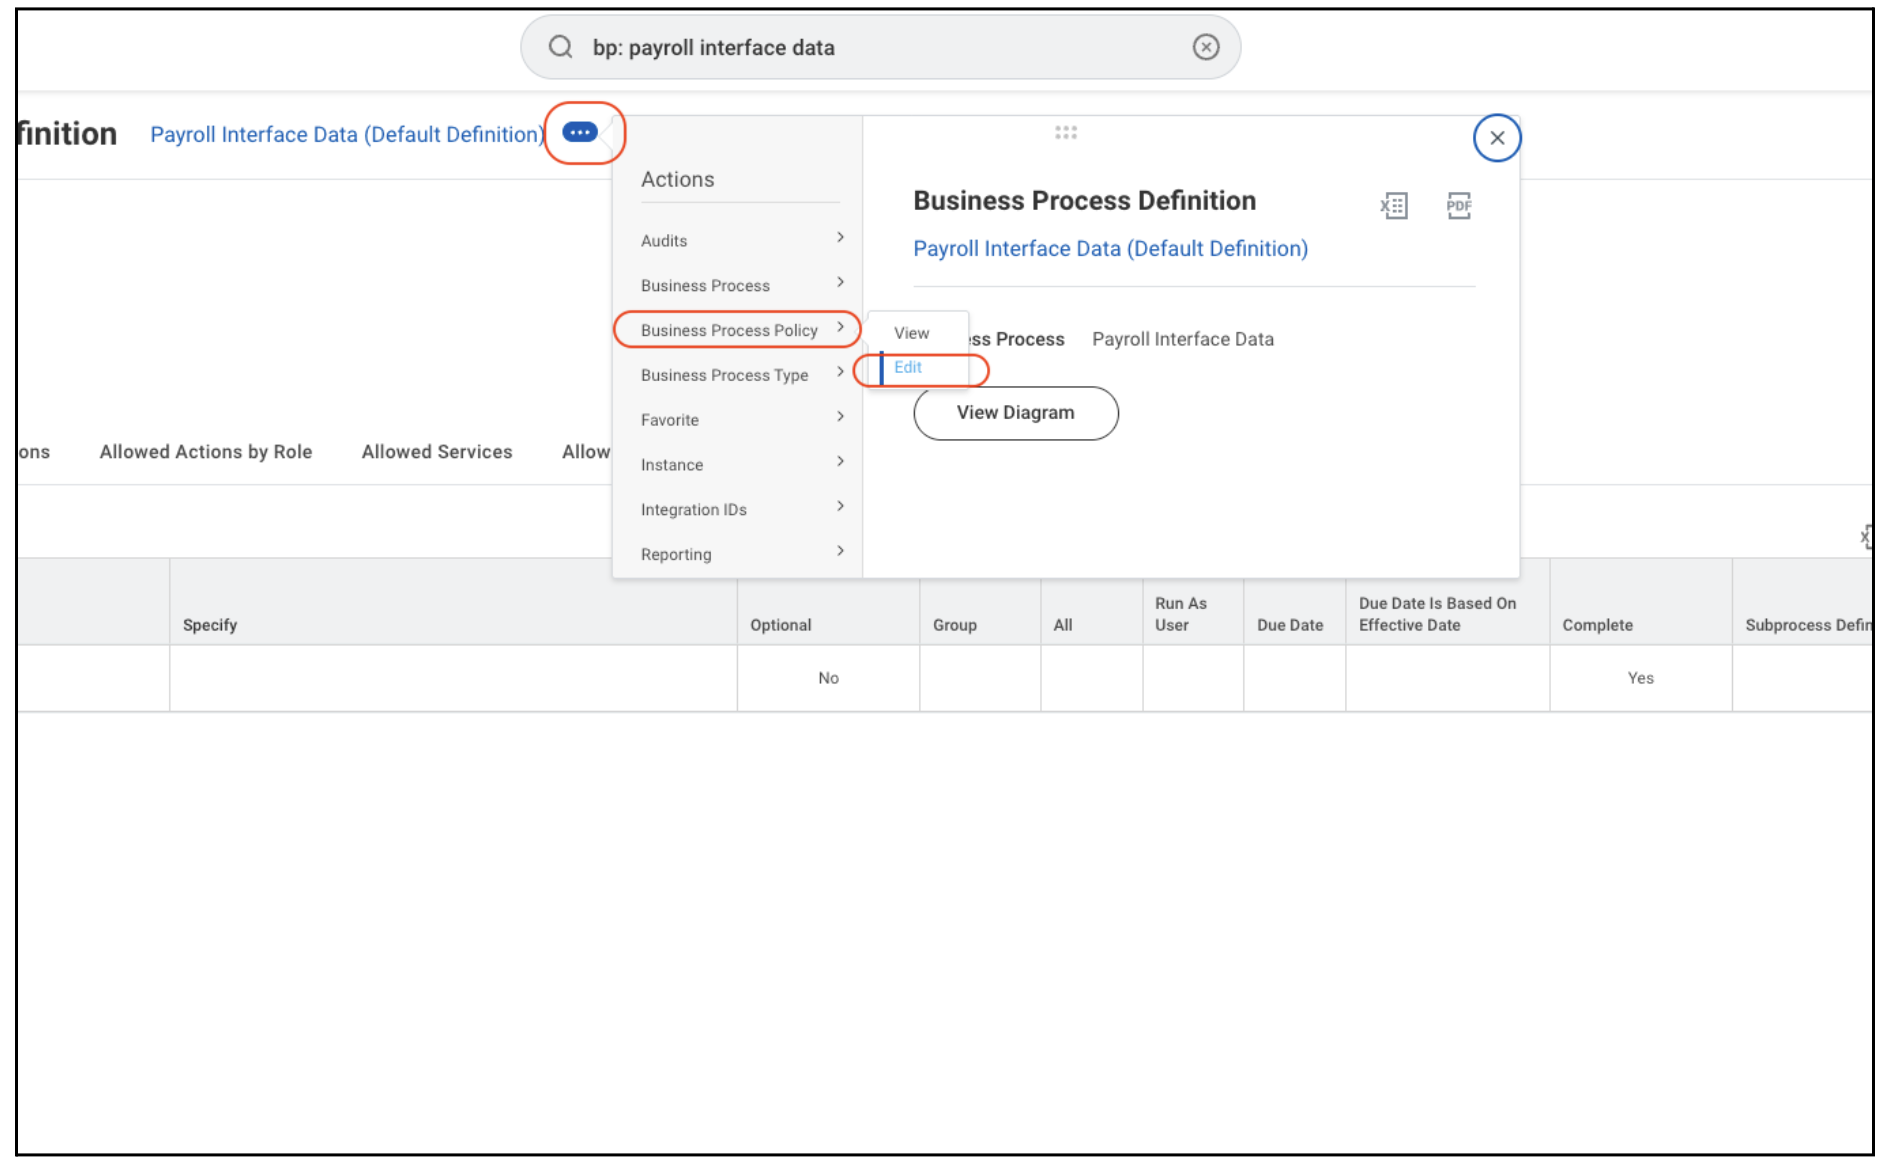
You’ll be greeted with this screen:
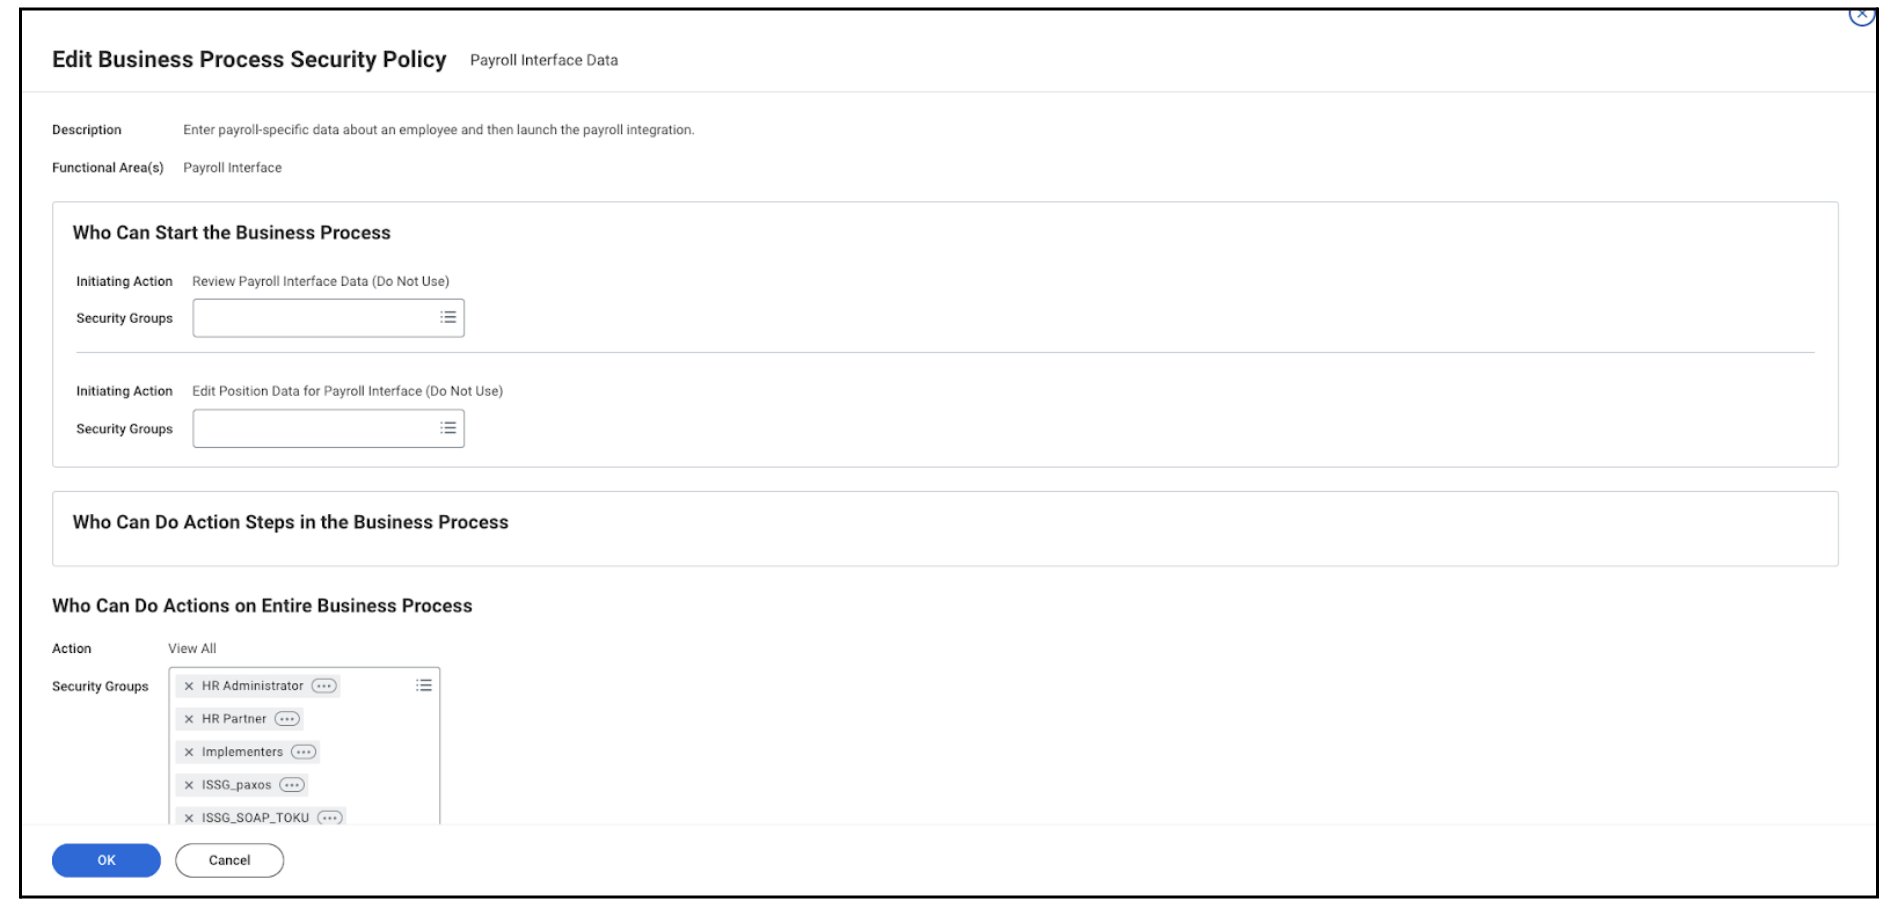
Scroll to Business process > Add your security group > Click on “OK”
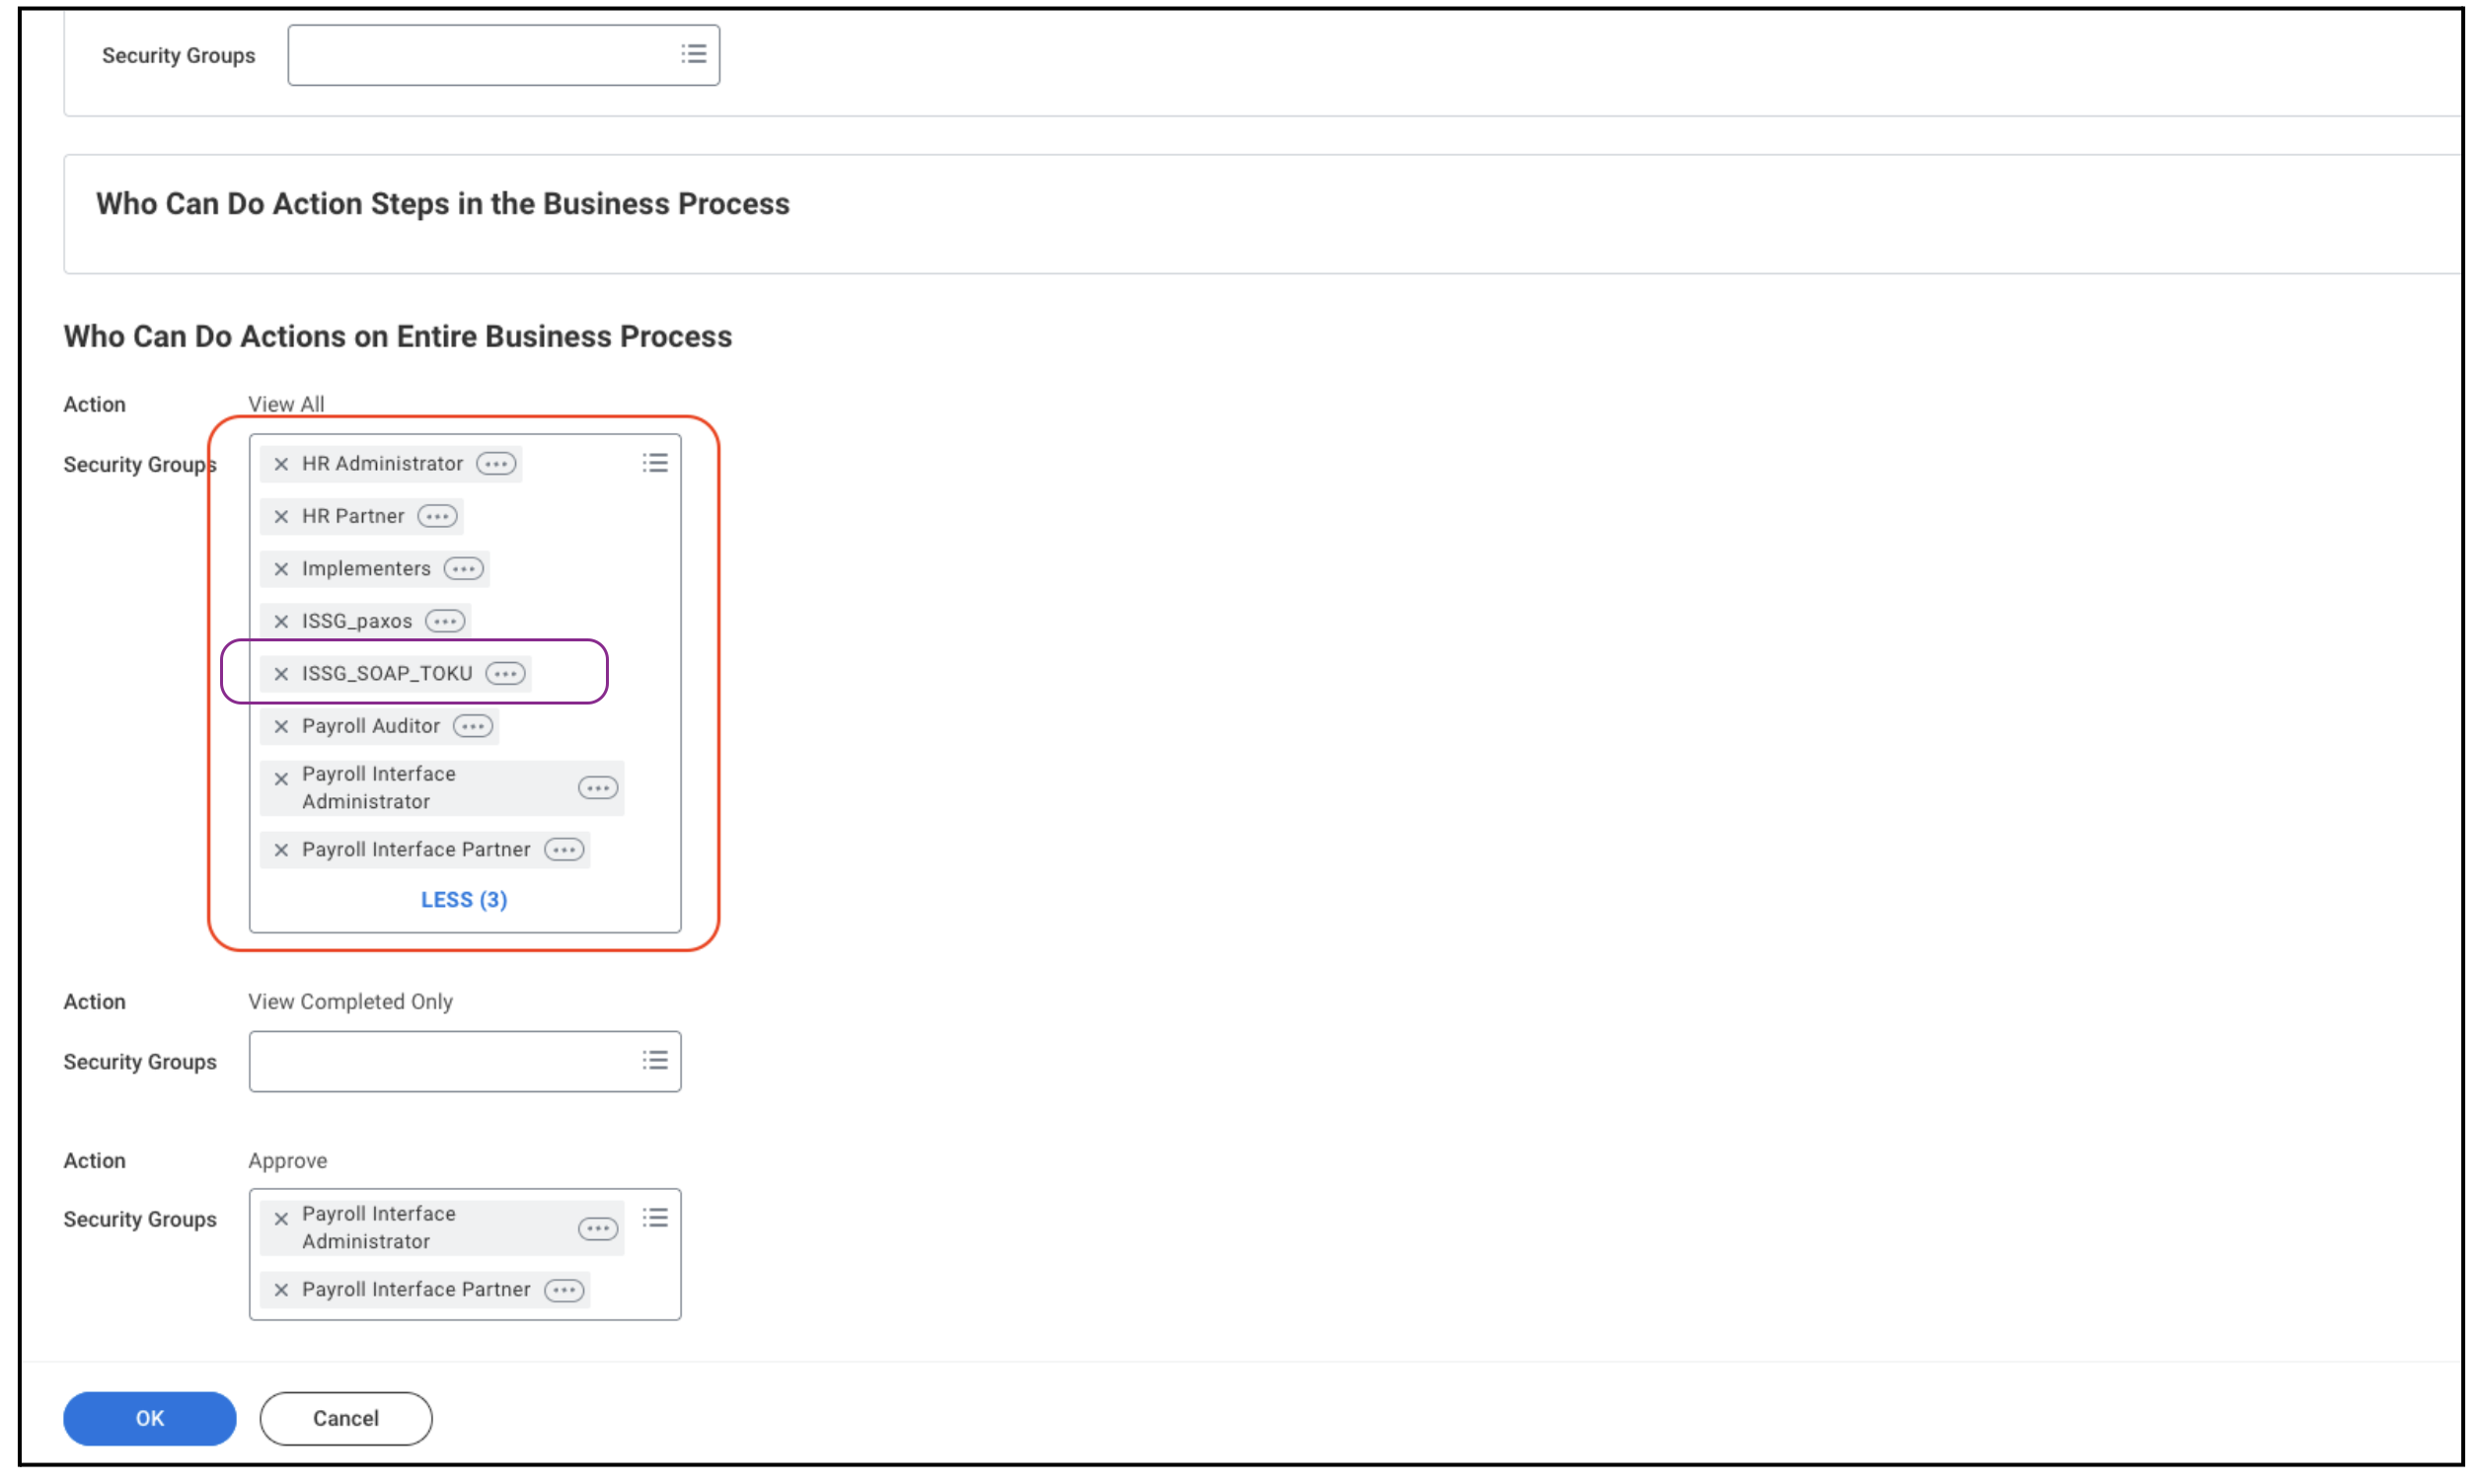
C) Go to “Manage authentication policies”
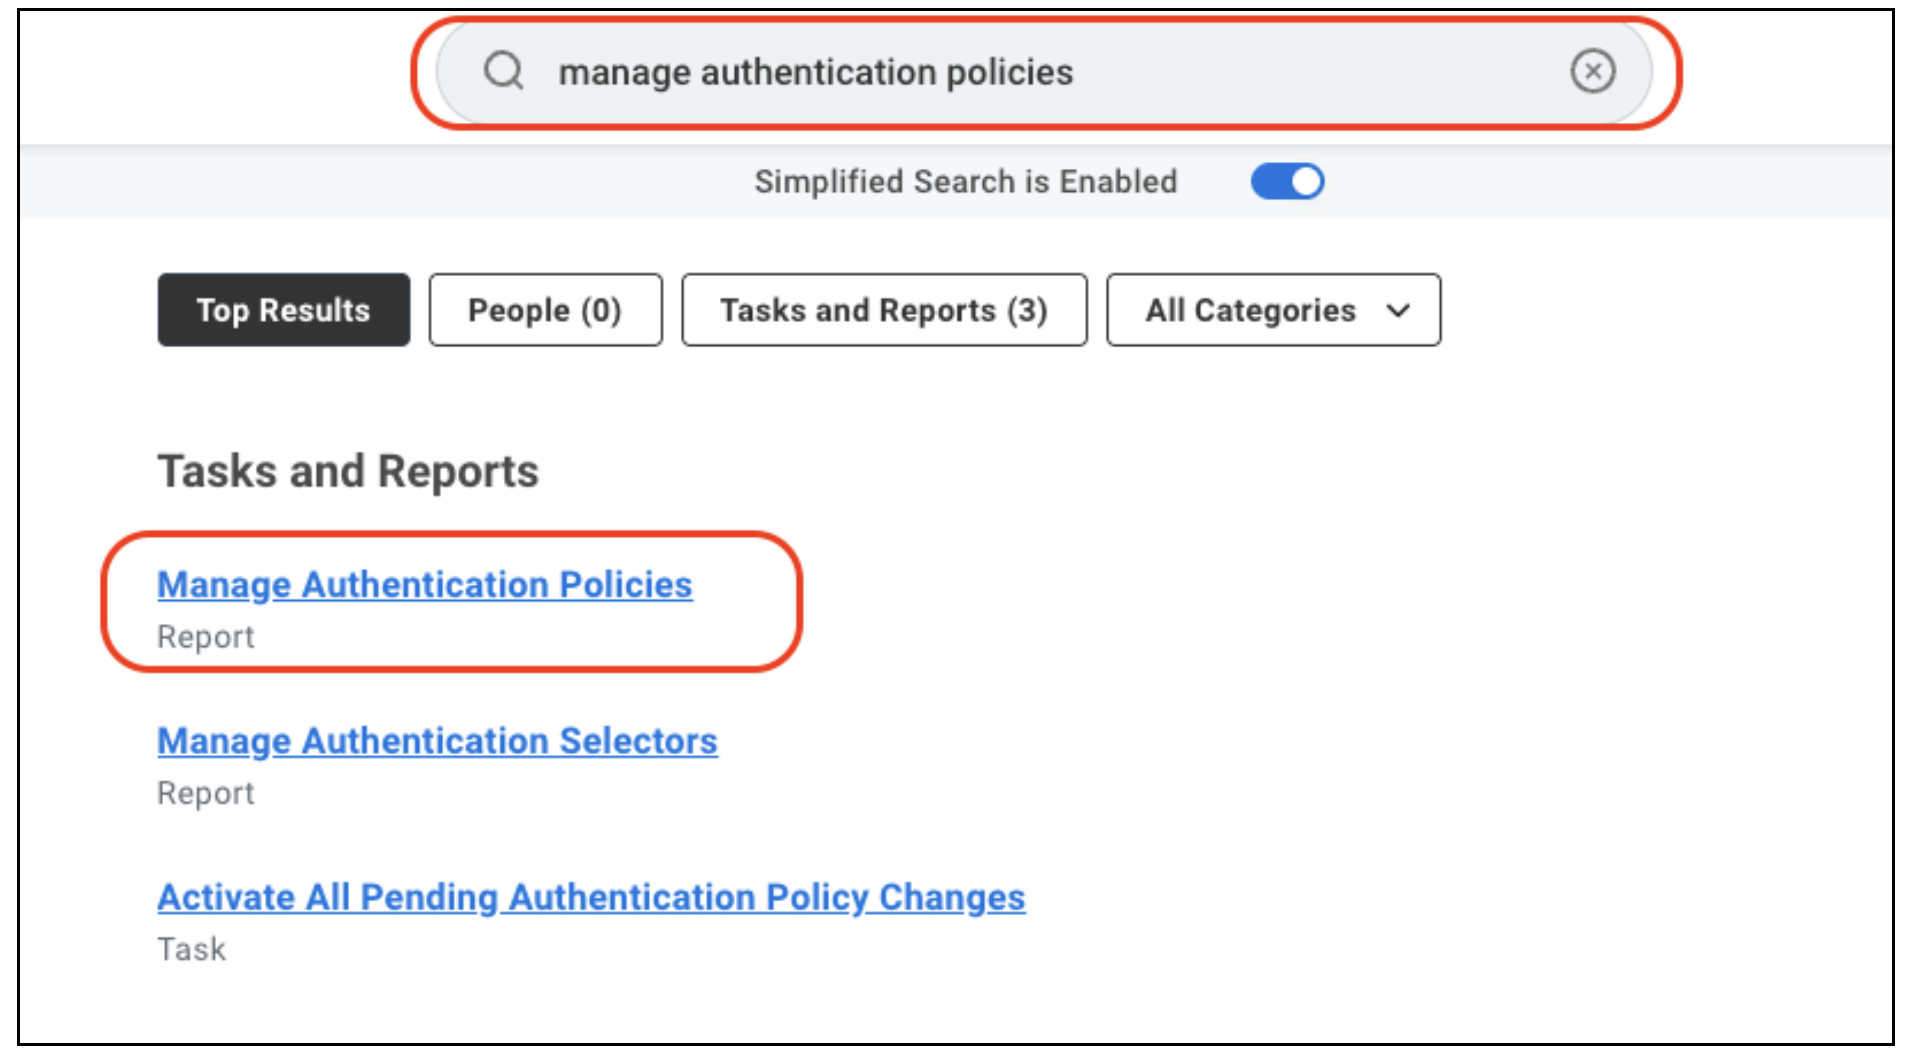
Add authentication rule for your Security group:
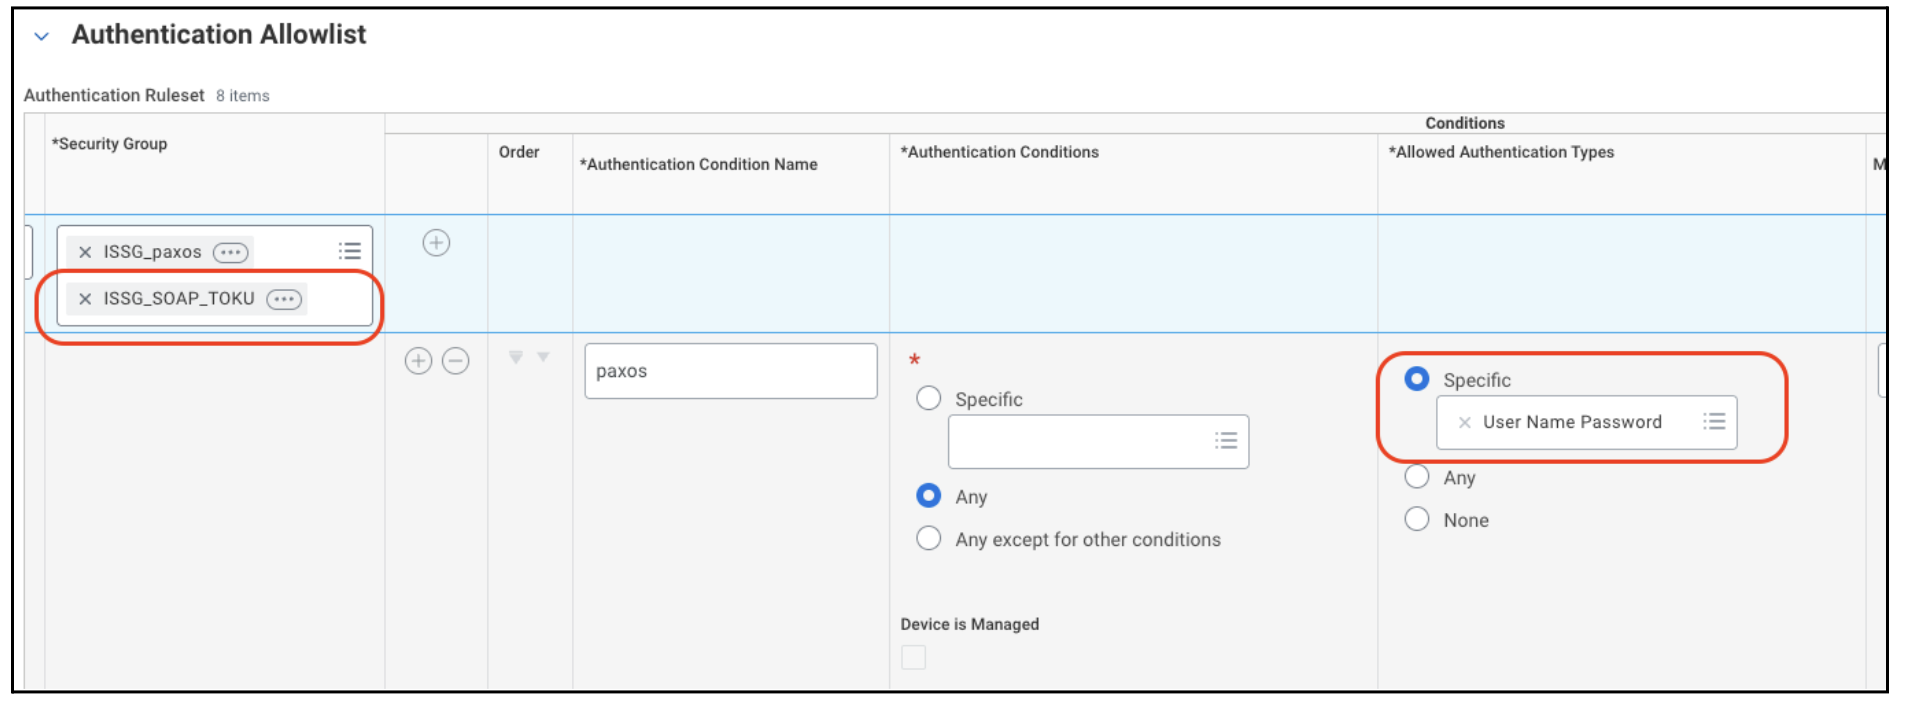
D) Add Import payroll input wsdl service to your integrated system user and click on “Save”
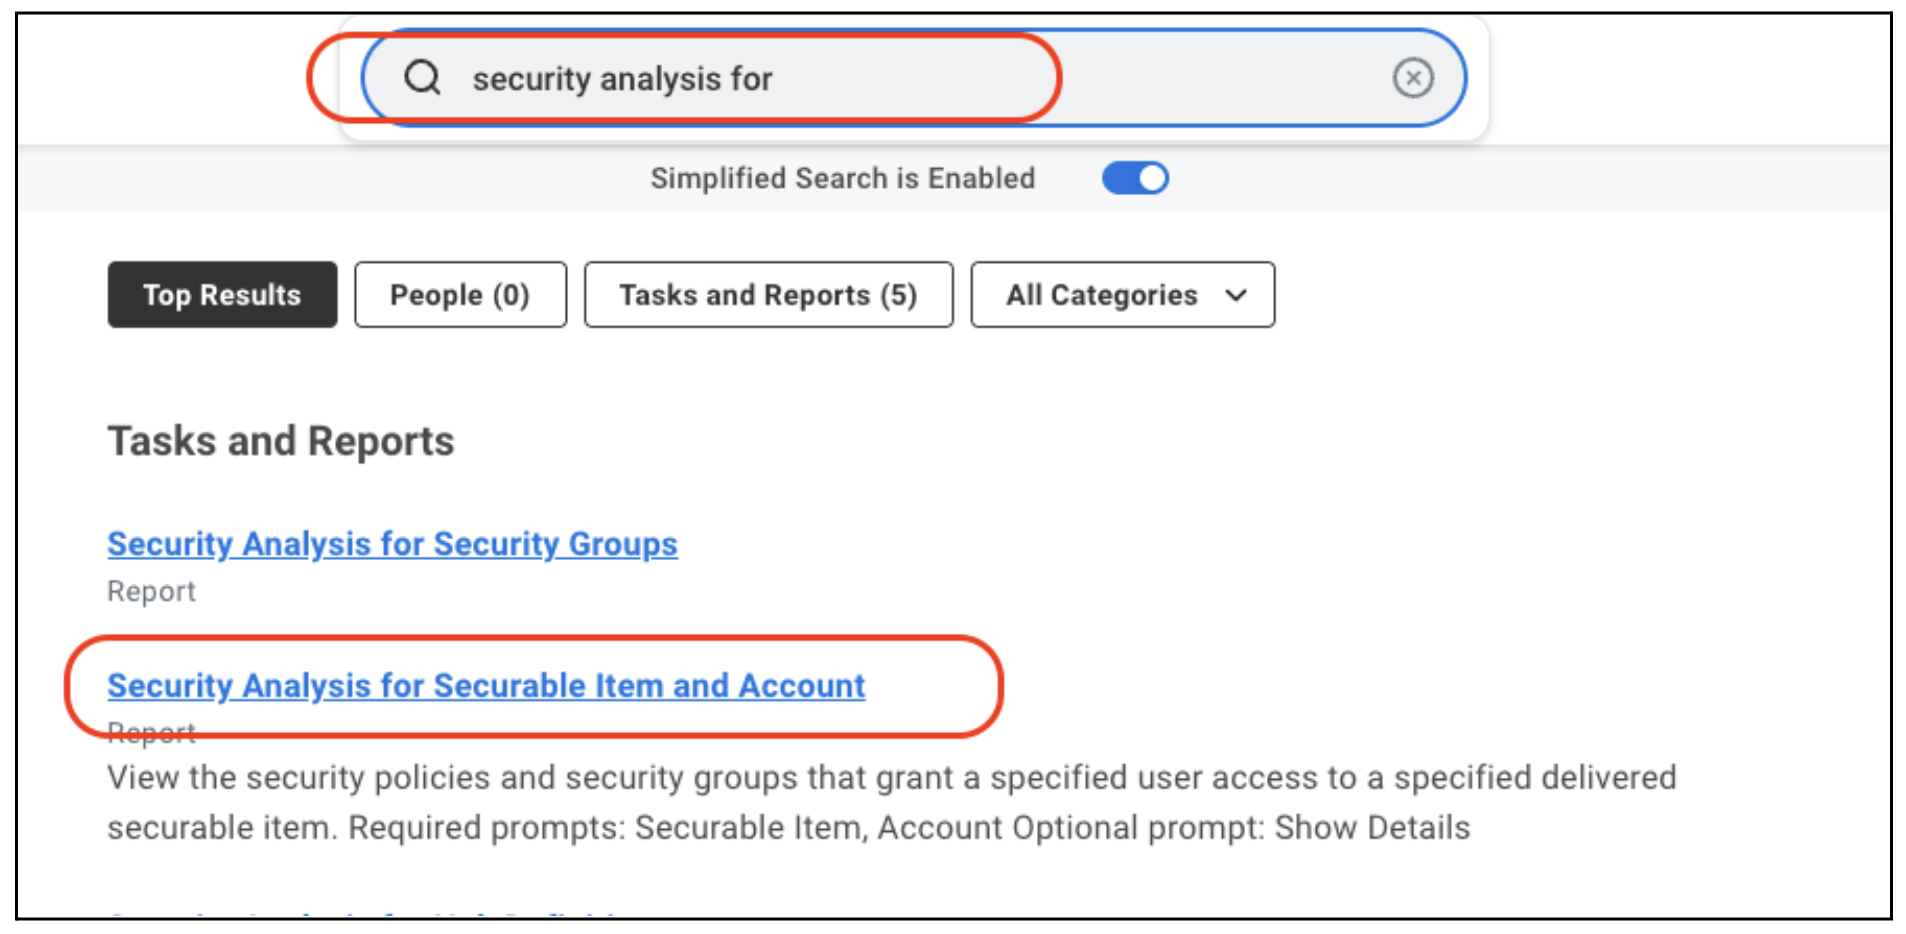
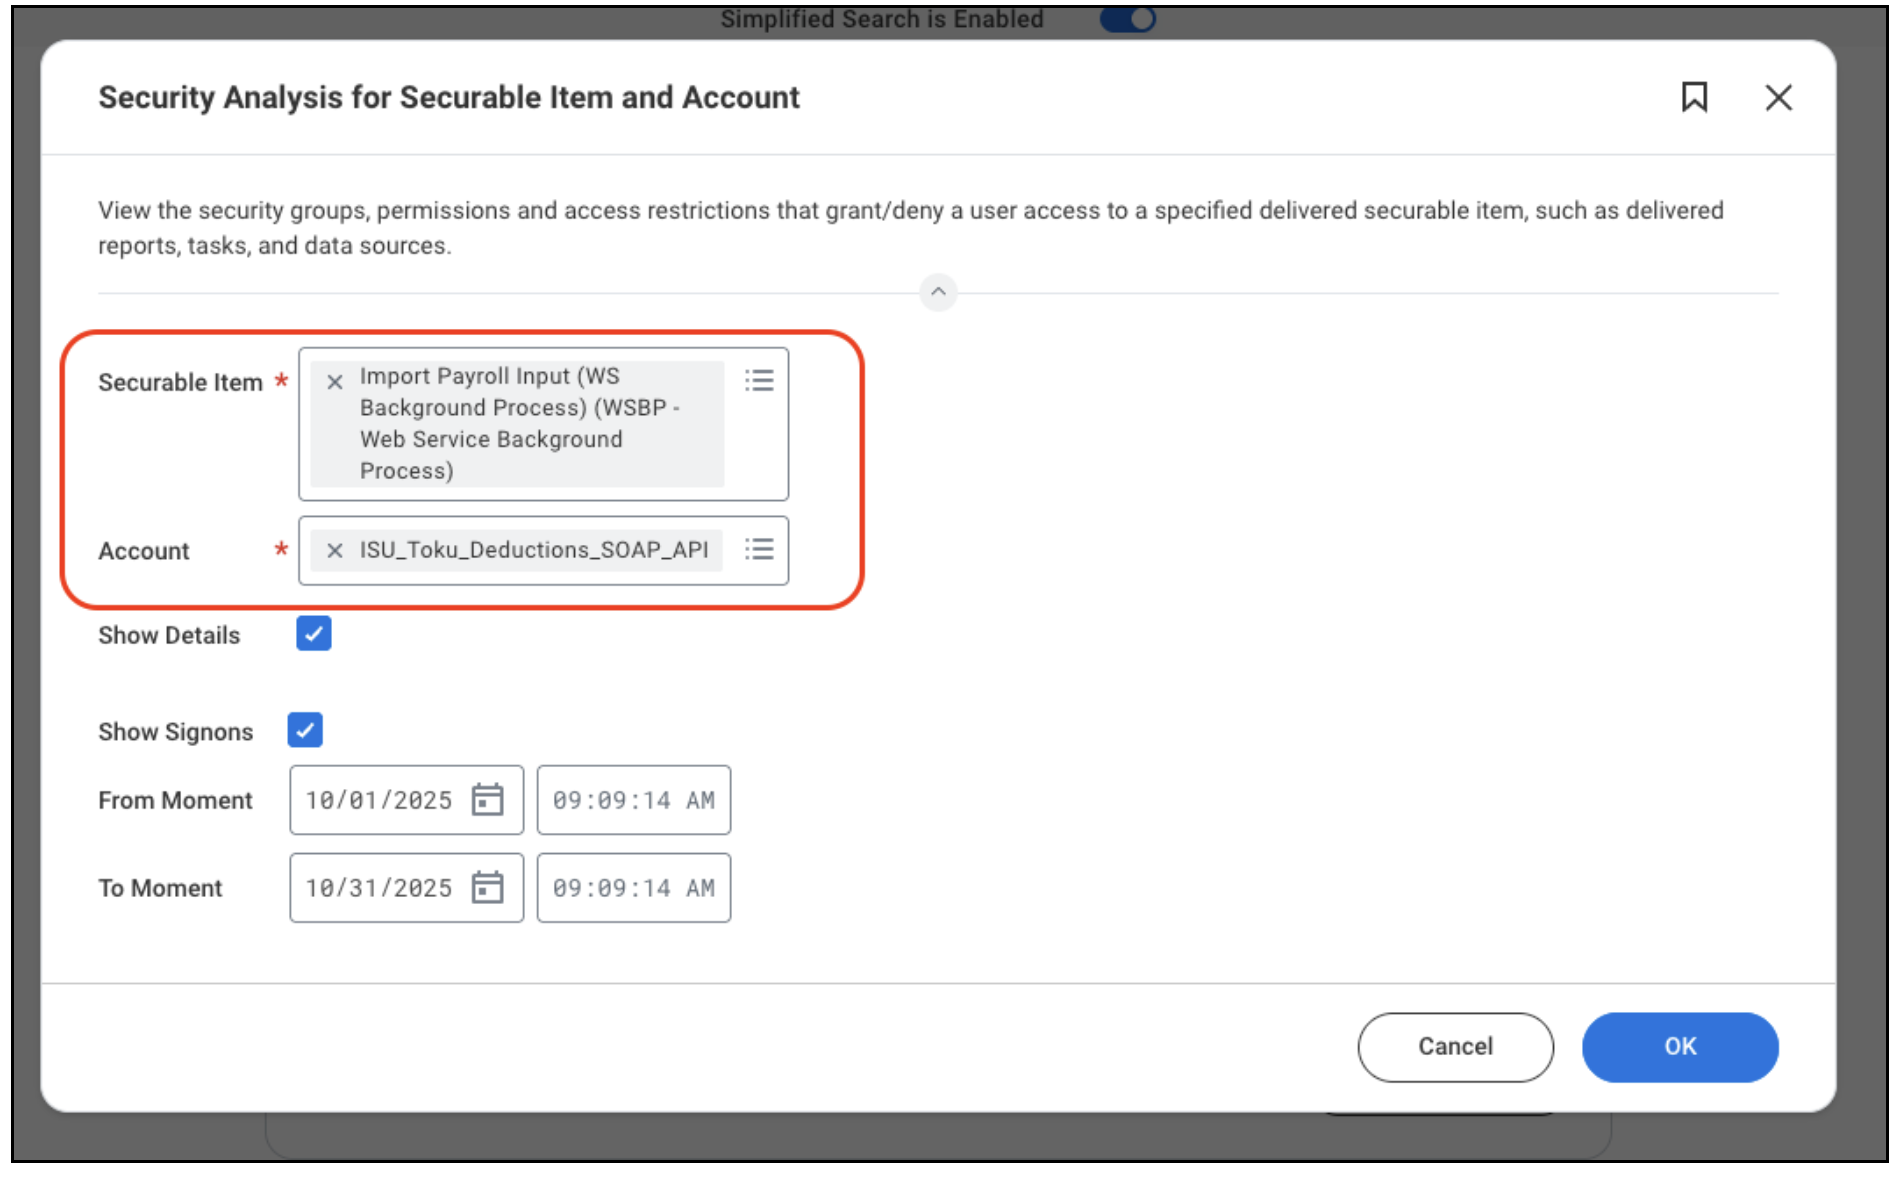
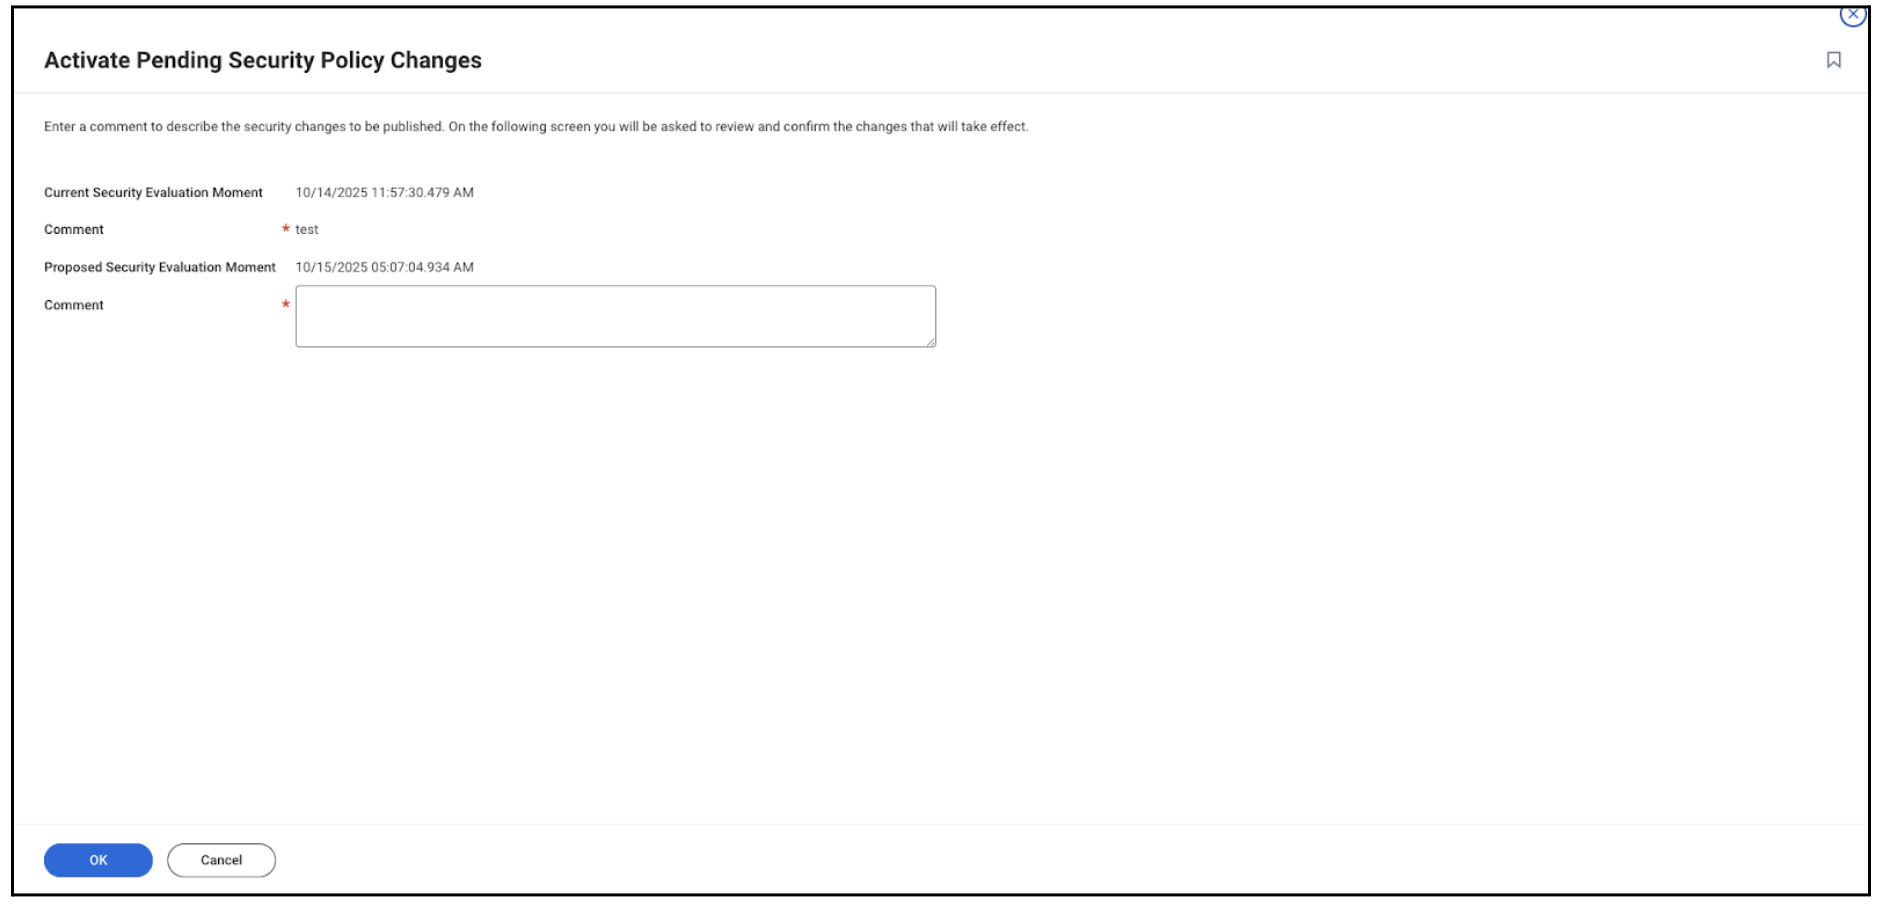
E) Activate all your policies
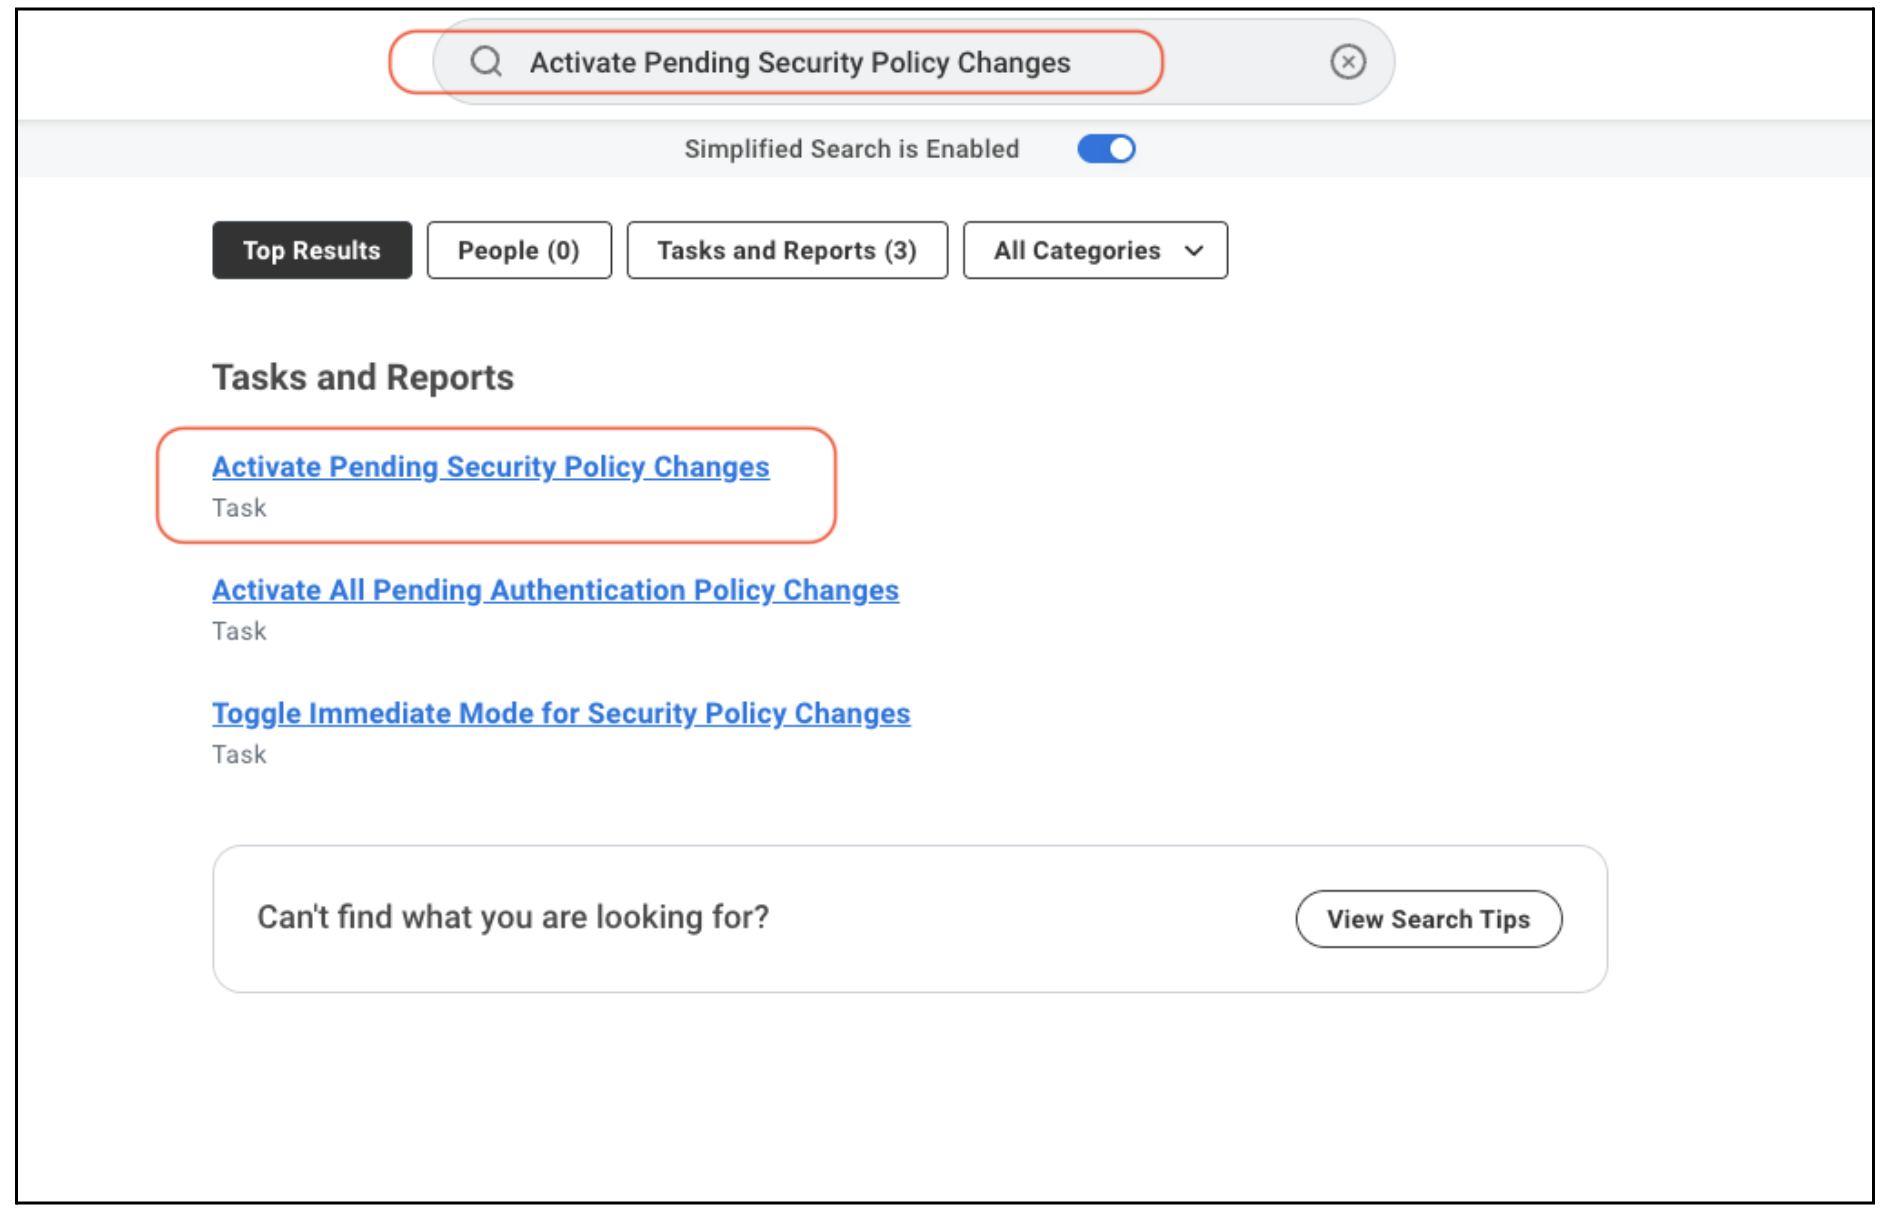
Add your comment and click on “OK”
Setup is done!
Create Payroll RAAS Report
Creating Custom Reports with RAAS enabled
Follow the steps below to create RAAS reports within Workday. This will enable you to push the required information needed to send in progress payrolls onto the platform.
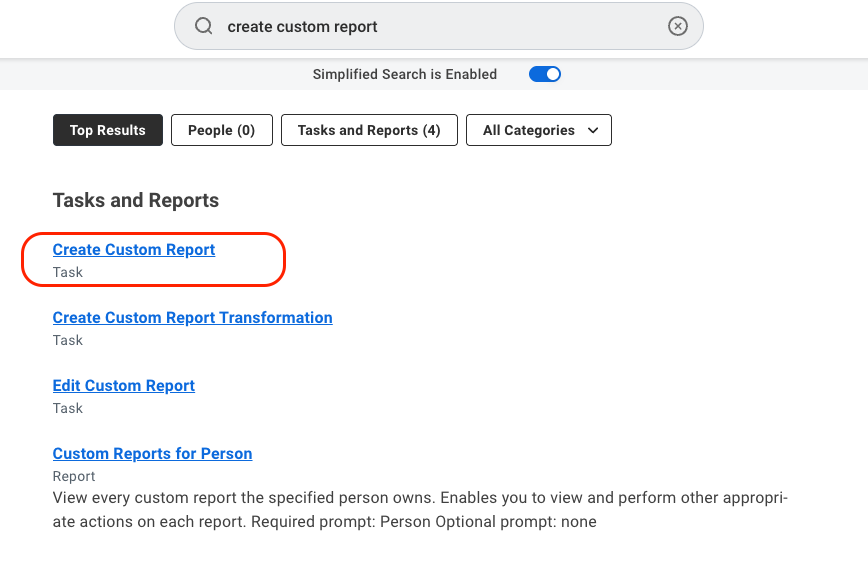
- Search for the “Create Custom Report” task and fill in the details as below. Ensure that the report type is “Advanced” and the “Enable as Web Service” is checked. Select the appropriate data source
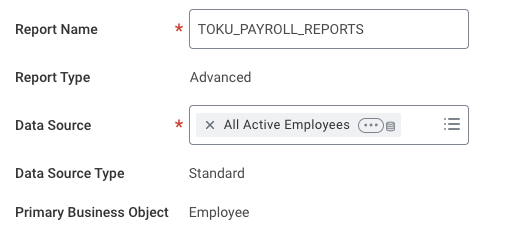
- Provide report name as: “TOKU_PAYROLL_REPORTS”
- You will be greeted with a screen (shared below) and now you can setup the fields in the custom report from the fields table
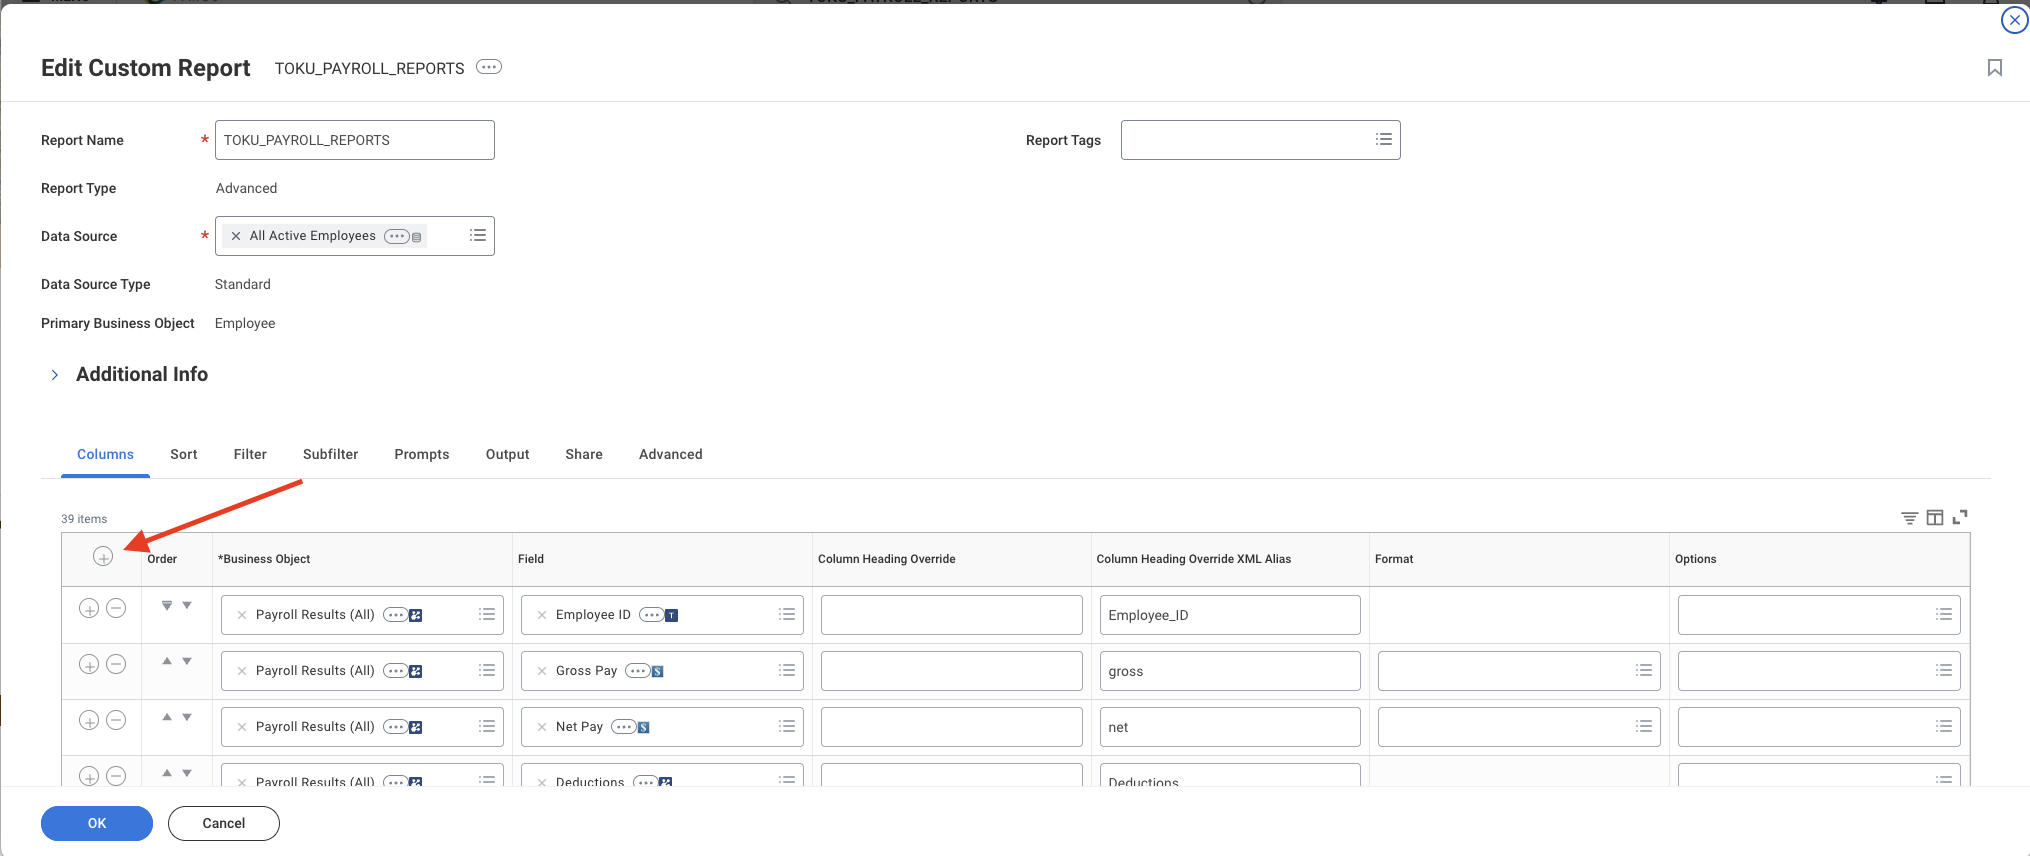
- Complete fields list 1. Field list needed
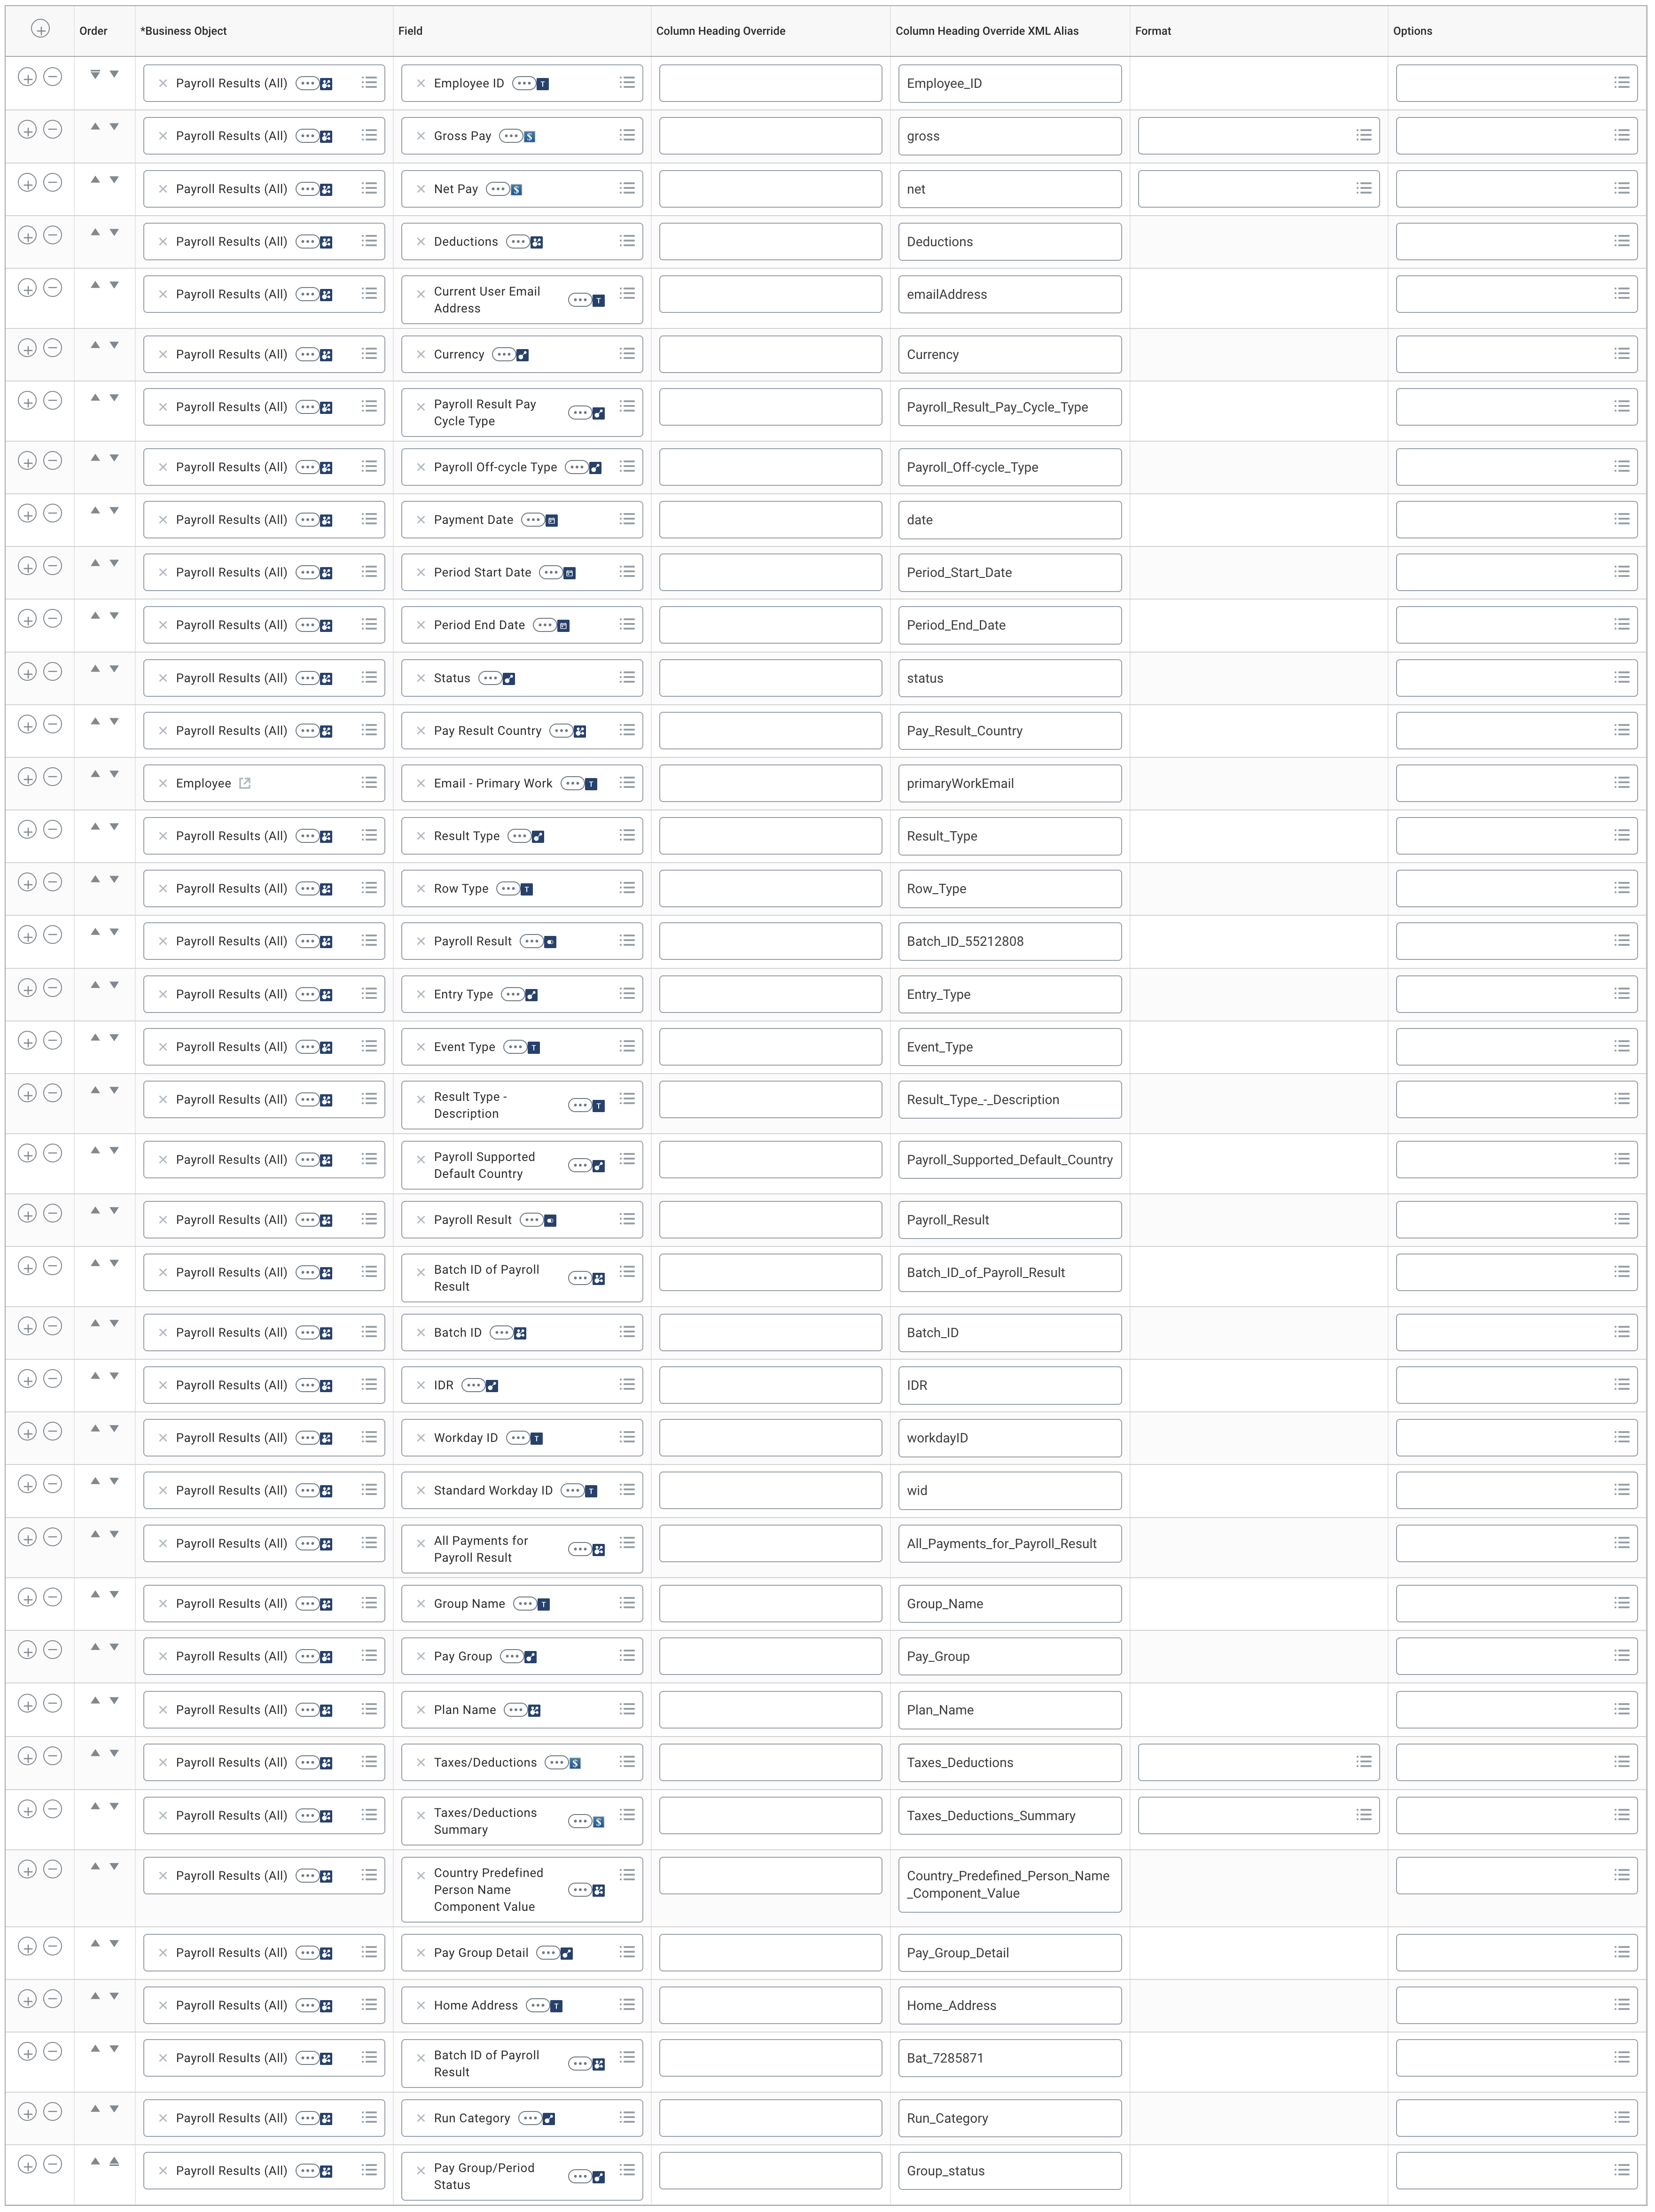
1. Table of fields needed. Required fields are marked with a *.
| Field | Column Heading Override (XML Alias) |
|---|---|
| Employee ID | Employee_ID |
| Gross Pay | gross |
| Net Pay | net |
| Deductions | Deductions |
| Current User Email Address | emailAddress |
| Currency | Currency |
| Payroll Result Pay Cycle Type | Payroll_Result_Pay_Cycle_Type |
| Payroll Off-cycle Type | Payroll_Off-cycle_Type |
| Payment Date | date |
| Period Start Date | Period_Start_Date |
| Period End Date | Period_End_Date |
| Status | status |
| Pay Result Country | Pay_Result_Country |
| Email - Primary Work | primaryWorkEmail |
| Result Type | Result_Type |
| Row Type | Row_Type |
| Payroll Result | Batch_ID_55212808 |
| Entry Type | Entry_Type |
| Event Type | Event_Type |
| Result Type - Description | Result_Type_-_Description |
| Payroll Supported Default Country | Payroll_Supported_Default_Country |
| Payroll Result | Payroll_Result |
| Batch ID of Payroll Result | Batch_ID_of_Payroll_Result |
| Batch ID | Batch_ID |
| IDR | IDR |
| Workday ID | workdayID |
| Standard Workday ID | wid |
| All Payments for Payroll Result | All_Payments_for_Payroll_Result |
| Group Name | Group_Name |
| Pay Group | Pay_Group |
| Plan Name | Plan_Name |
| Taxes/Deductions | Taxes_Deductions |
| Taxes/Deductions Summary | Taxes_Deductions_Summary |
| Country Predefined Person Name Component Value | Country_Predefined_Person_Name_Component_Value |
| Pay Group Detail | Pay_Group_Detail |
| Home Address | Home_Address |
| Batch ID of Payroll Result | Bat_7285871 |
| Run Category | Run_Category |
| Pay Group/Period Status | Group_status |
- Click on “OK”, once all the fields are added
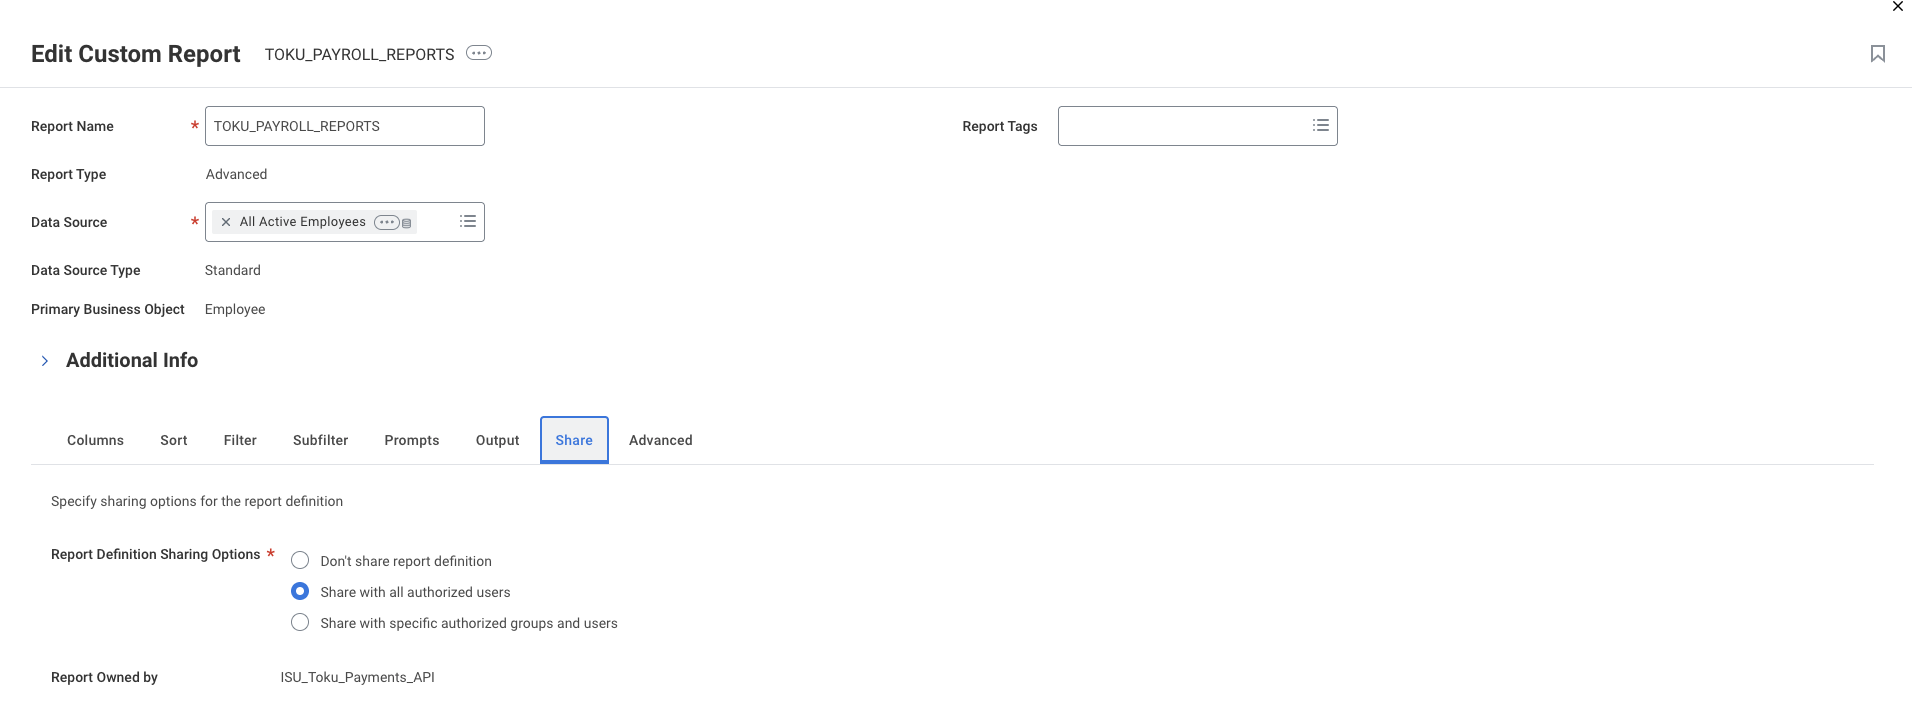
- Add your integrated system user to the Authorized Users of the Share section (For eg. if your integrated system user is ISU_TOKU_PAYMENTS_API)
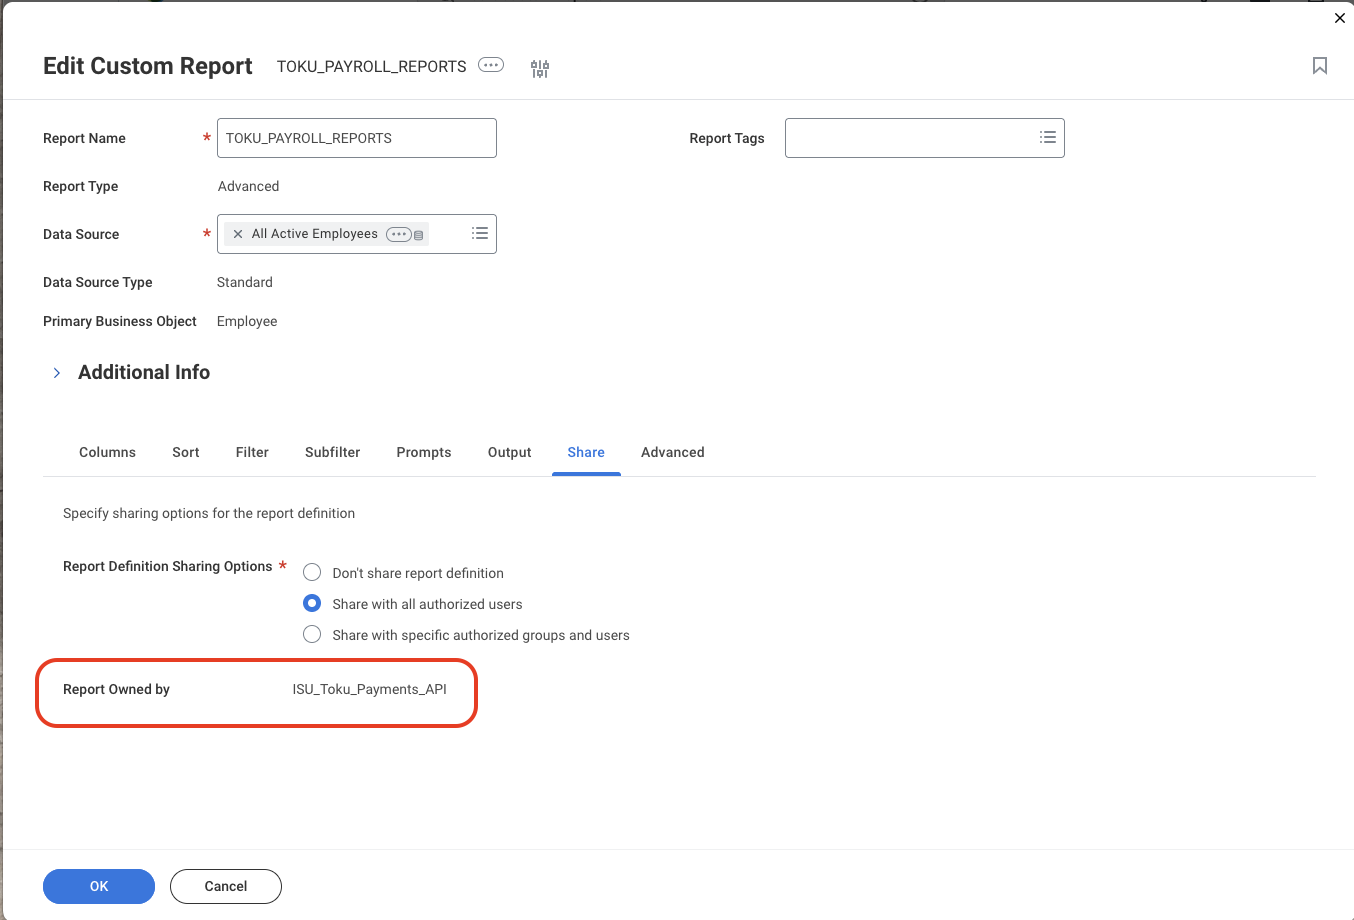
- Your custom report is ready!
One-Time Set Up
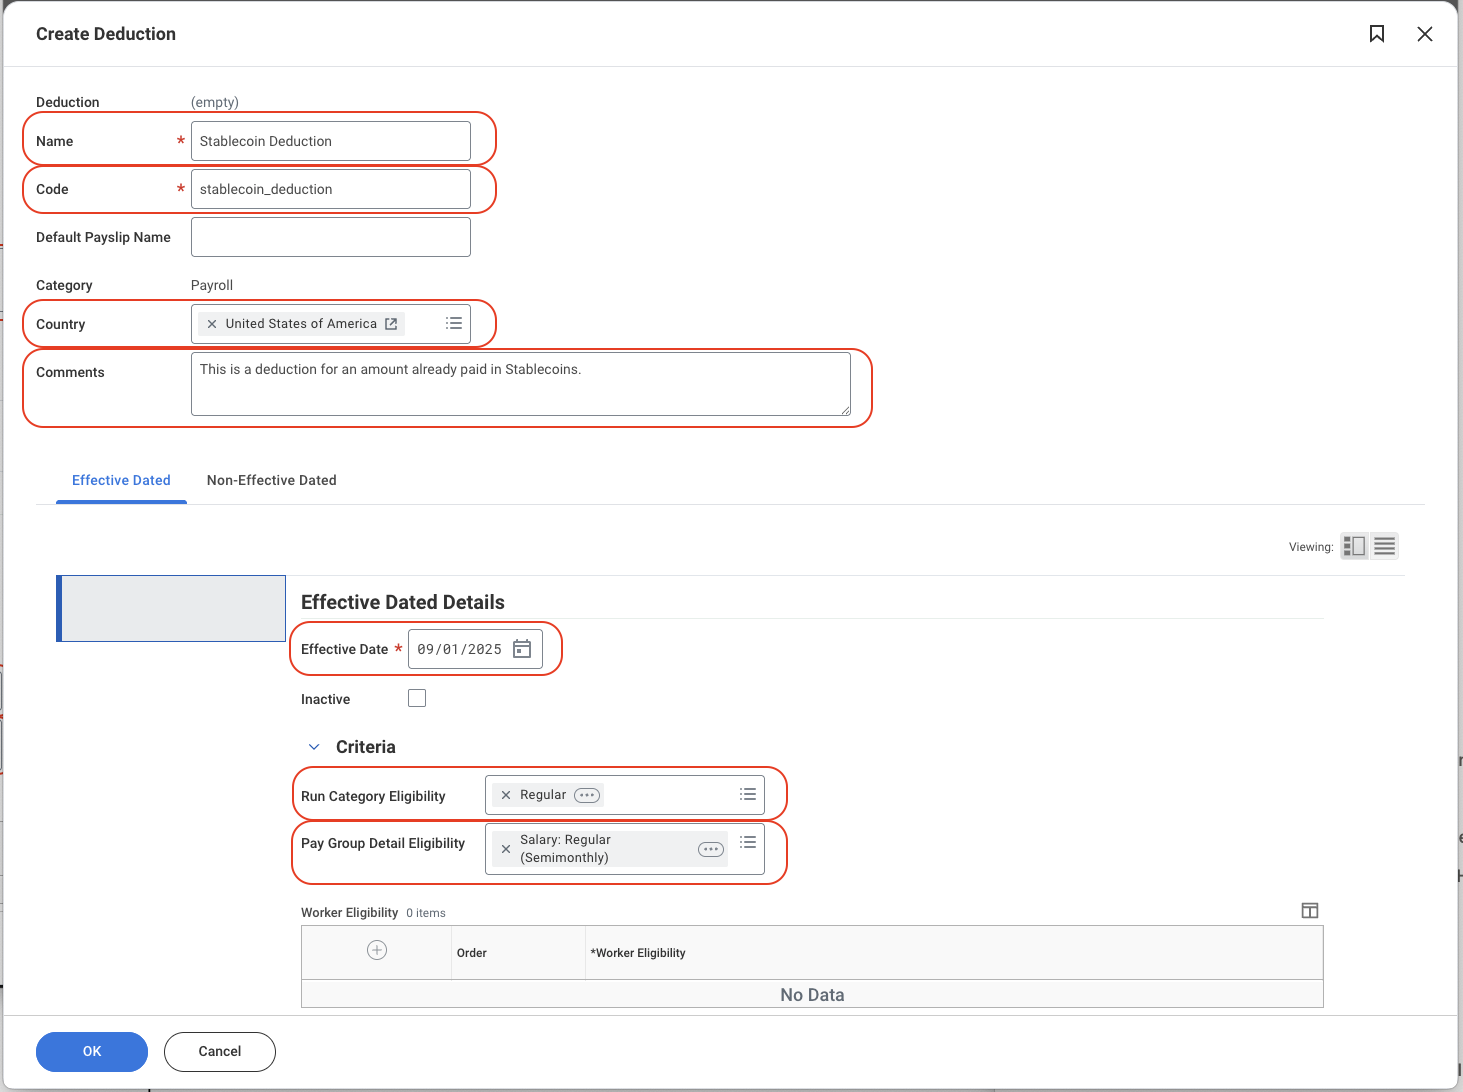
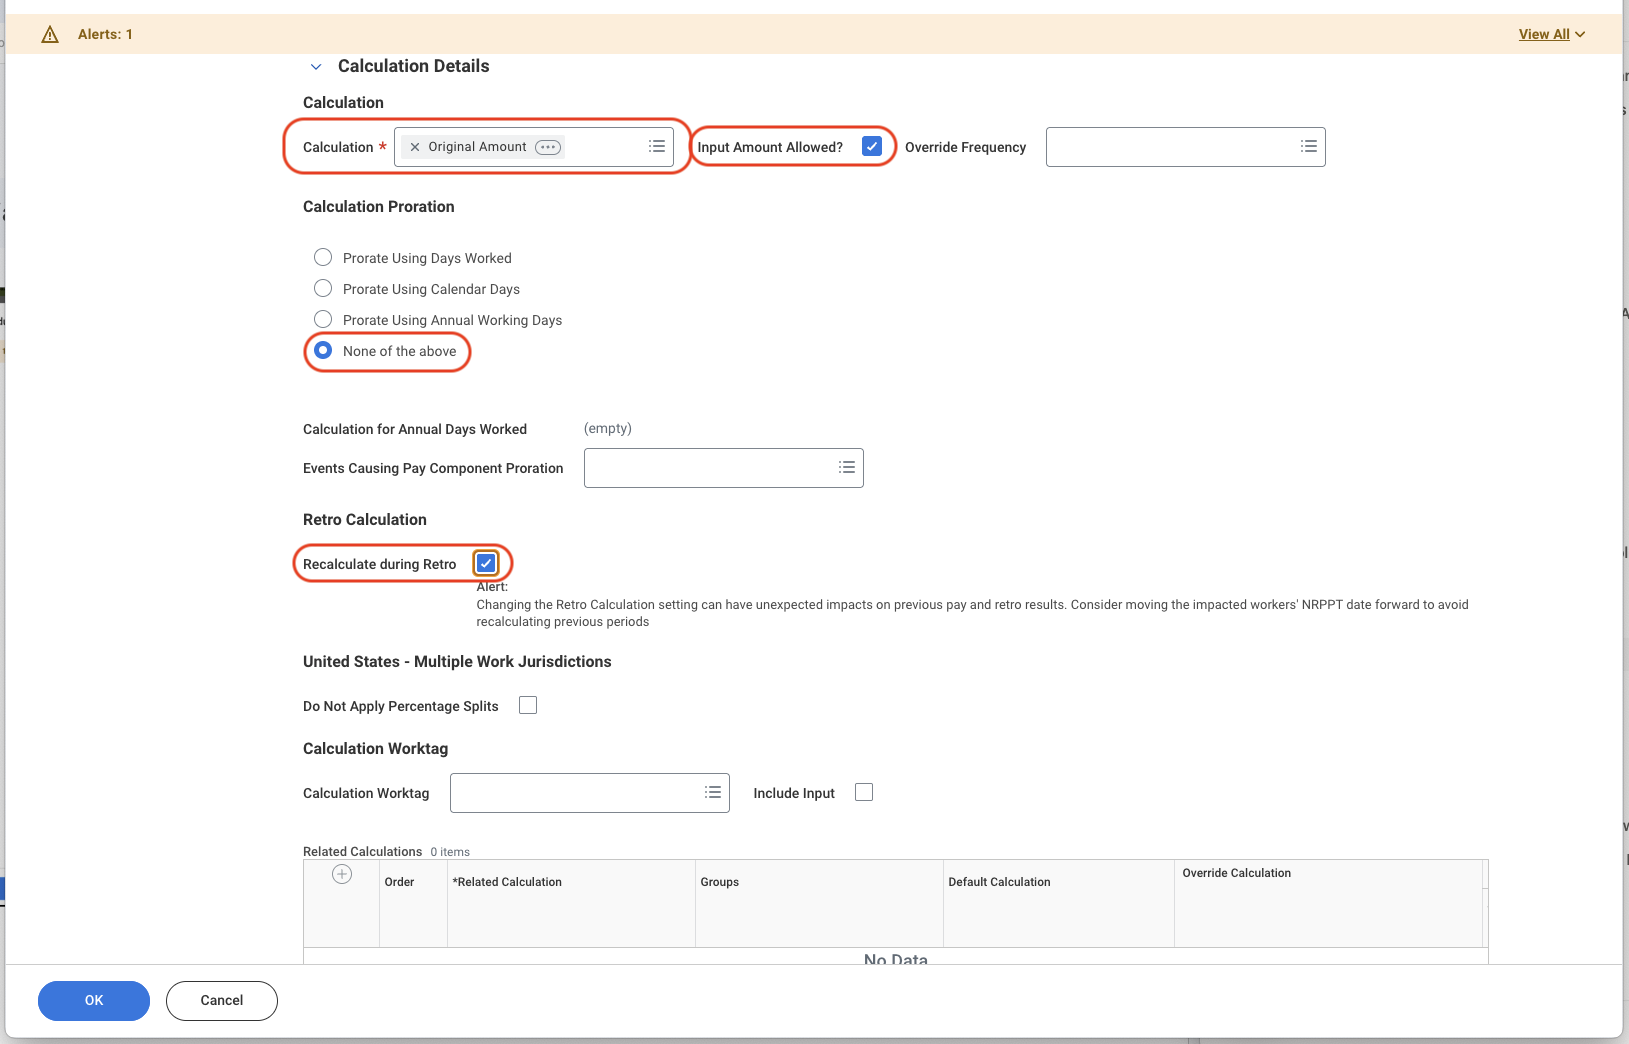
These steps are required to ensure the Stablecoin Deduction is properly configured in Workday and to have a manual way to post deductions as a failsafe.
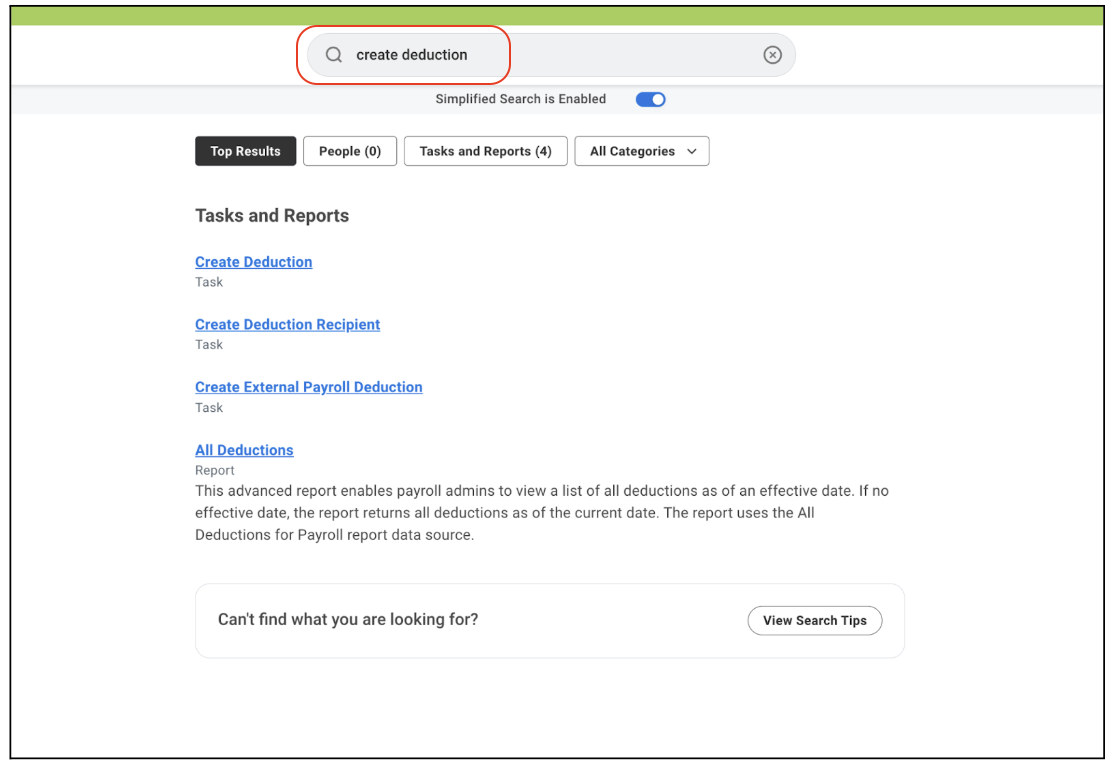
How to create a Stablecoin Deduction
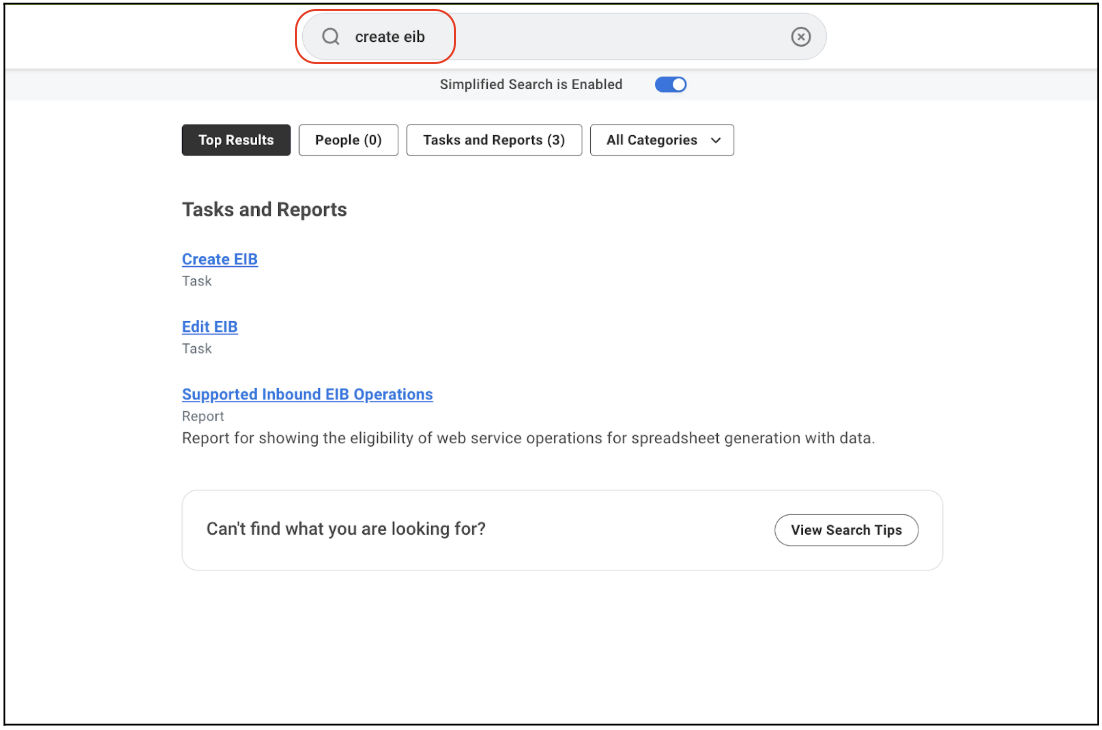
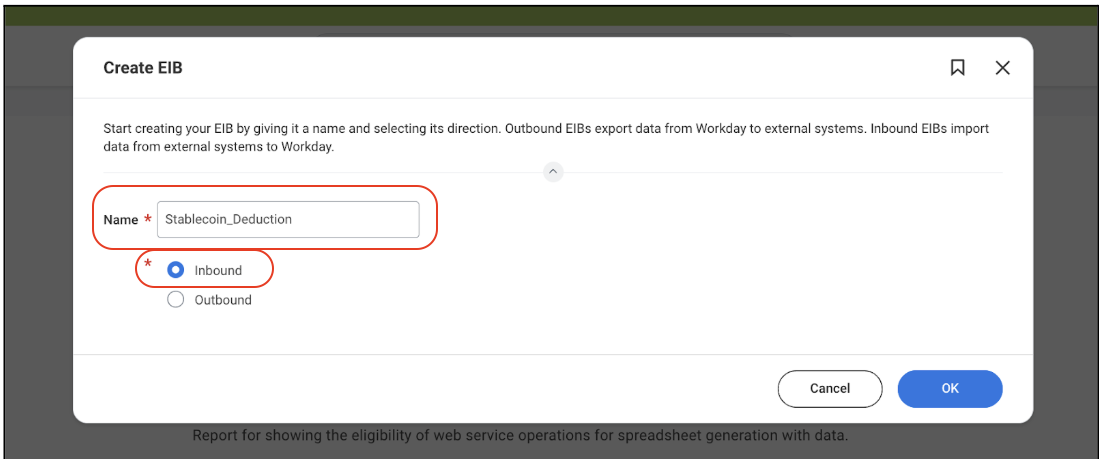
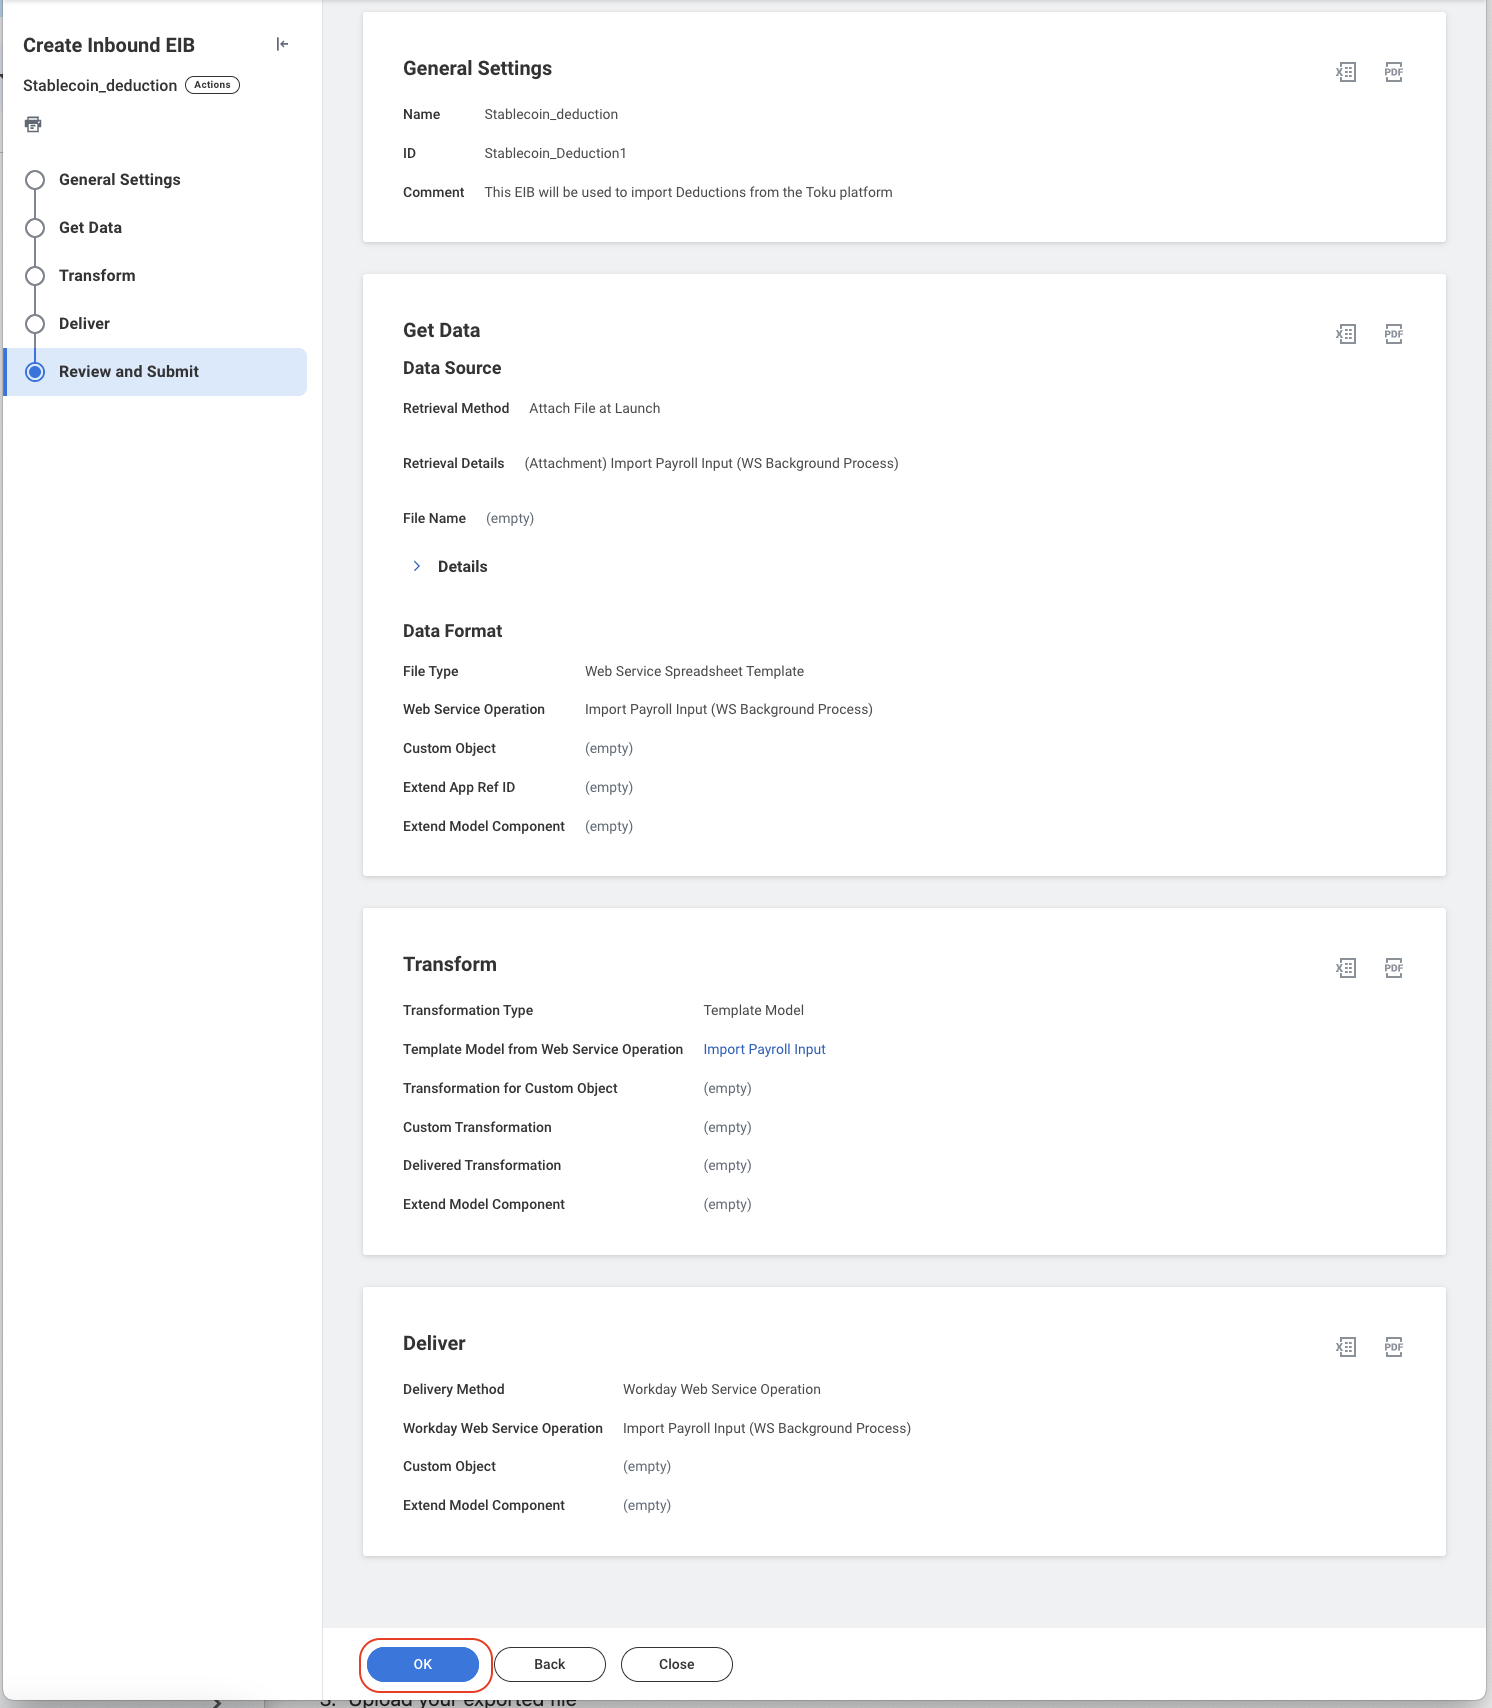
How to create an EIB to import deductions manually
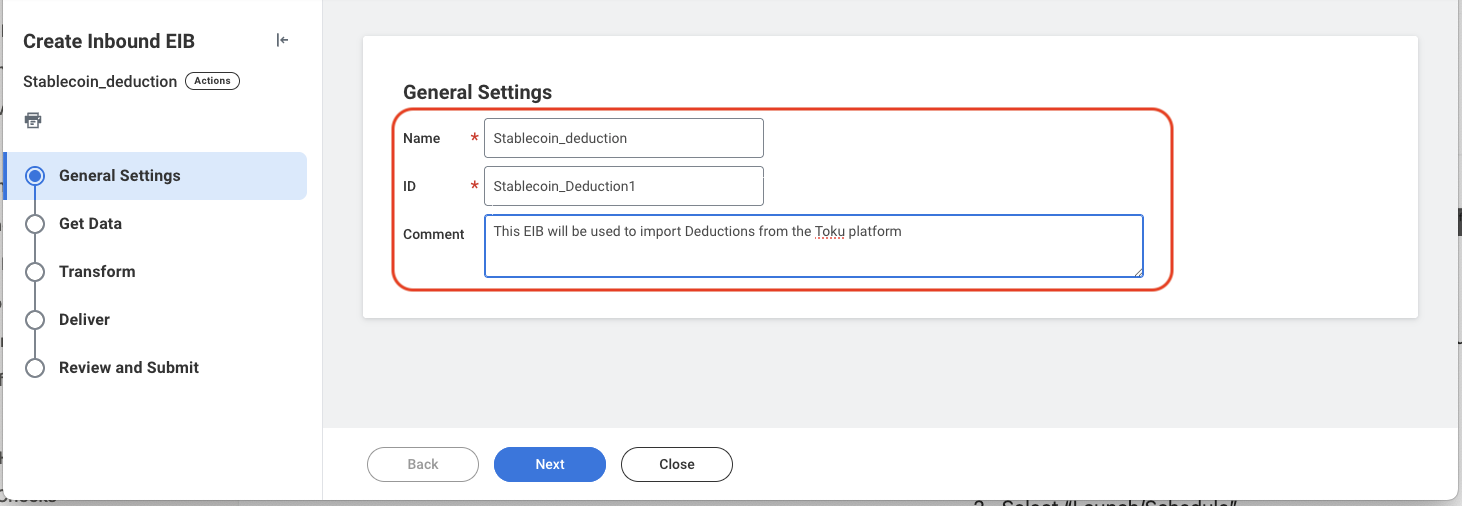
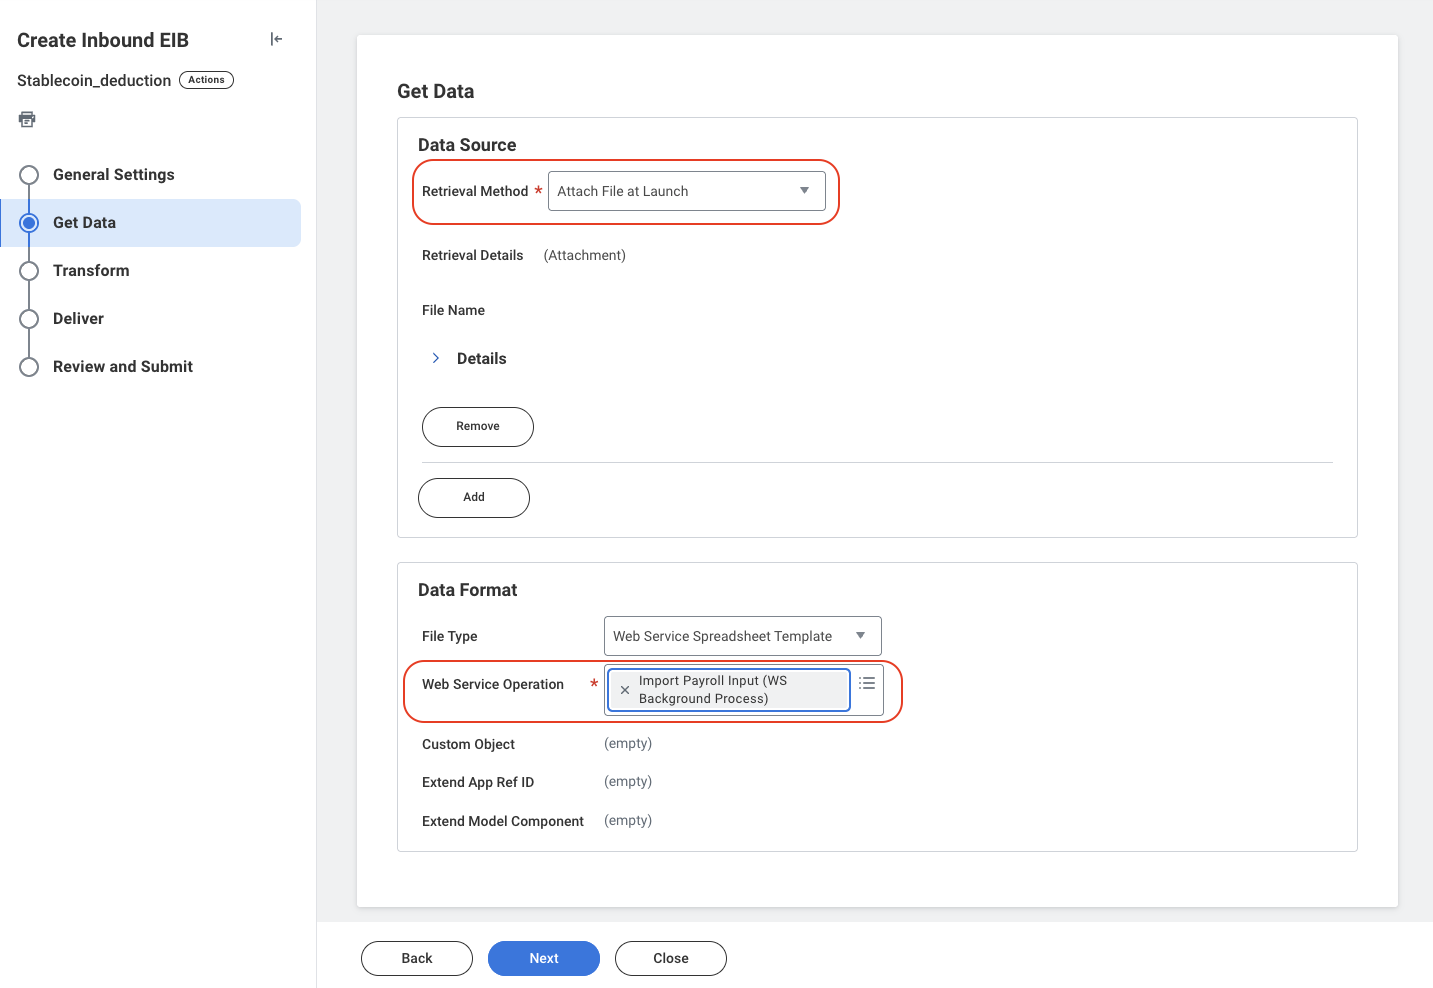
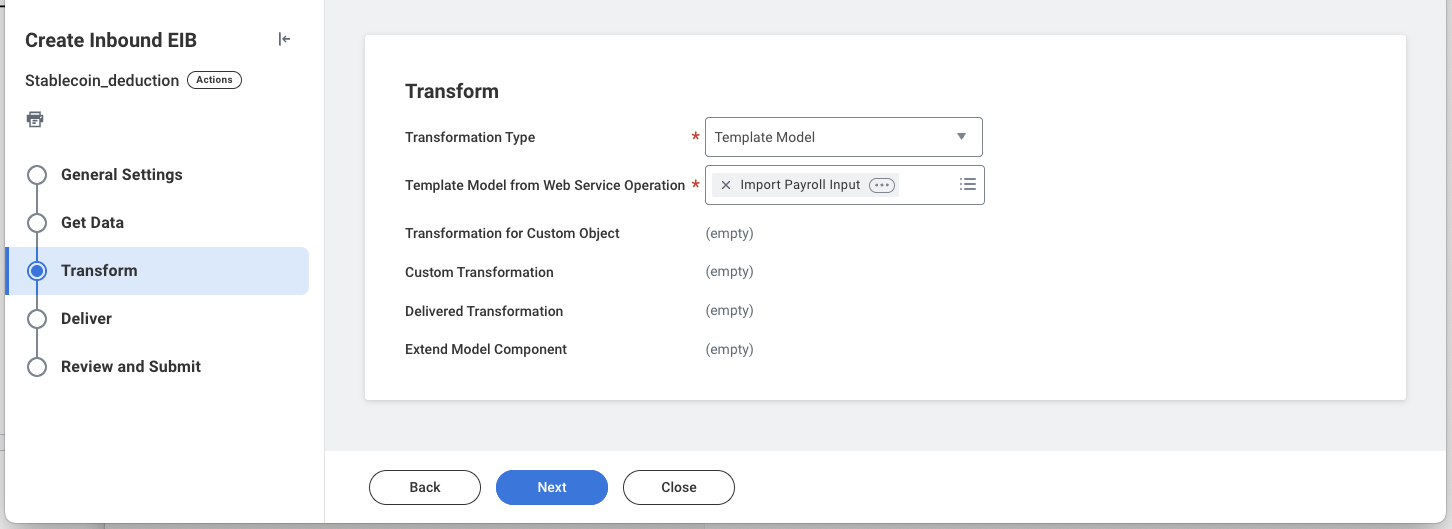
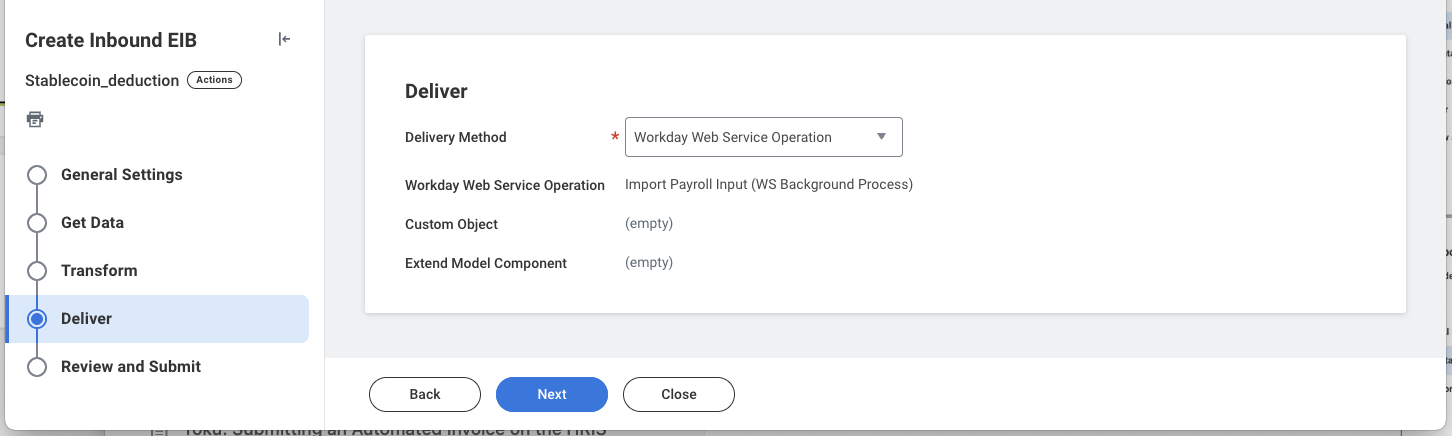
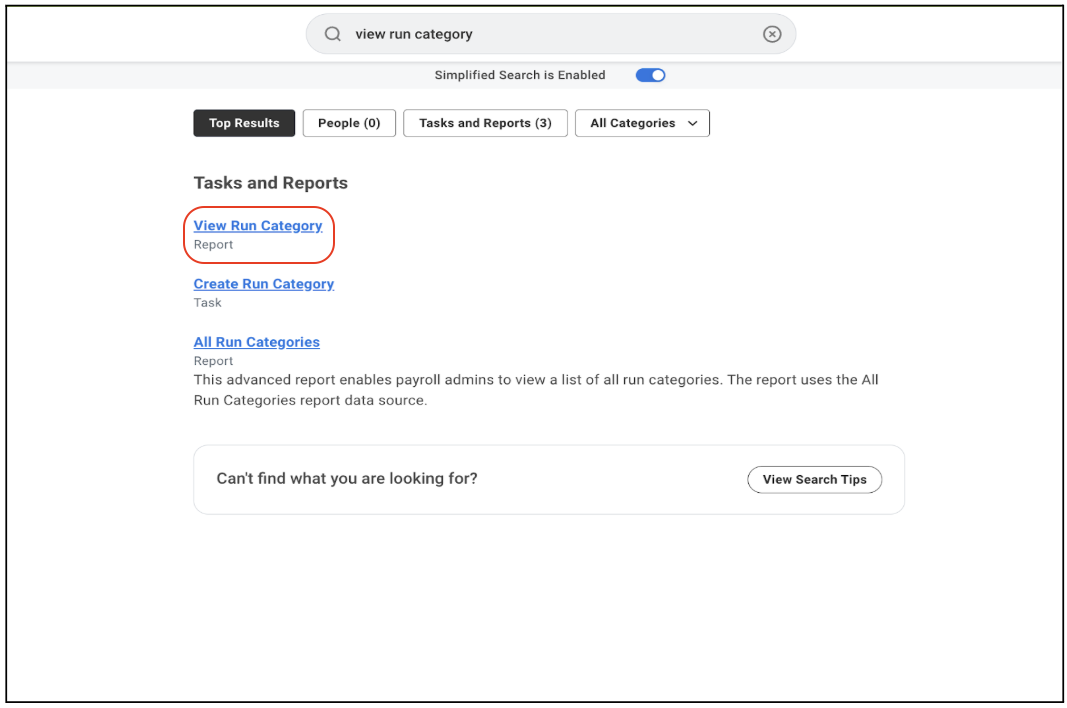
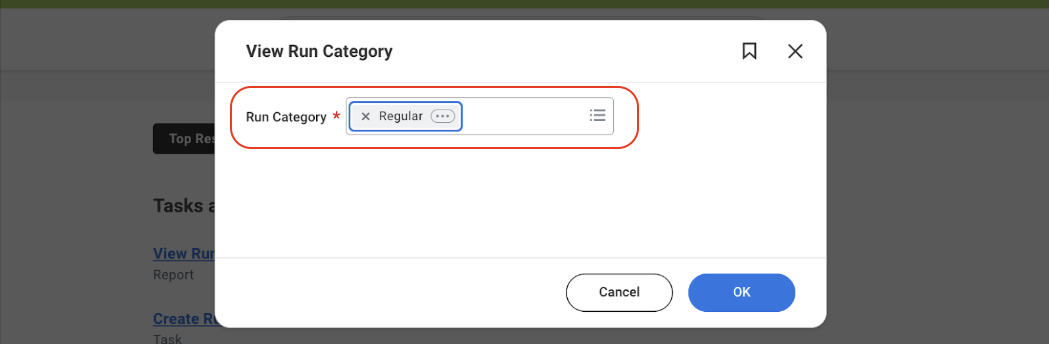
How to add your deduction to a run category
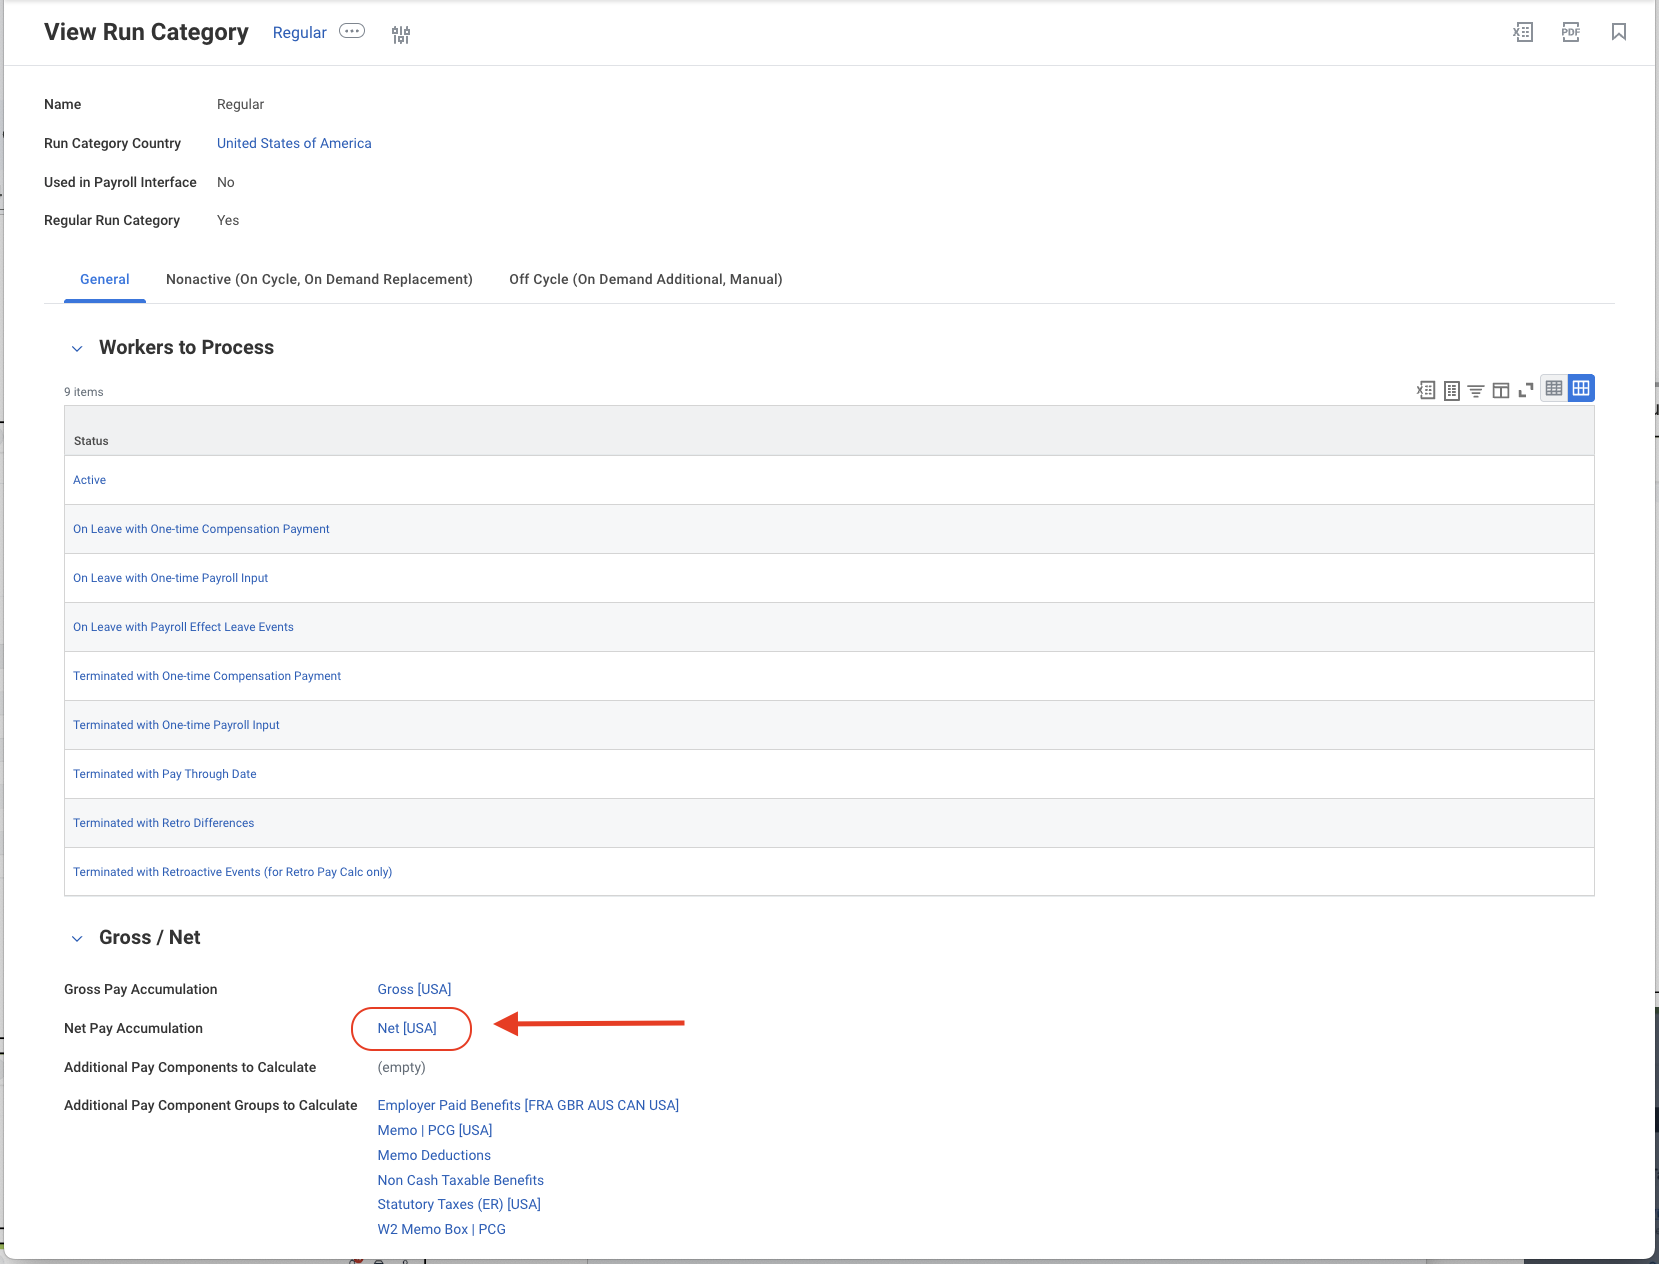
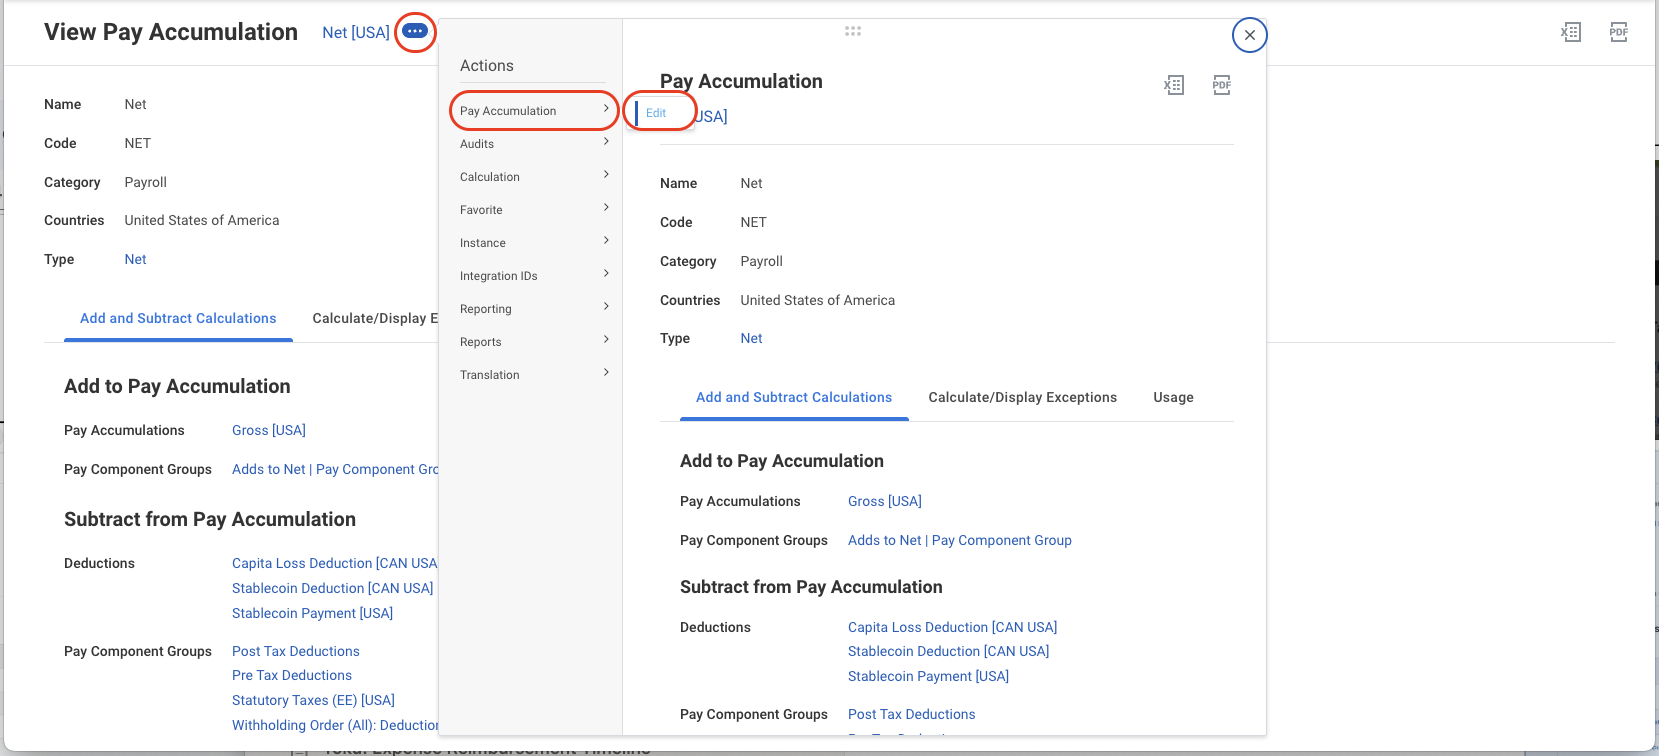
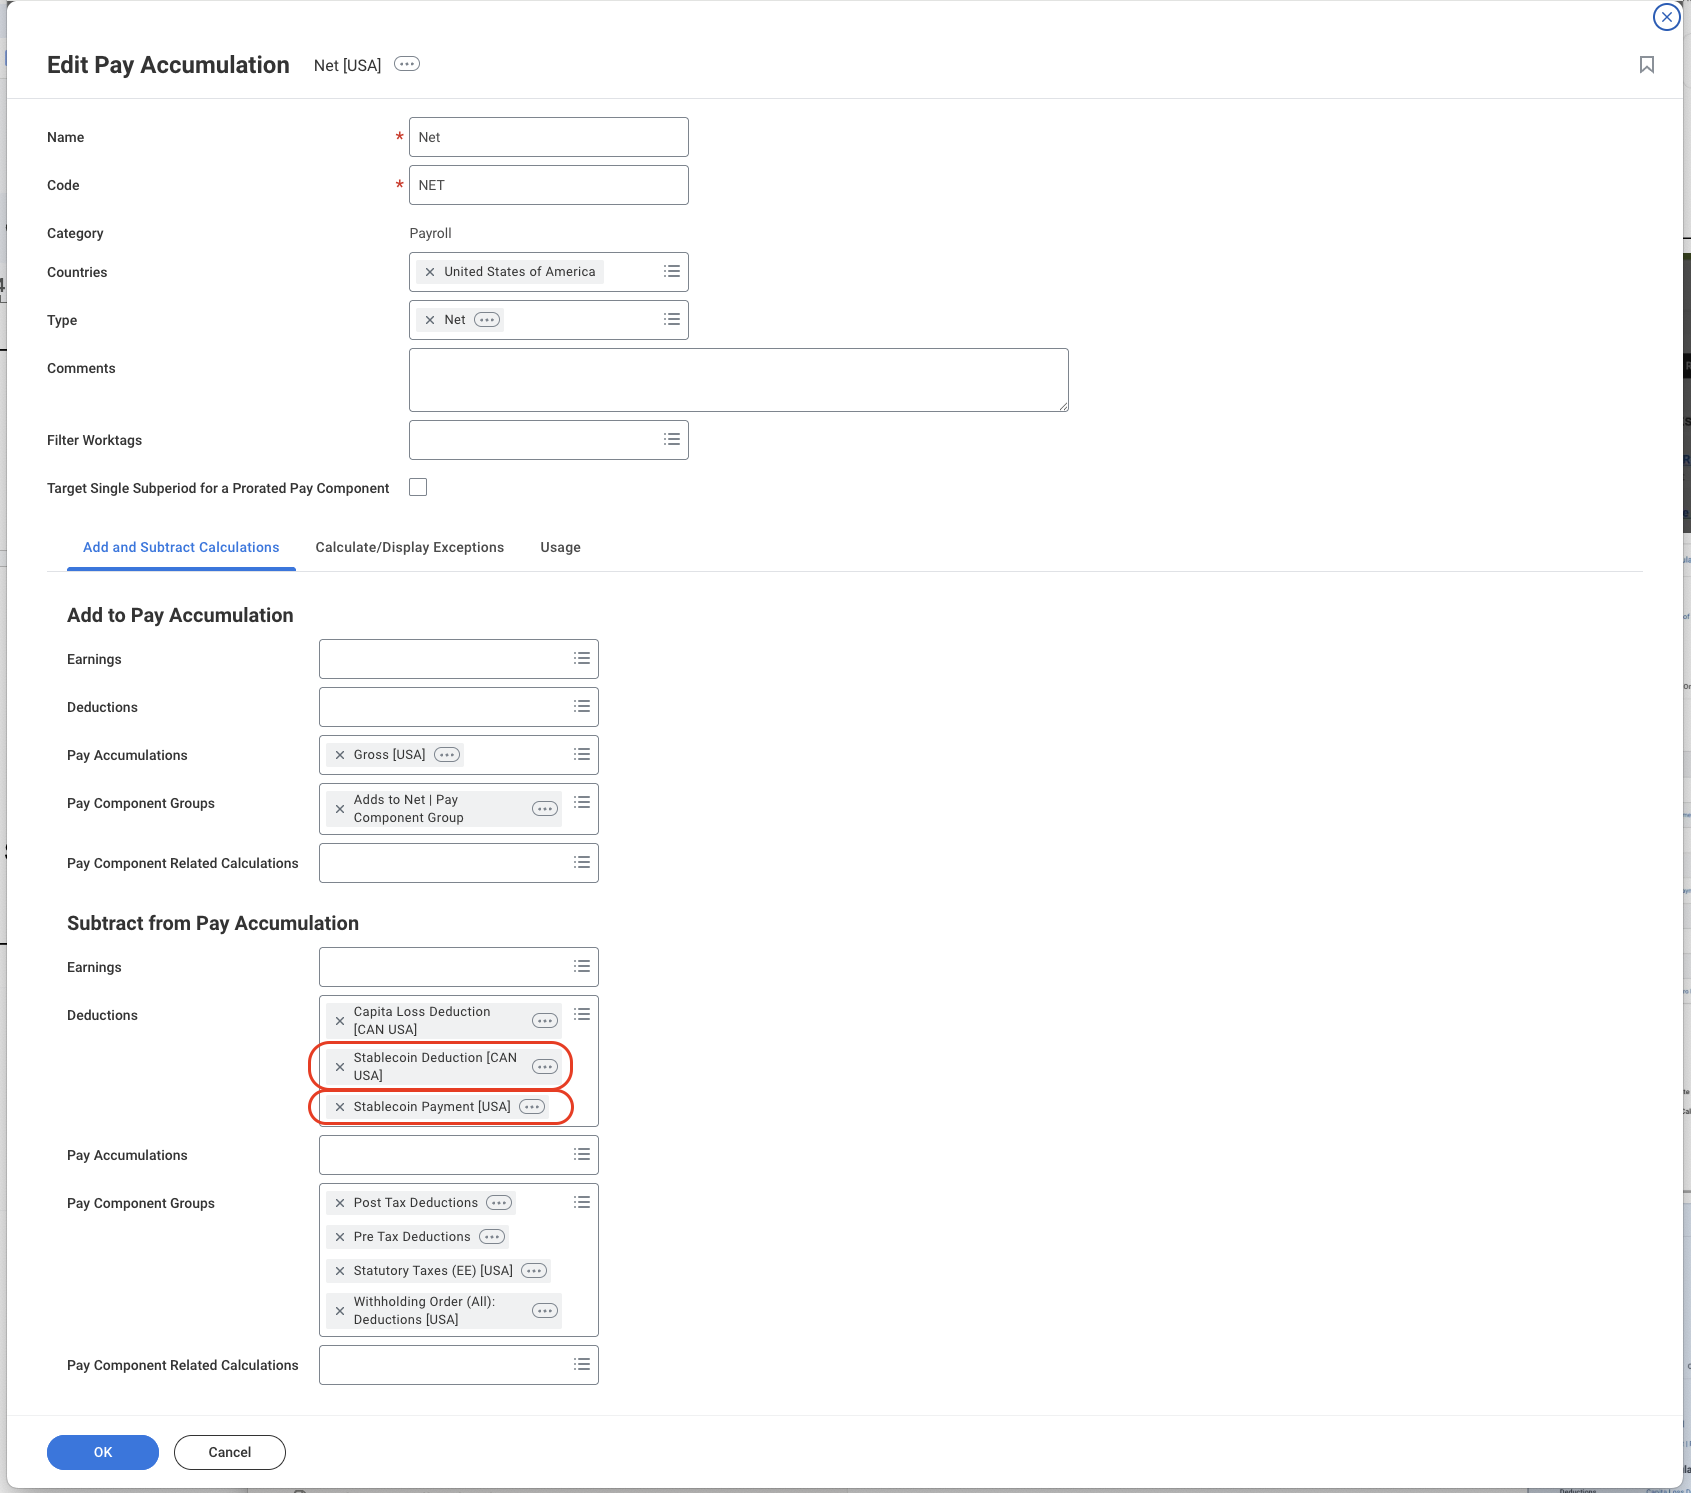
Note: Add your deduction codes to the “Deductions” under Subtract from pay accumulation section
Reoccurring Payroll Process (No SOAP API setup)
These EIB steps are only needed when manually posting deductions. Running payroll calculation is required for both manually posting and automatic posting of deductions.
Export Your Deductions
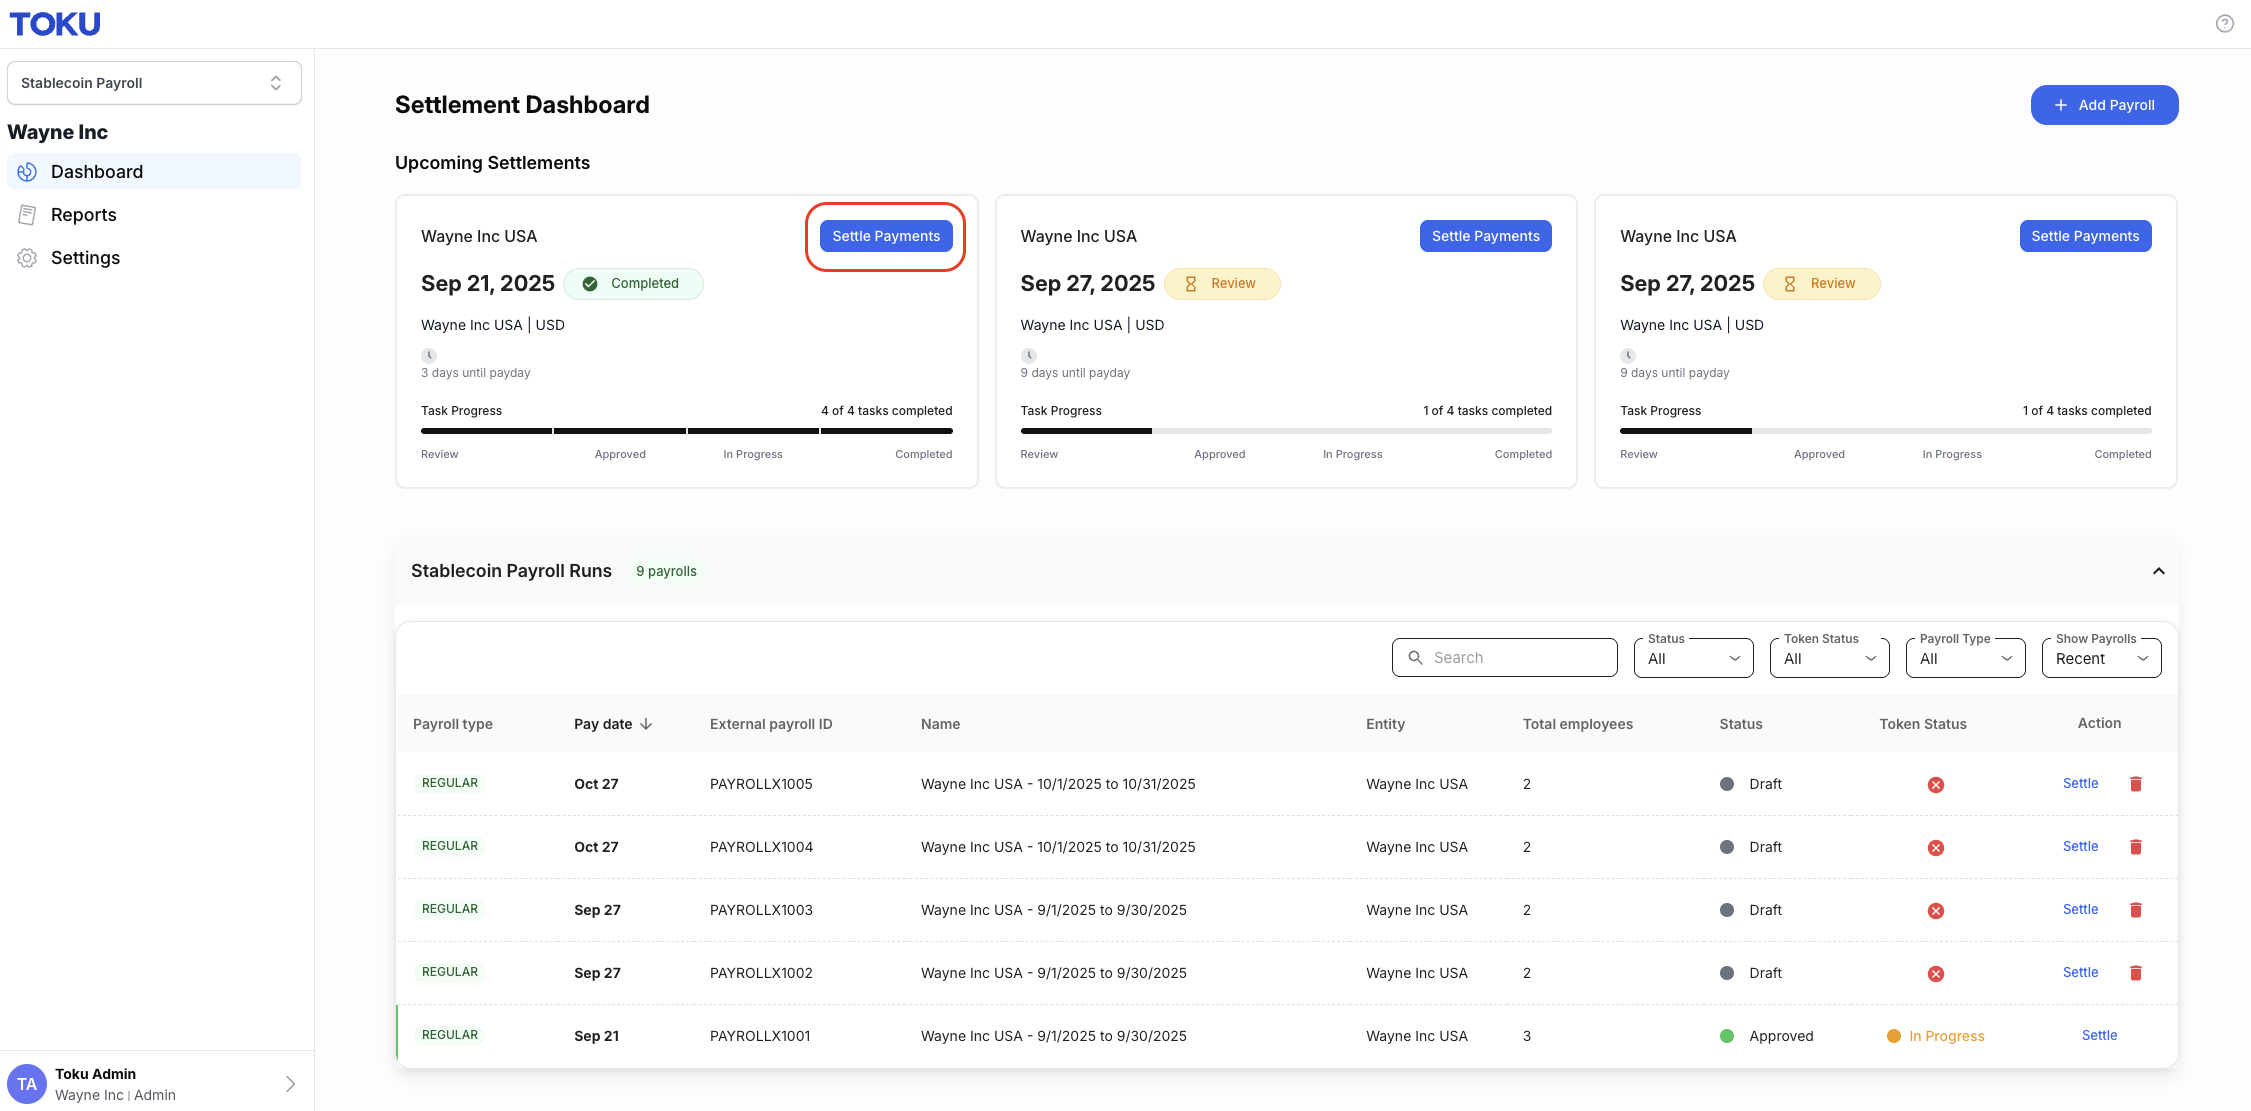
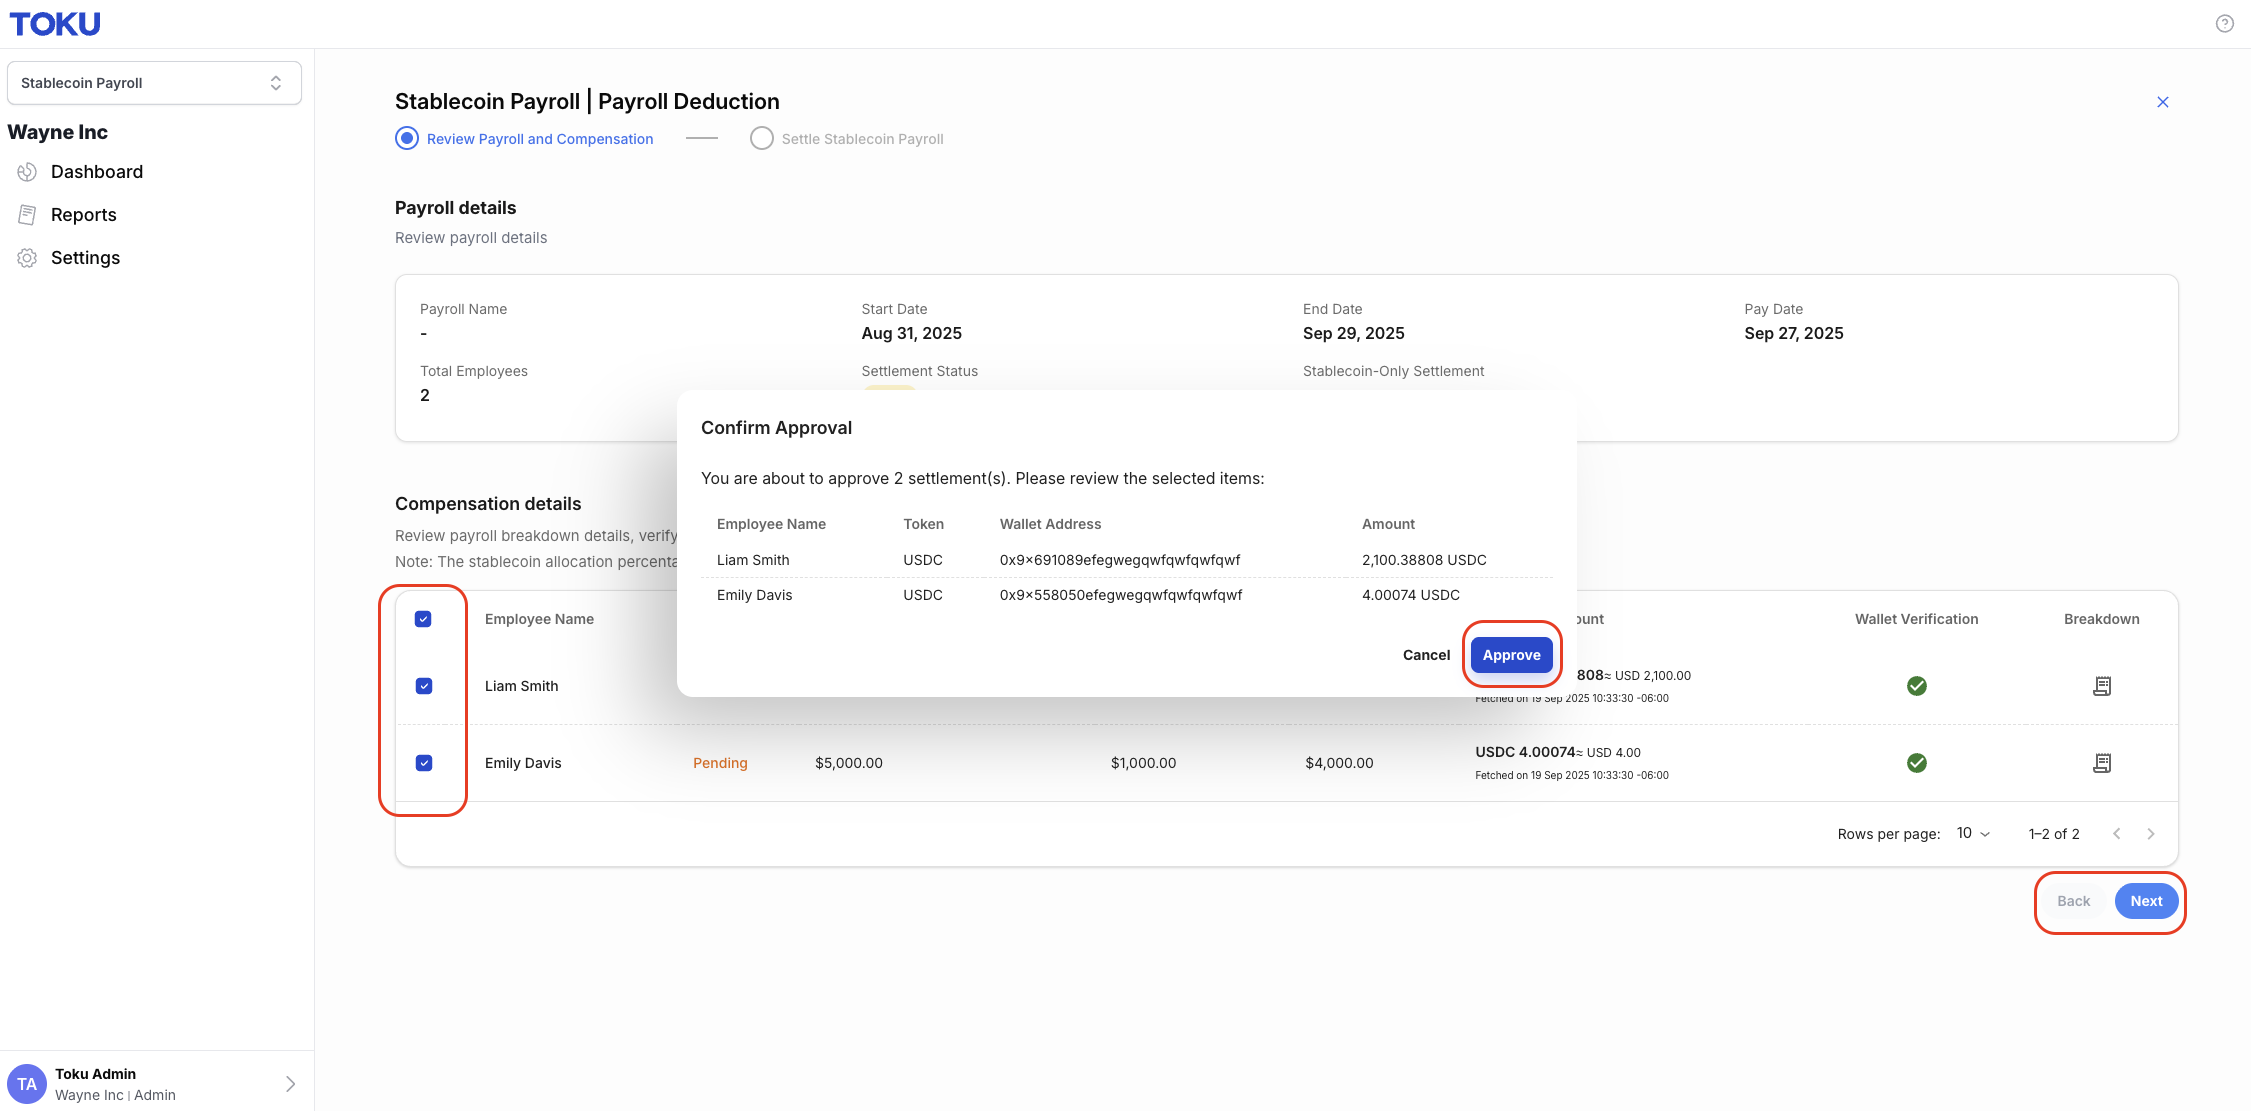
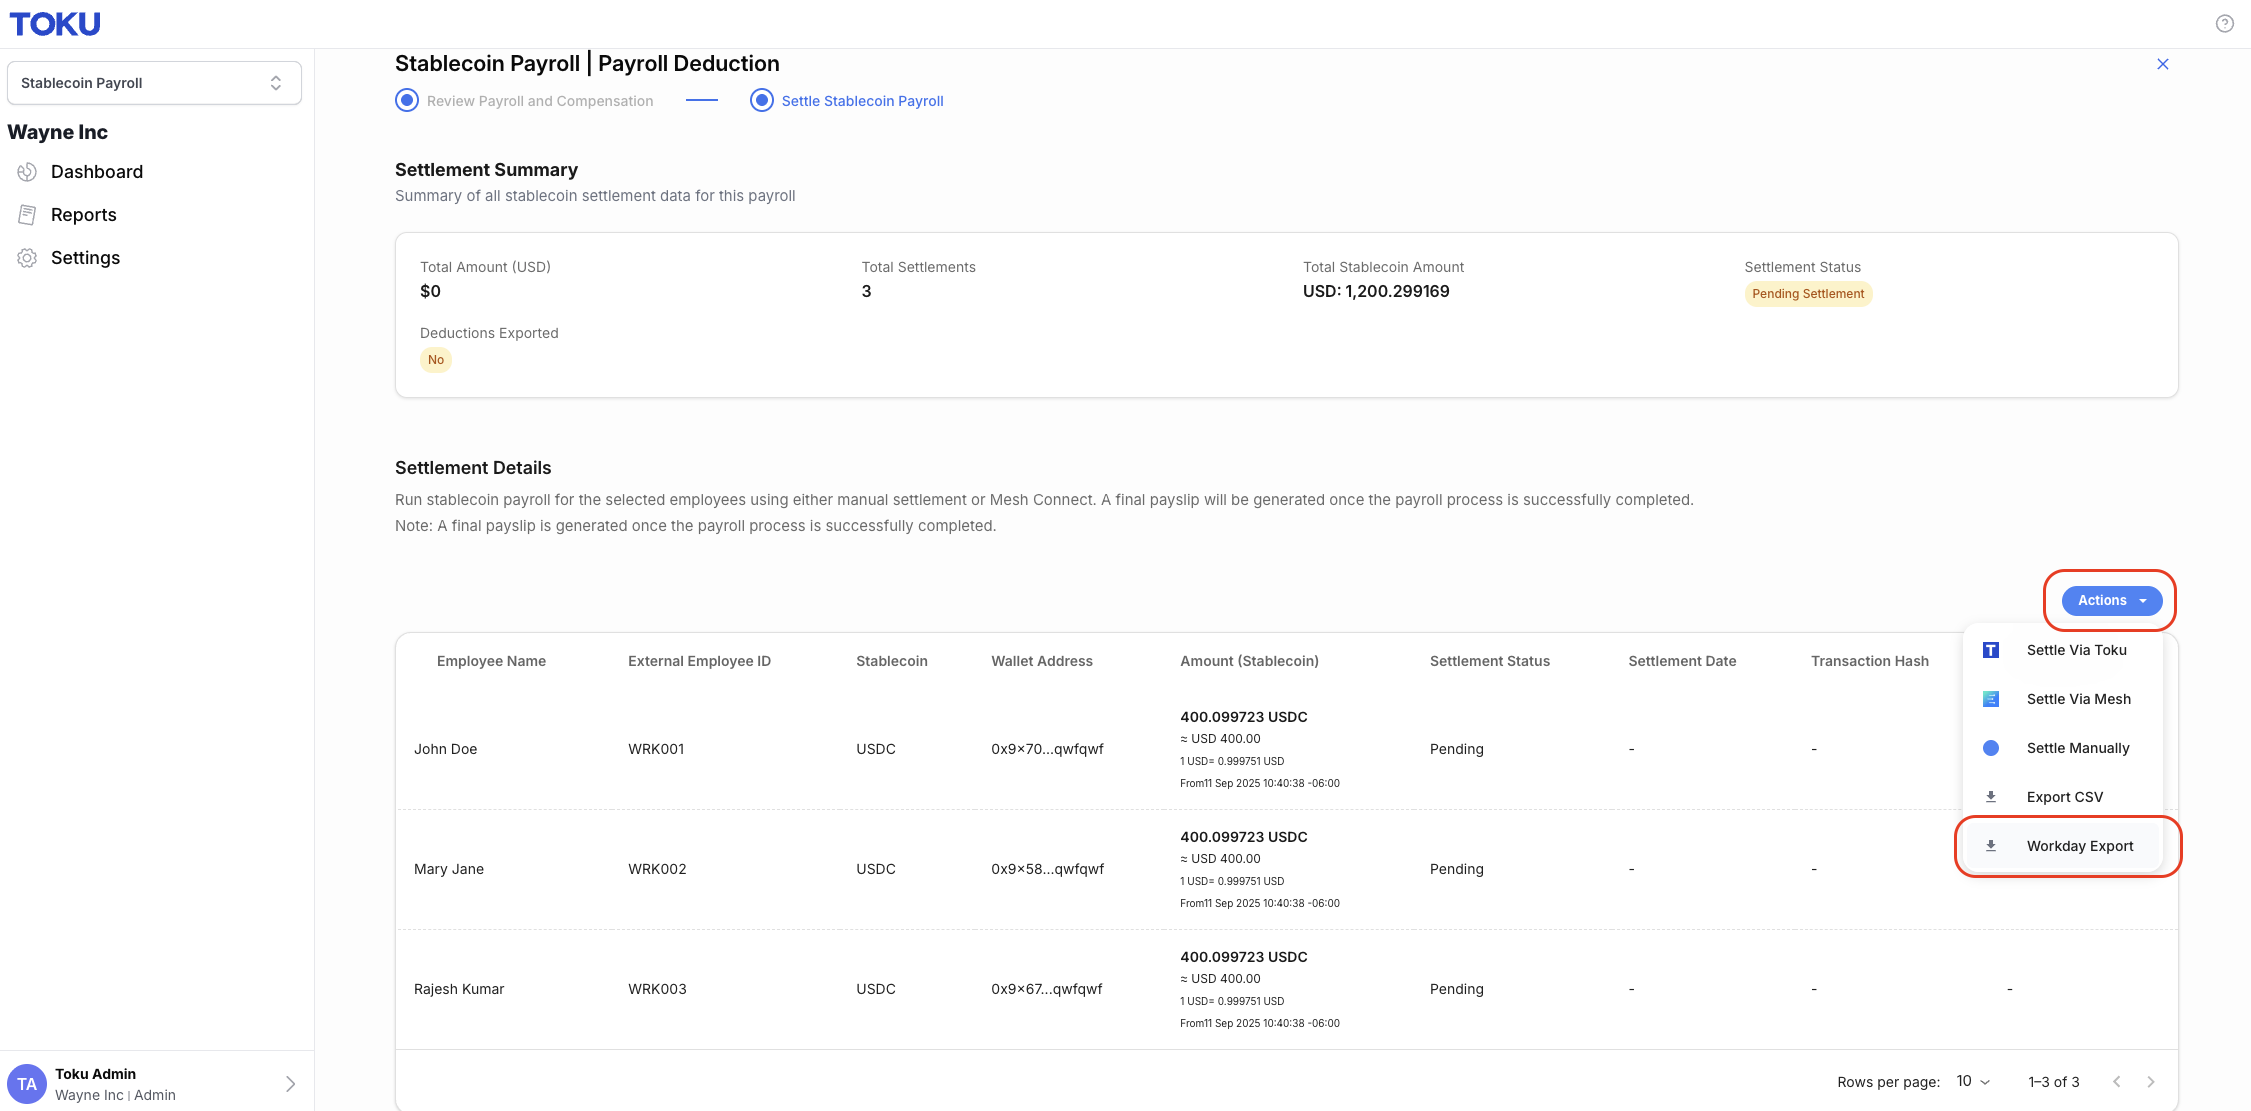
Your export will look something like this. Save for later!
Launch your EIB
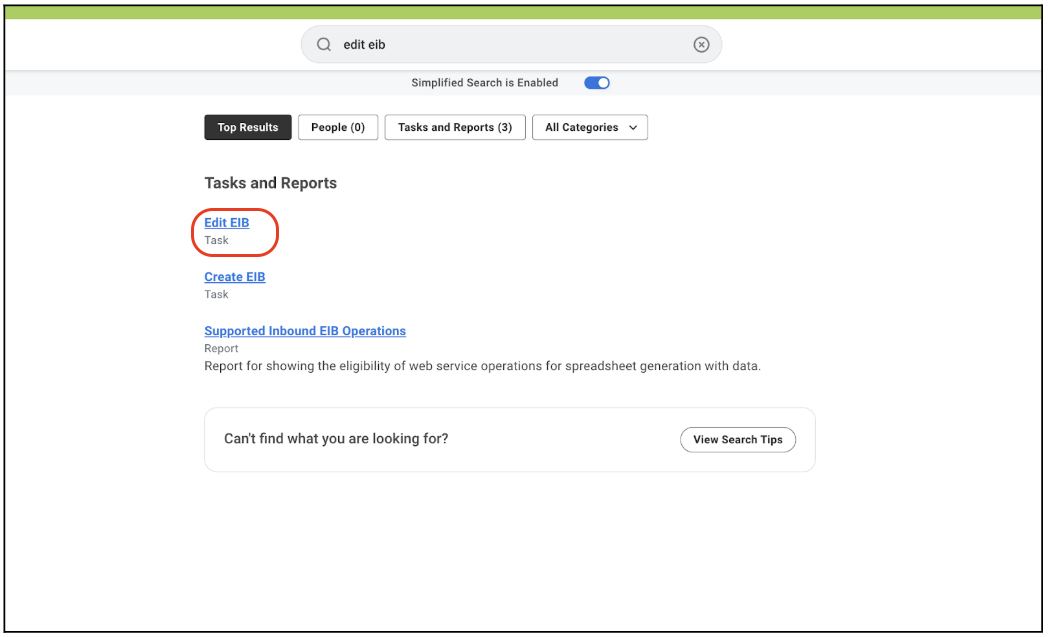
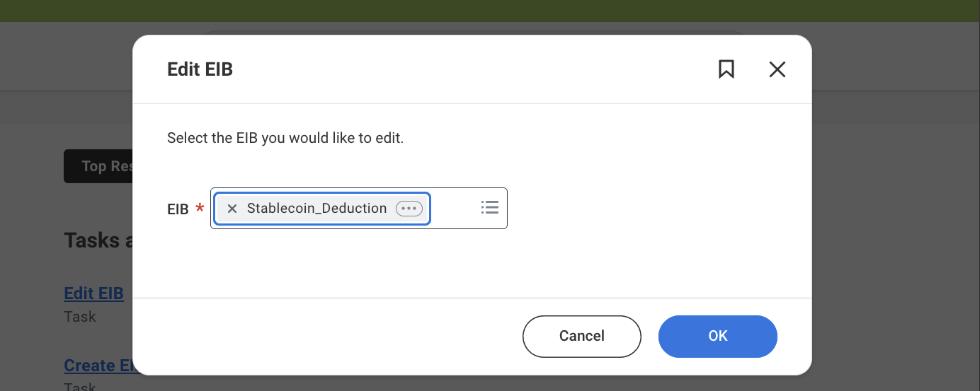
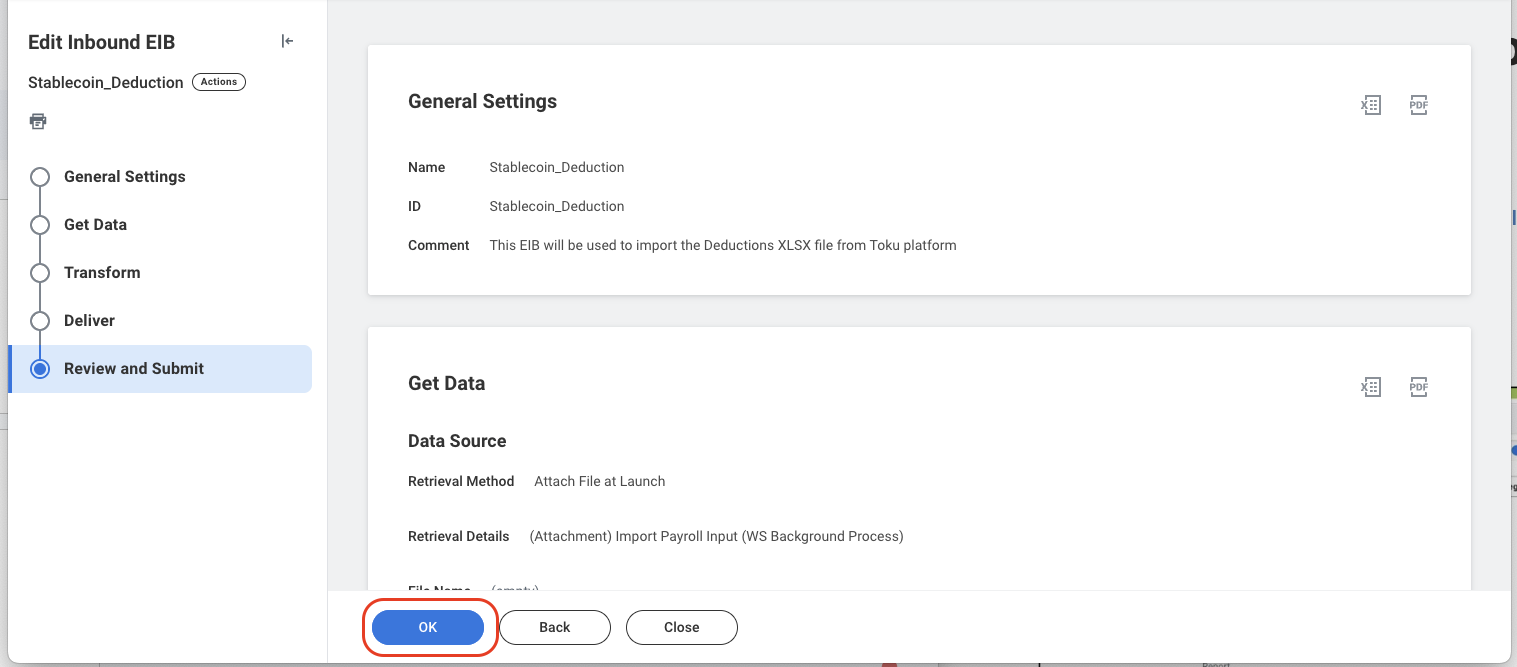
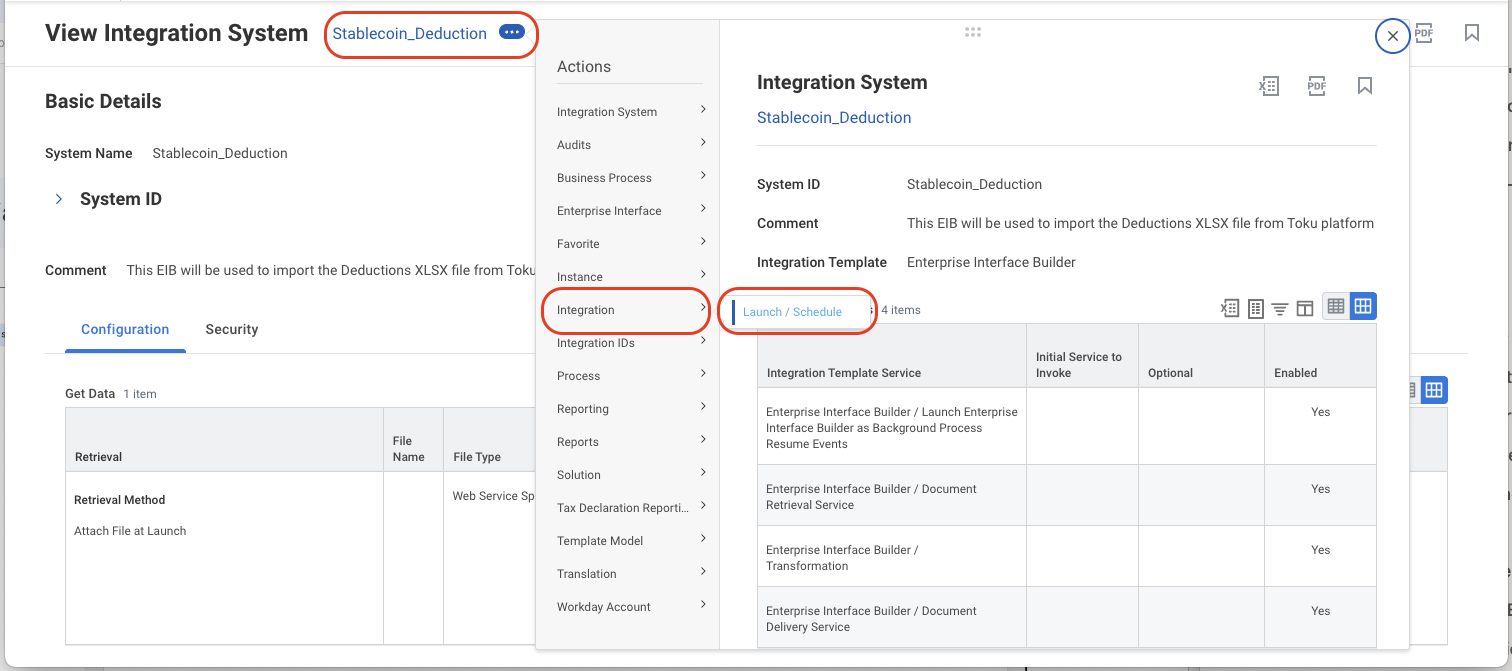
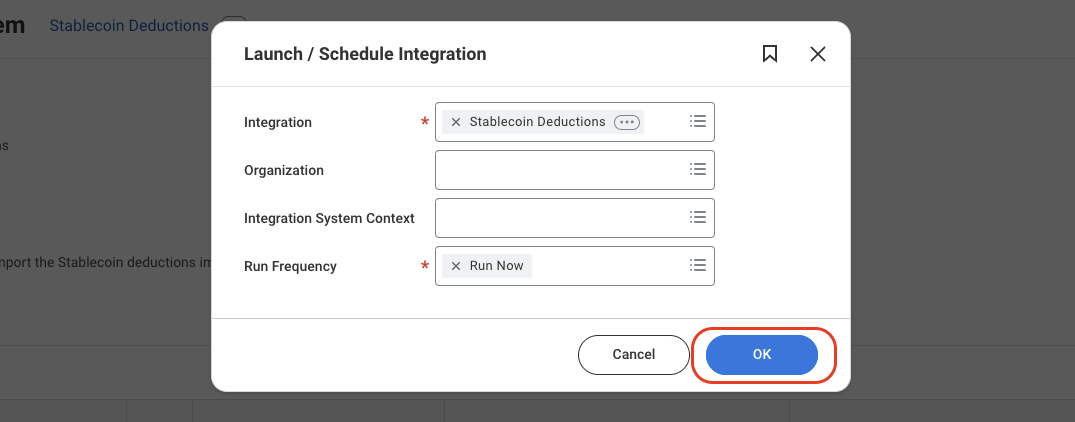
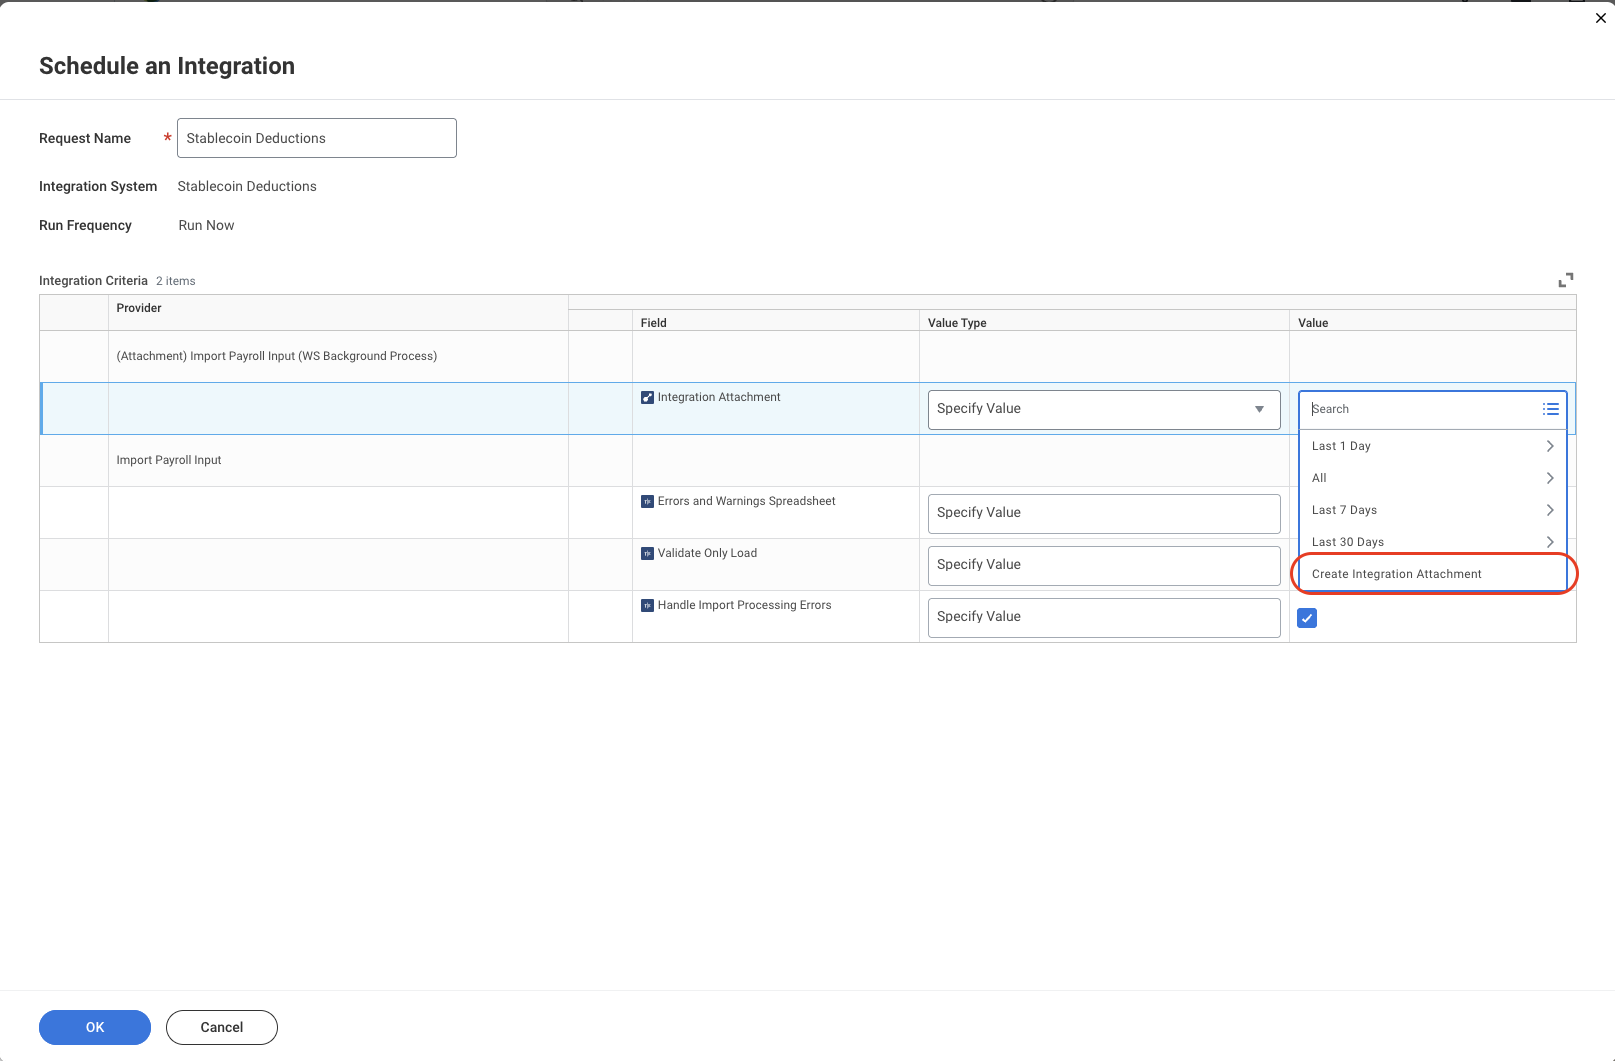
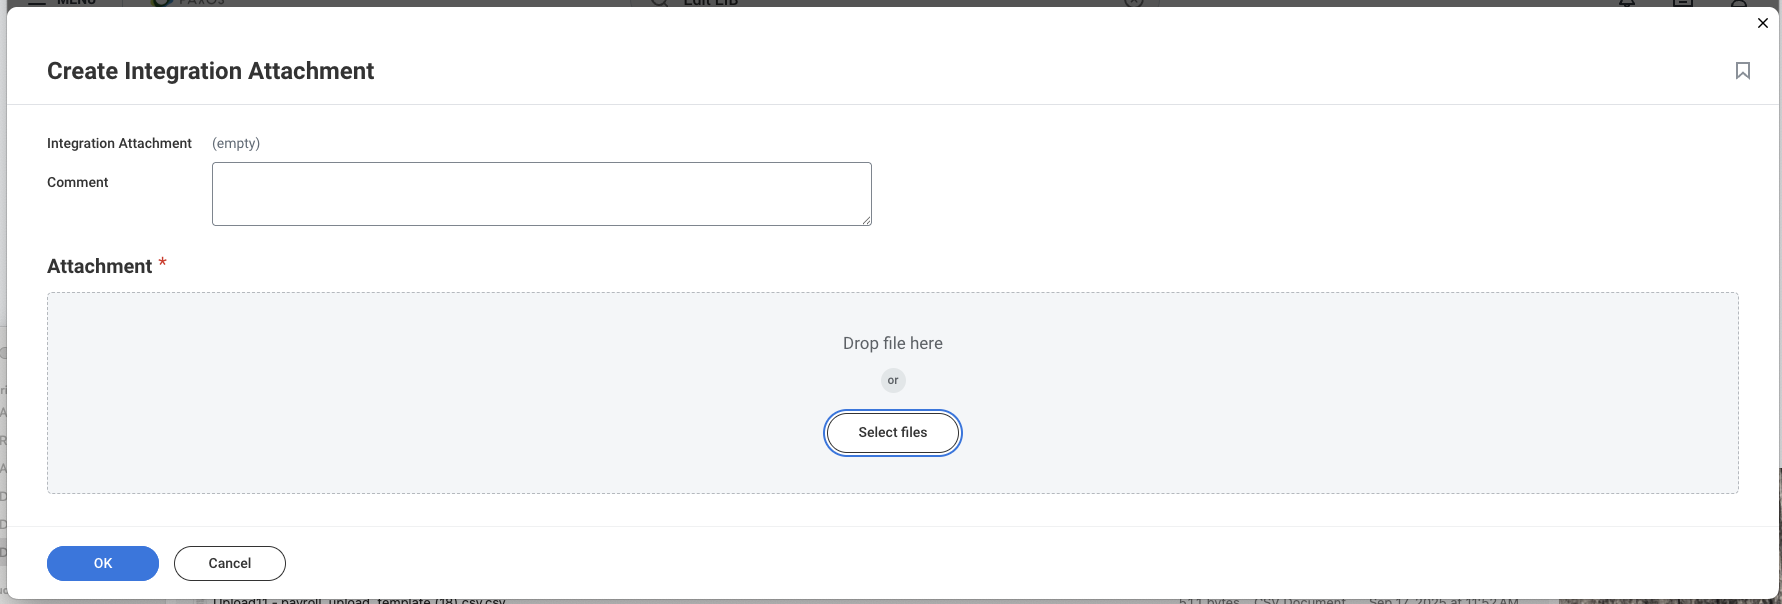
Add your deduction export from Toku
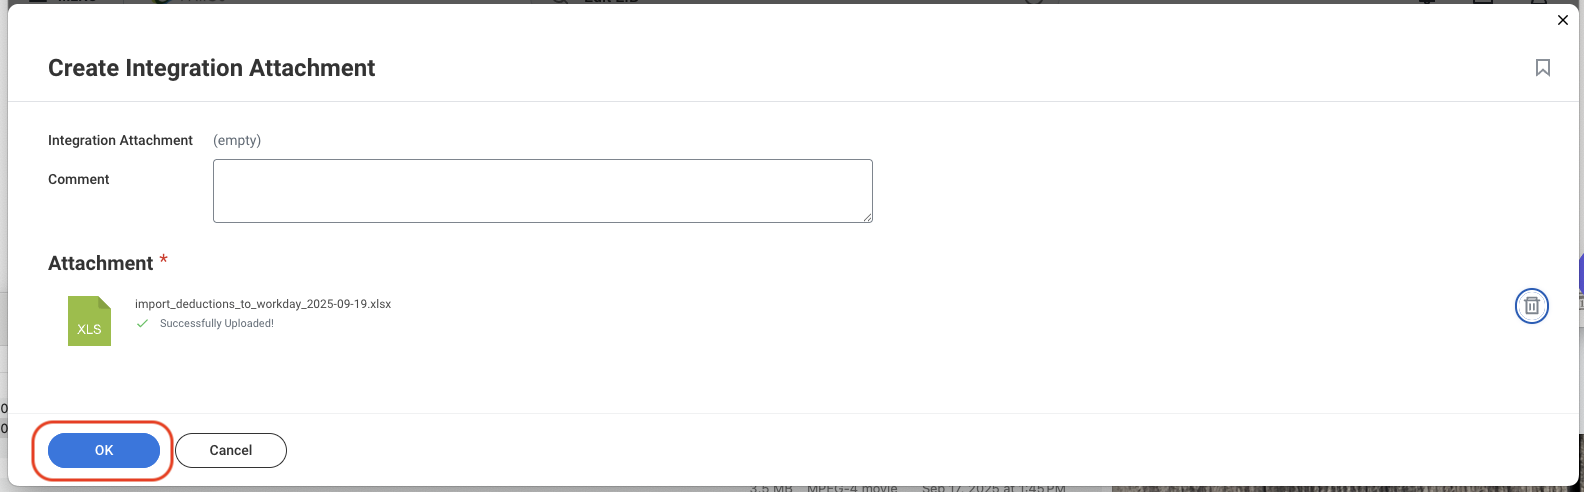
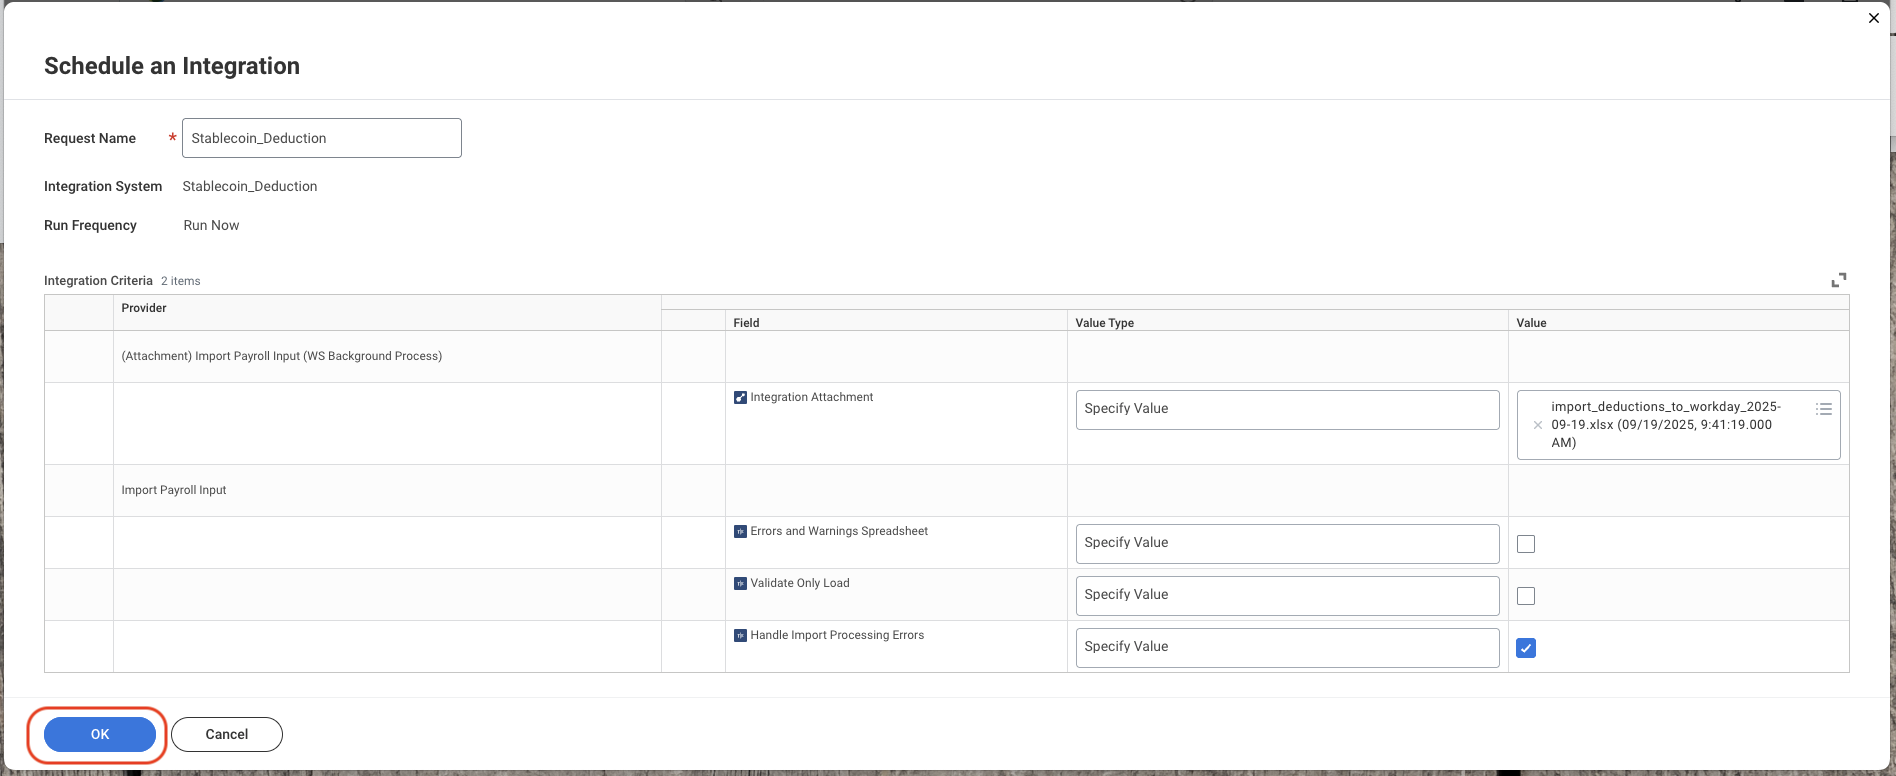
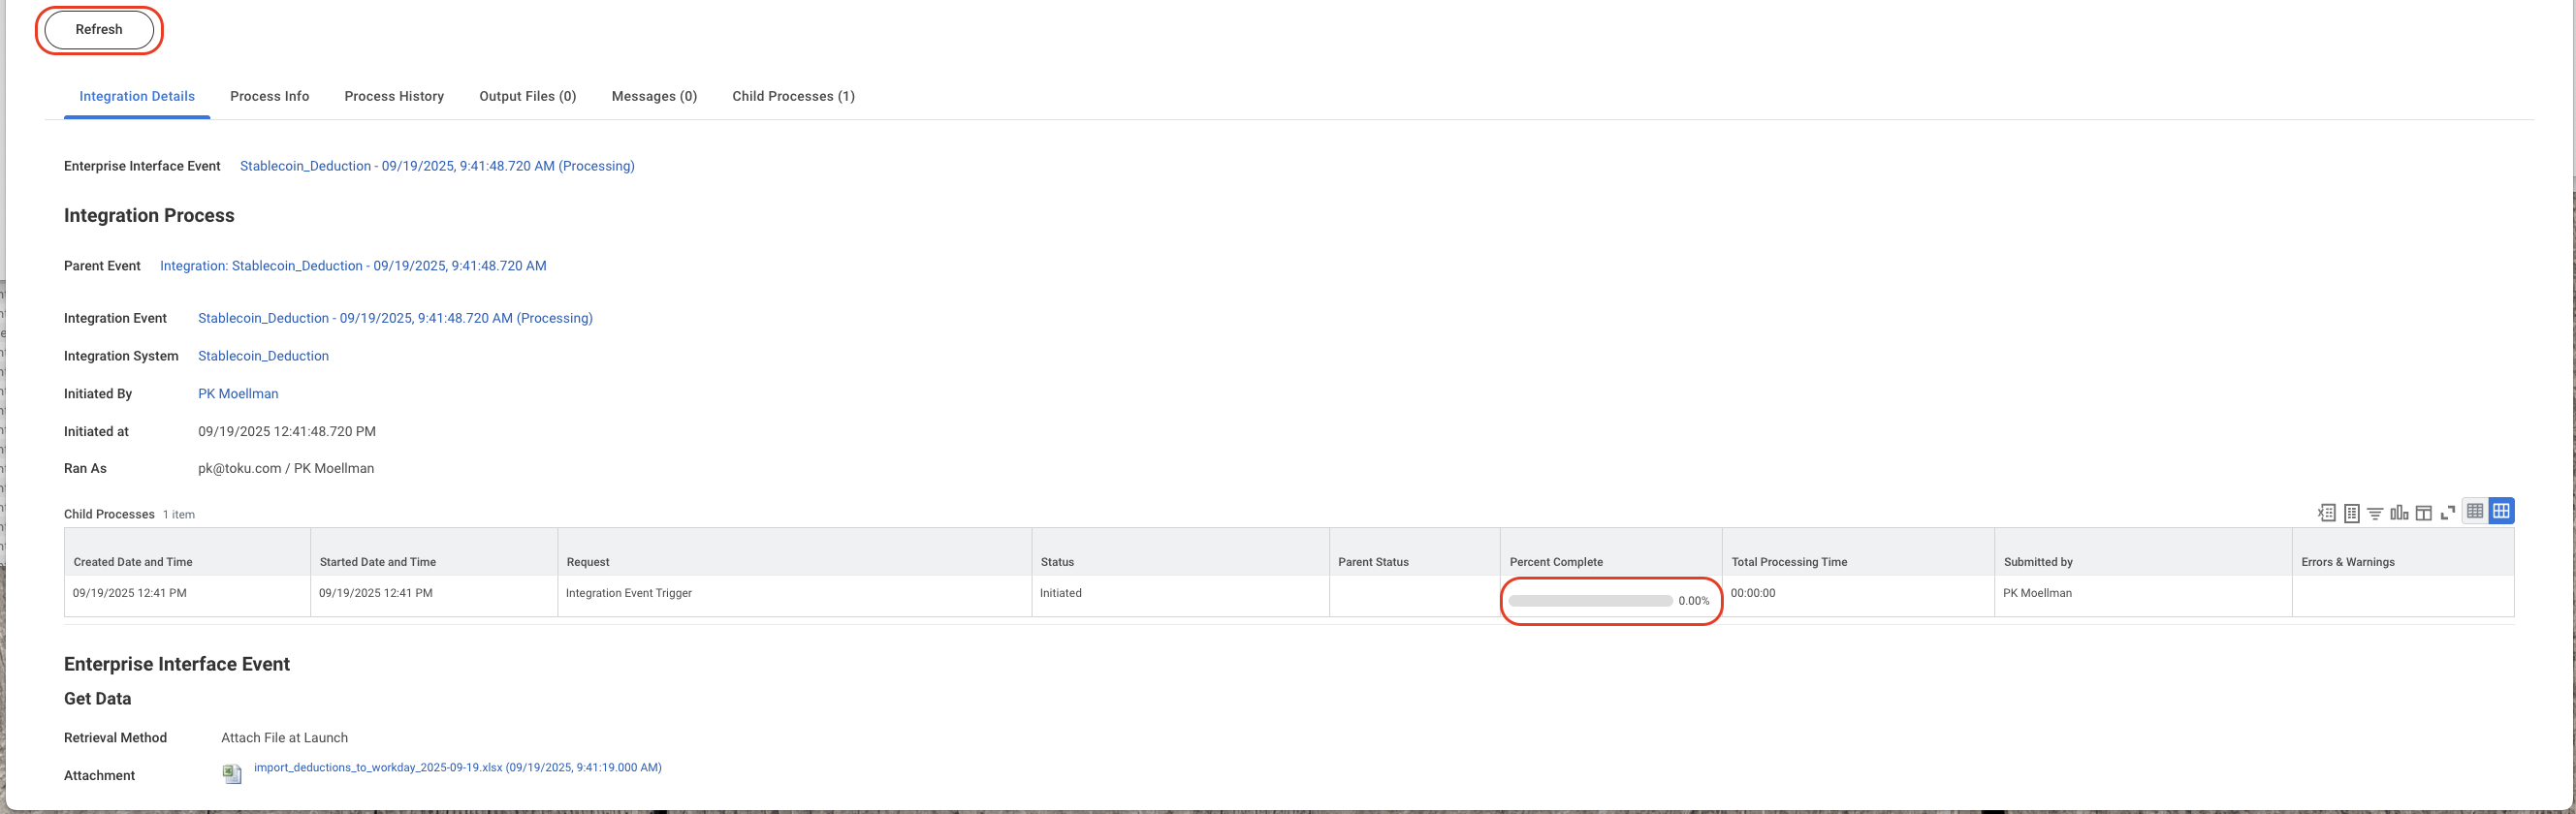
You can hit refresh until the “Status” changes to “Complete”
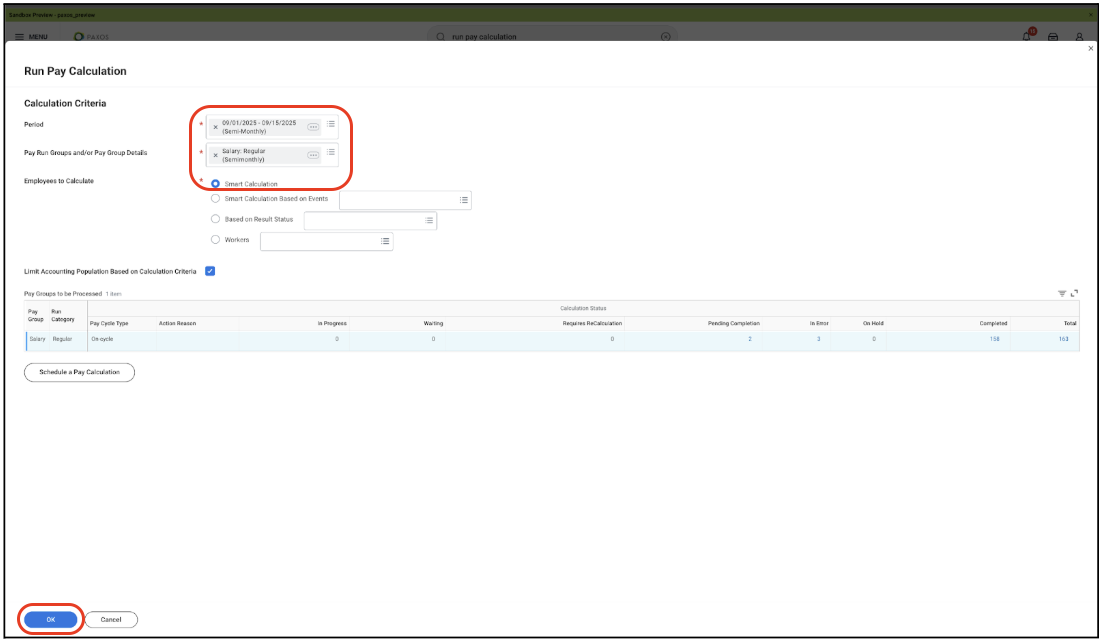
Run Pay Calculation*
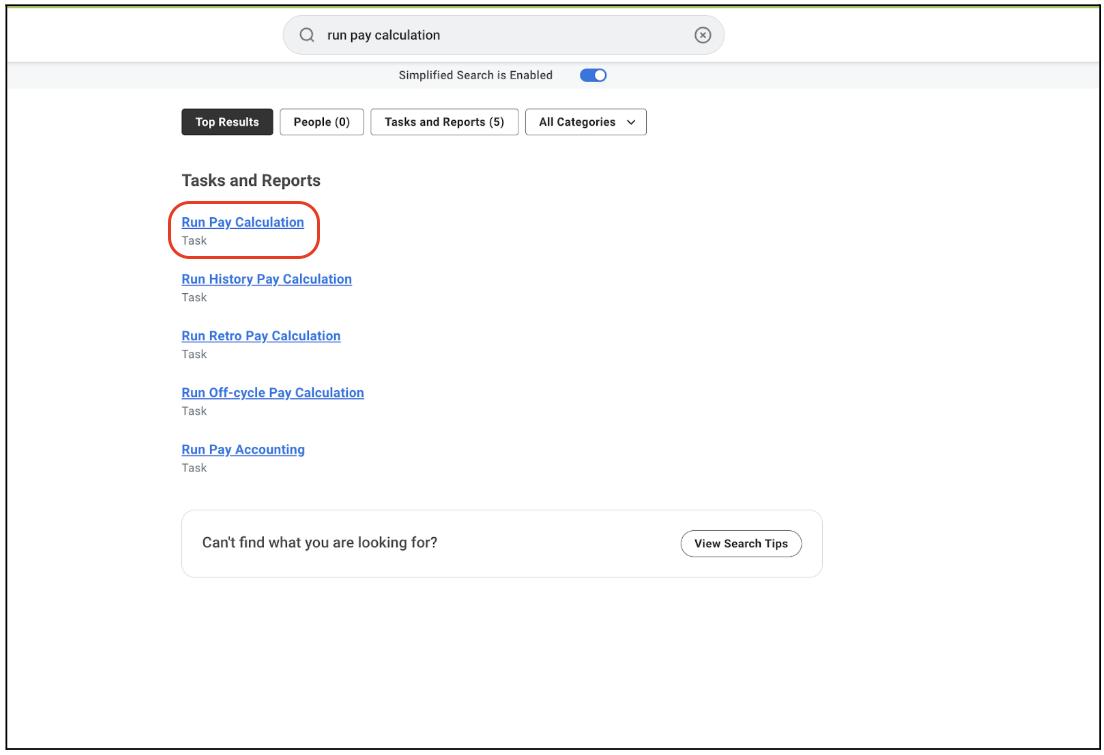
Select the pay period matching the Toku payroll you exported your deductions from
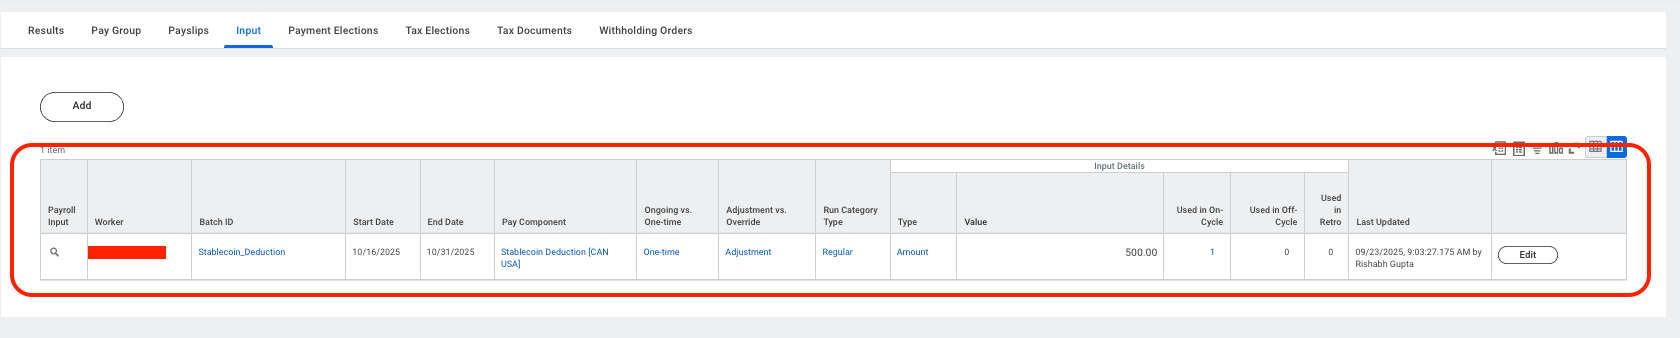
Verification: Go to the worker > Pay > Input
Automated deductions (SOAP API setup required)
These steps are required to post deductions from the Toku platform to workday (via API and not the manual way)
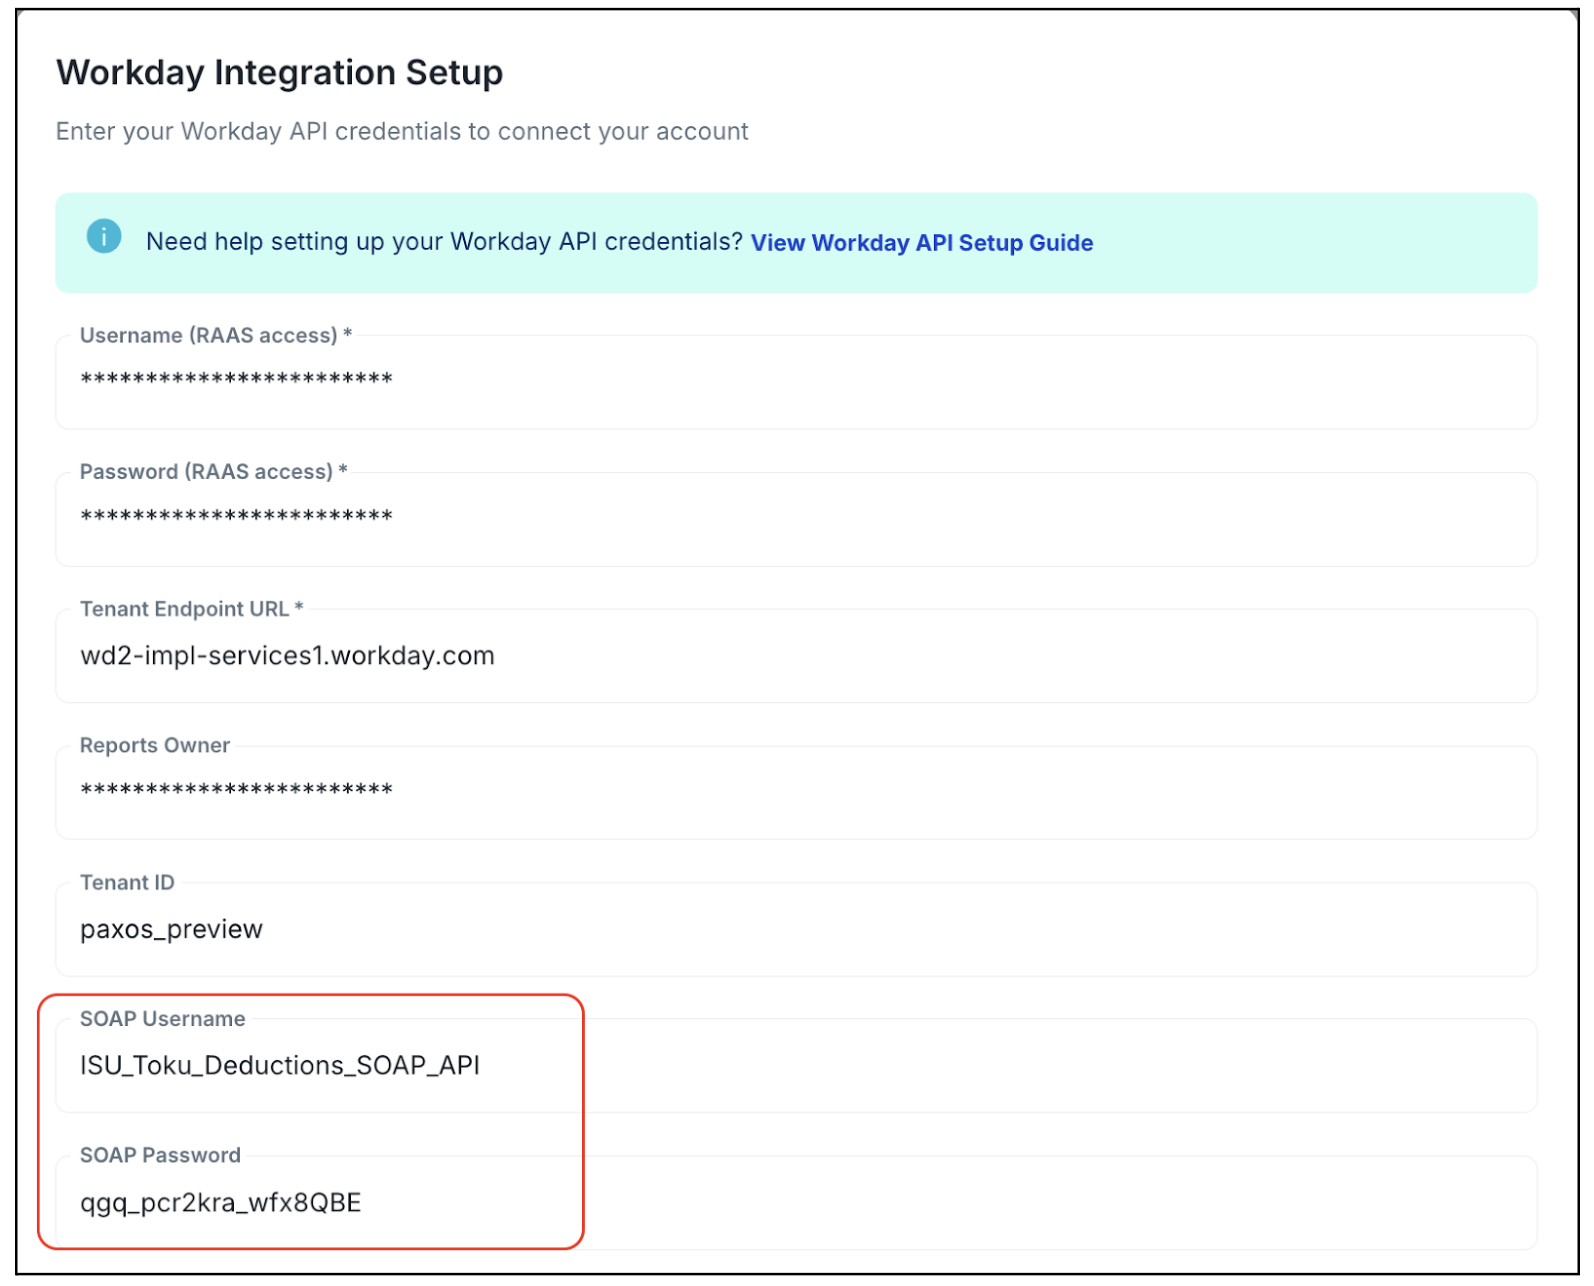
Update workday integration setup on our platform
Use the SOAP username and SOAP password created on this step
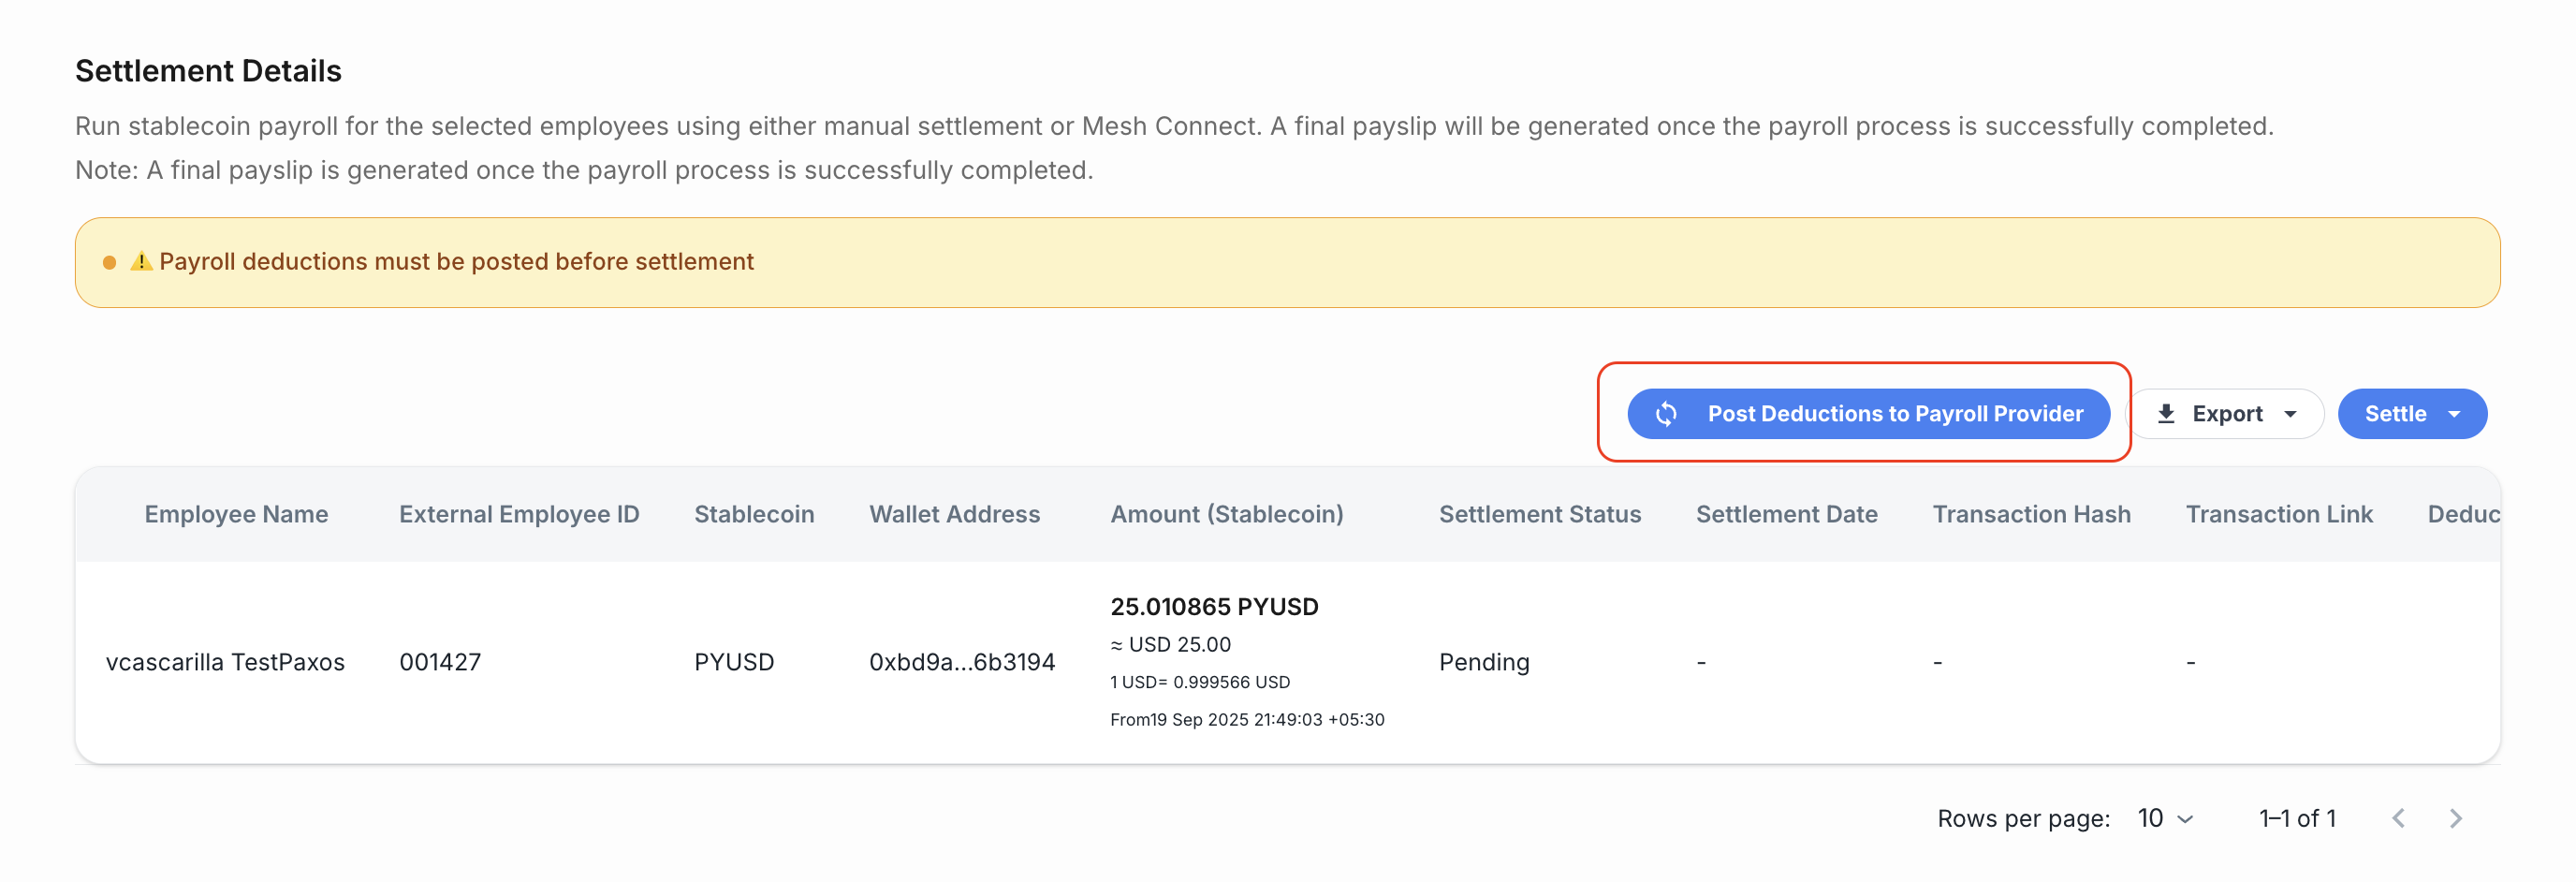
Post deductions from the platform
Success message
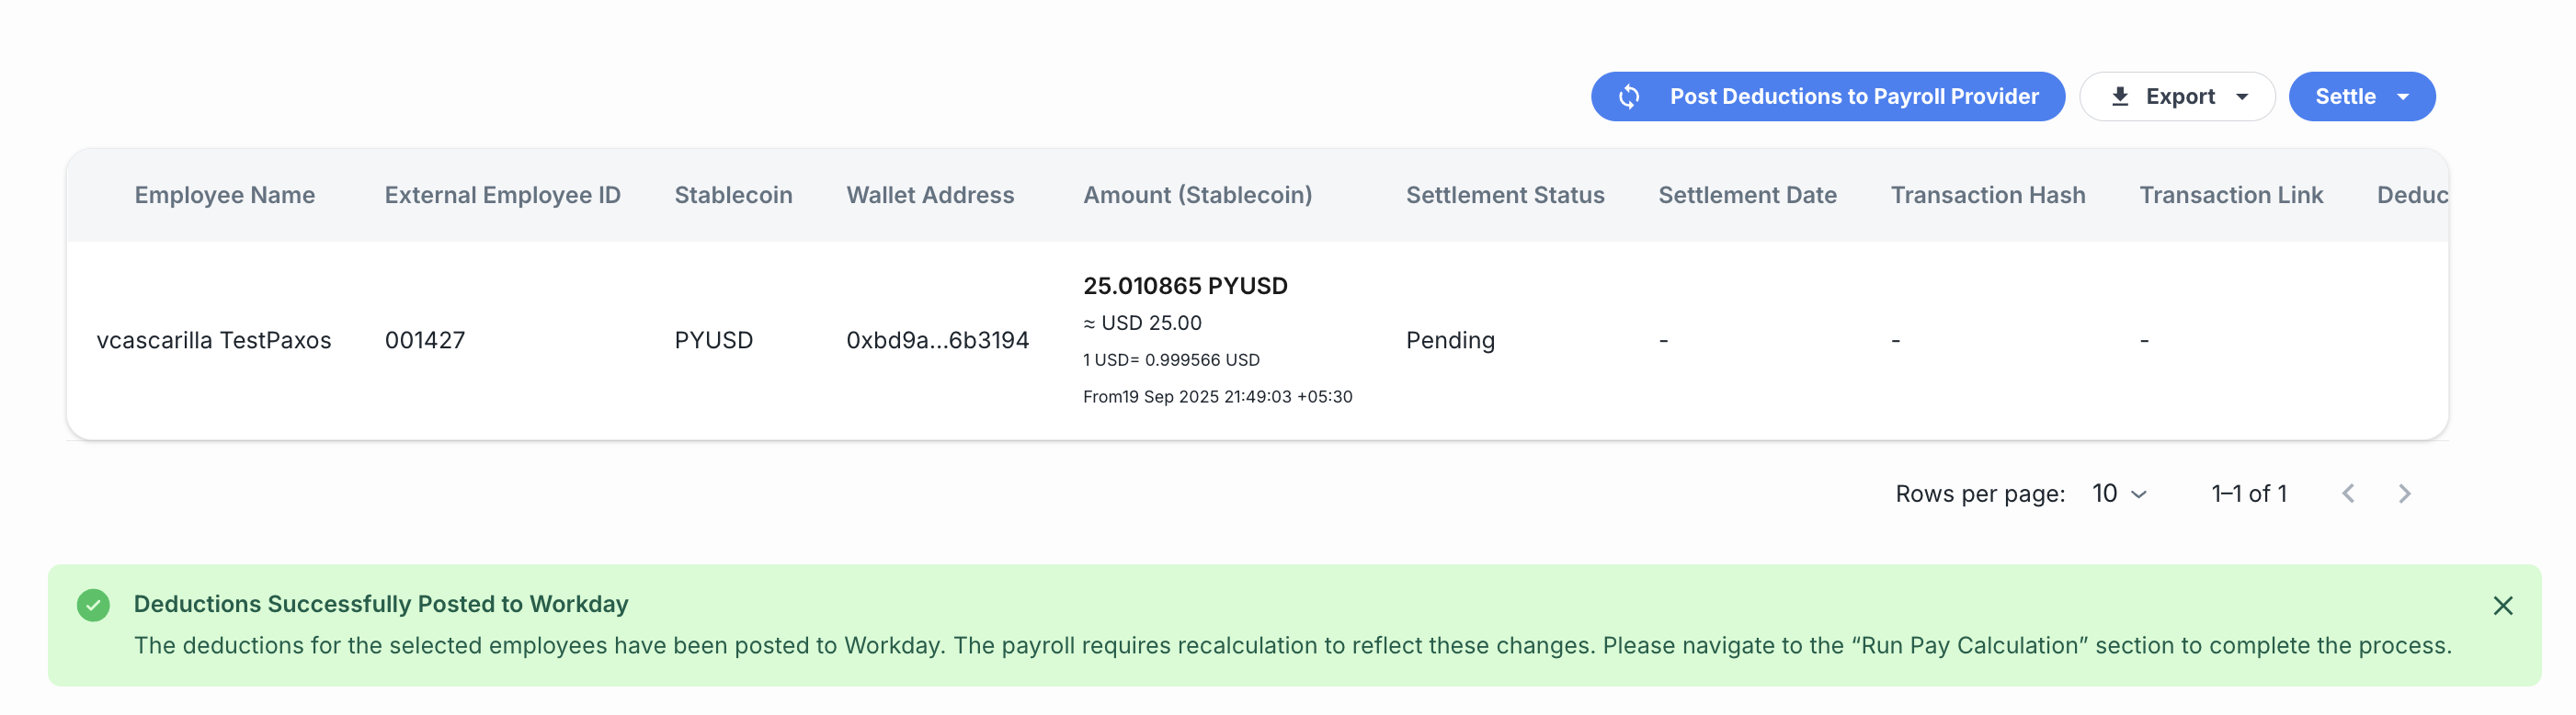
You will need to trigger “Run Pay Calculation” explicitly from workday as a final step
Where to find login credentials
This is where you can find the Workday Credentials to establish your connection to Toku
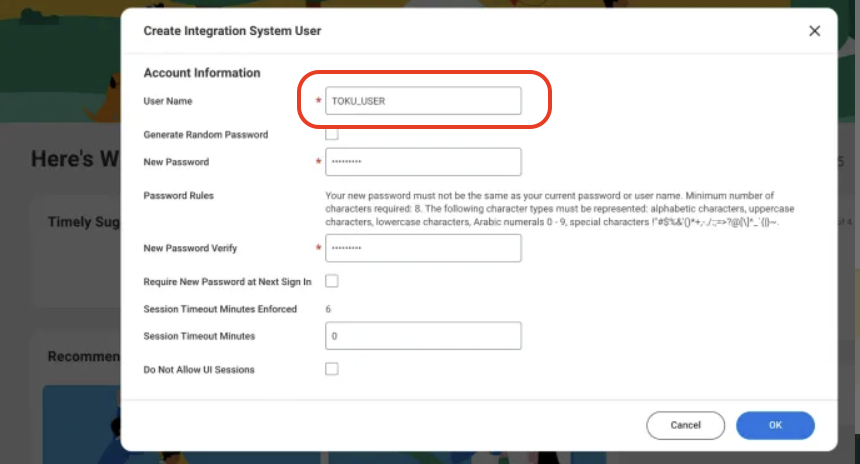
Username
- Create an integrated system user by searching for “Create Integrated System User” task in the search box

- Username can be found here
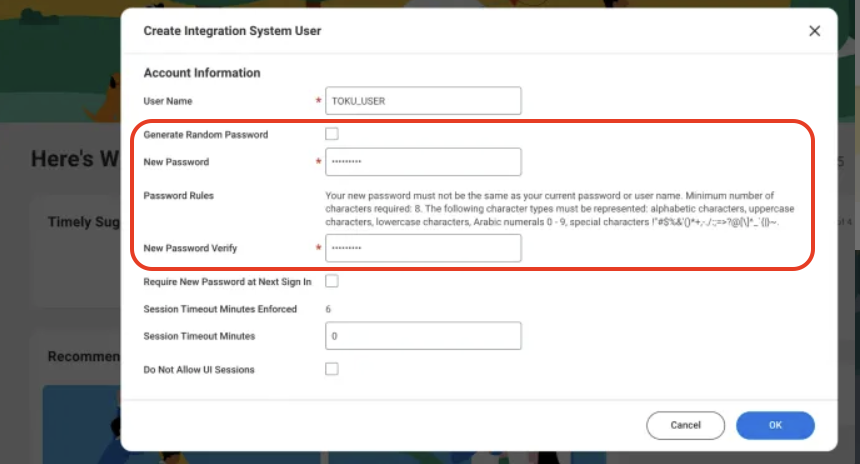
Password
- Create an integrated system user by searching for “Create Integrated System User” task in the search box

- Password can be found here
Tenant ID
- In Workday search “View API Clients”
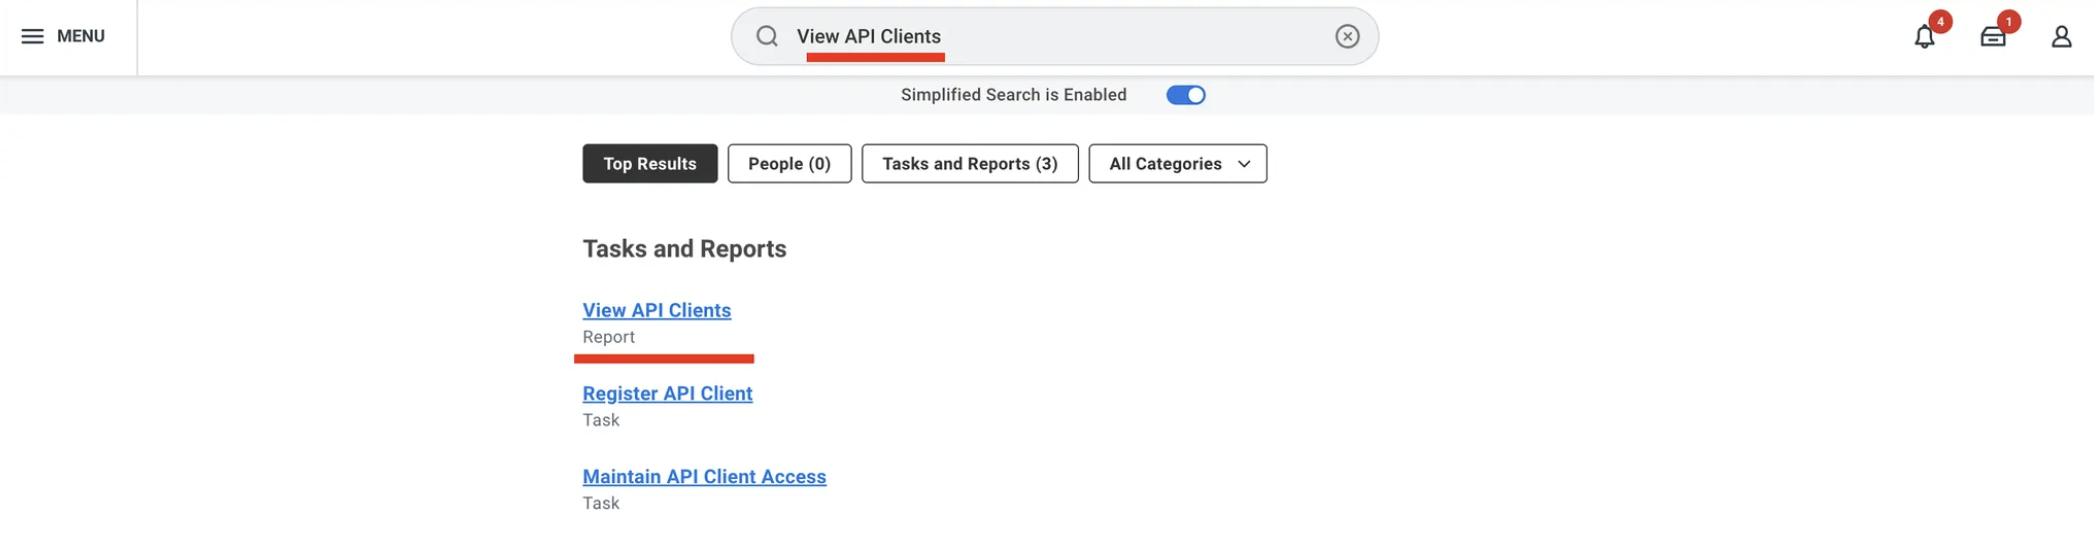
- In the URL of this page you will see the Tenant ID

Tenant URL
- In Workday search “View API Clients”
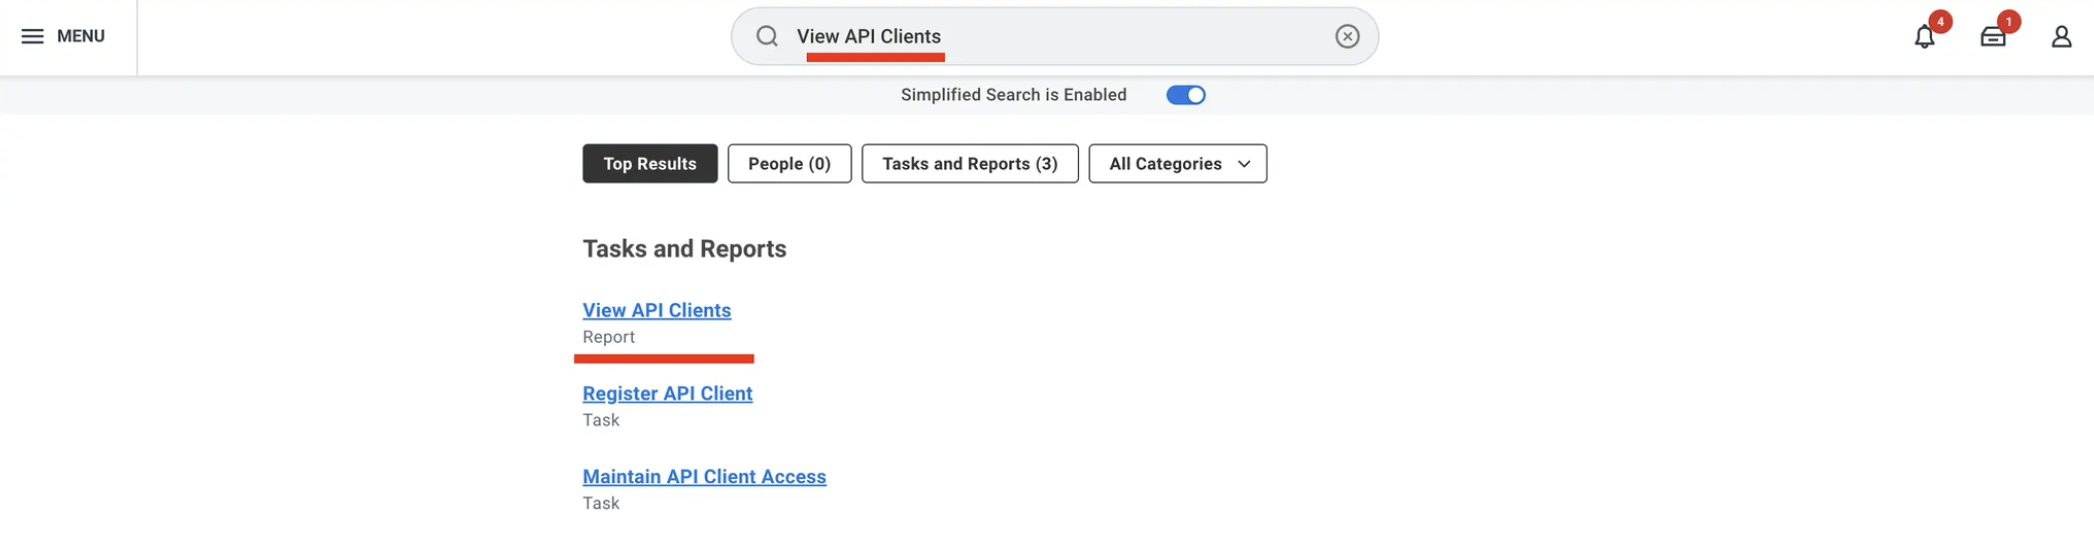
- On the Workday REST API Endpoint field you will copy the part after the
https://and before the/ccx./….

Report Owner
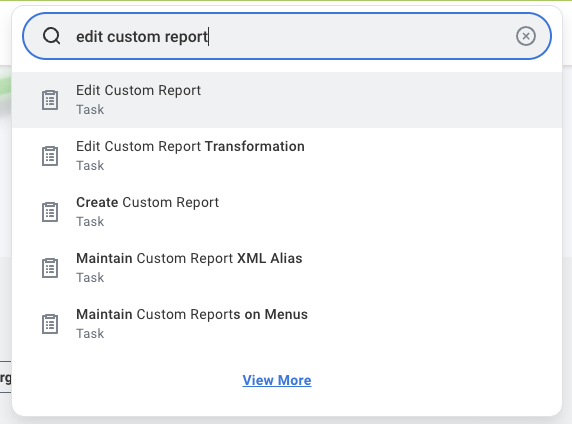
- In Workday search for “Edit Custom Report”
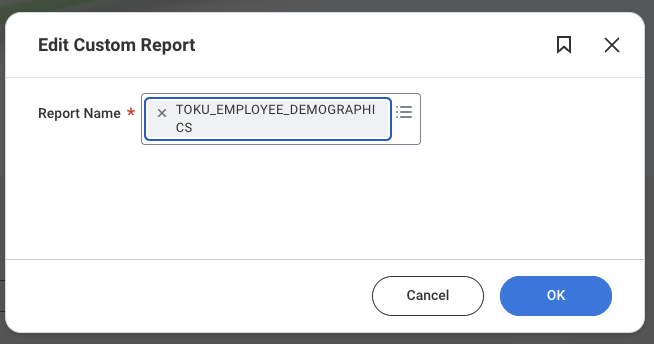
- Search for the: “TOKU_EMPLOYEE_DEMOGRAPHICS” you created previously
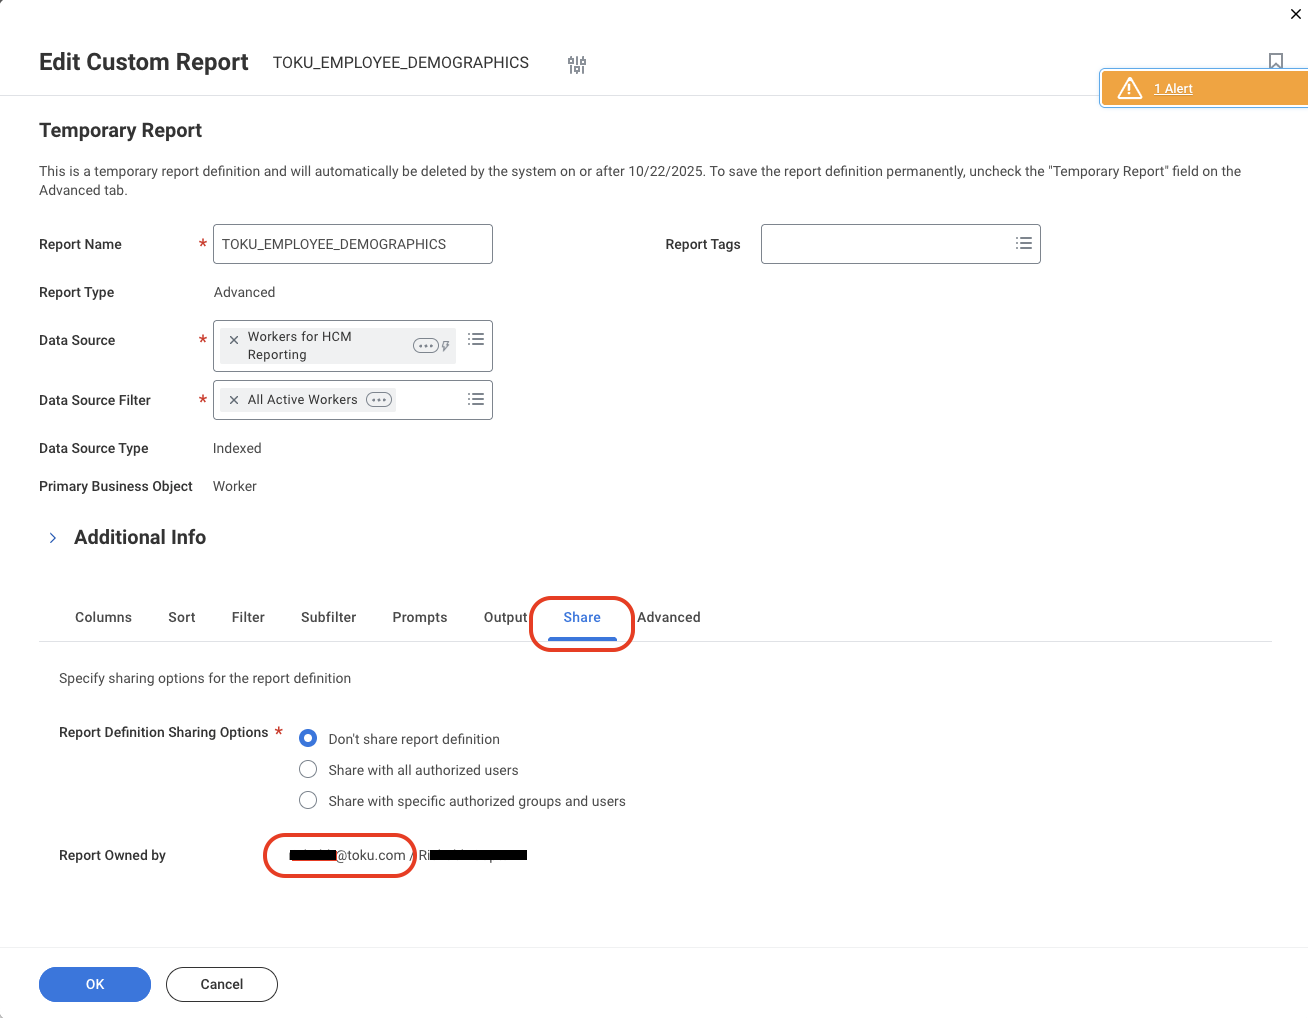
- Click “Share”, Then copy the first section before the “/”
- This is your “Report Owner”. 1. Note: This can be formatted as an email address or a username depending on your account settings.
CONFIDENTIALITY NOTICE: resource and any attachments are only for the use of the intended recipient and may contain information that is privileged, confidential or exempt from disclosure under applicable law. If you are not the intended recipient, any disclosure, distribution or other use of this resource or attachments is prohibited. If you have received this resource in error, please delete and notify the sender immediately. Thank you.