
 16 MIN READ
 UPDATED AUG 26, 2026
📘 Audience: client admins · Customer-facing · Last verified August 19, 2026 against the platform live in production.
Who this is for and what you'll accomplish
You are an administrator for your organization on Toku, and you pay one or more contractors a fixed amount on a regular schedule. Auto-invoicing means Toku creates each contractor's invoice for you automatically every period - weekly, biweekly, or monthly - priced from the rate on their contract, so nobody has to remember to raise an invoice by hand. By the end of this guide you will have turned auto-invoicing on for a contractor, confirmed it is working, and learned what to check when an invoice you expected has not appeared.
Before you start
- You can sign in at https://app.toku.com with your work email and password. (The old
tga.app.toku.comaddress is no longer the way in, and there are no product tabs to choose.) - Your account is an administrator for your organization (if you are unsure, ask whoever invited you to Toku).
- The contractor you want to invoice automatically already appears in your organization with a contracted rate on file. A contractor whose row reads "No rate on file" cannot be auto-invoiced until a rate is added to their contract details.
- Auto-invoicing is available to your organization. If the Contractor Invoices section described below never appears on your Settings page, contact support to have it turned on.
Settings: auto-approval and per-currency thresholds
Auto-invoicing decides when an invoice is created. Auto-approval decides whether that invoice still needs a person to approve it. They are two different settings: turning auto-invoicing on does not approve anything by itself, and every invoice it creates waits in Pending Review until either you approve it or auto-approval approves it for you.
All of the auto-approval settings sit in one place. Sign in, click Company in the left sidebar, click the Settings tab near the top of the page, and scroll down to the section titled Invoice approvals, described as "Configure auto-approval behavior, contractor allow/deny lists, and per-currency thresholds for HRIS contractor invoices". It sits directly above the Contractor Invoices section used later in this guide. Inside it are two cards: Auto-Approval and Per-currency thresholds.
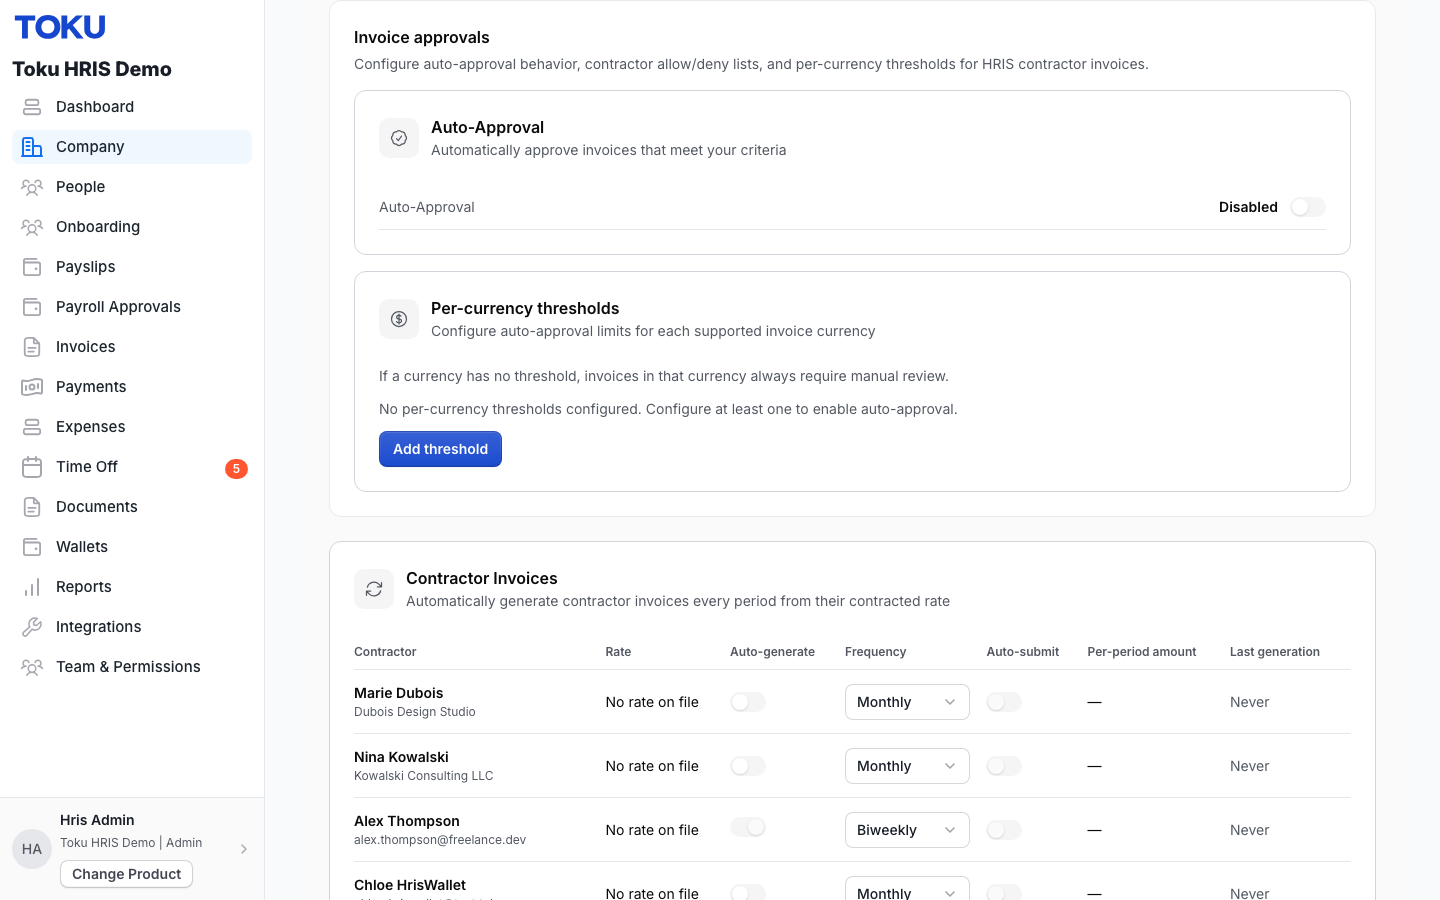
There are three separate things you can set. An invoice has to satisfy all of them to be approved automatically.
1. The Auto-Approval switch and the overall limit
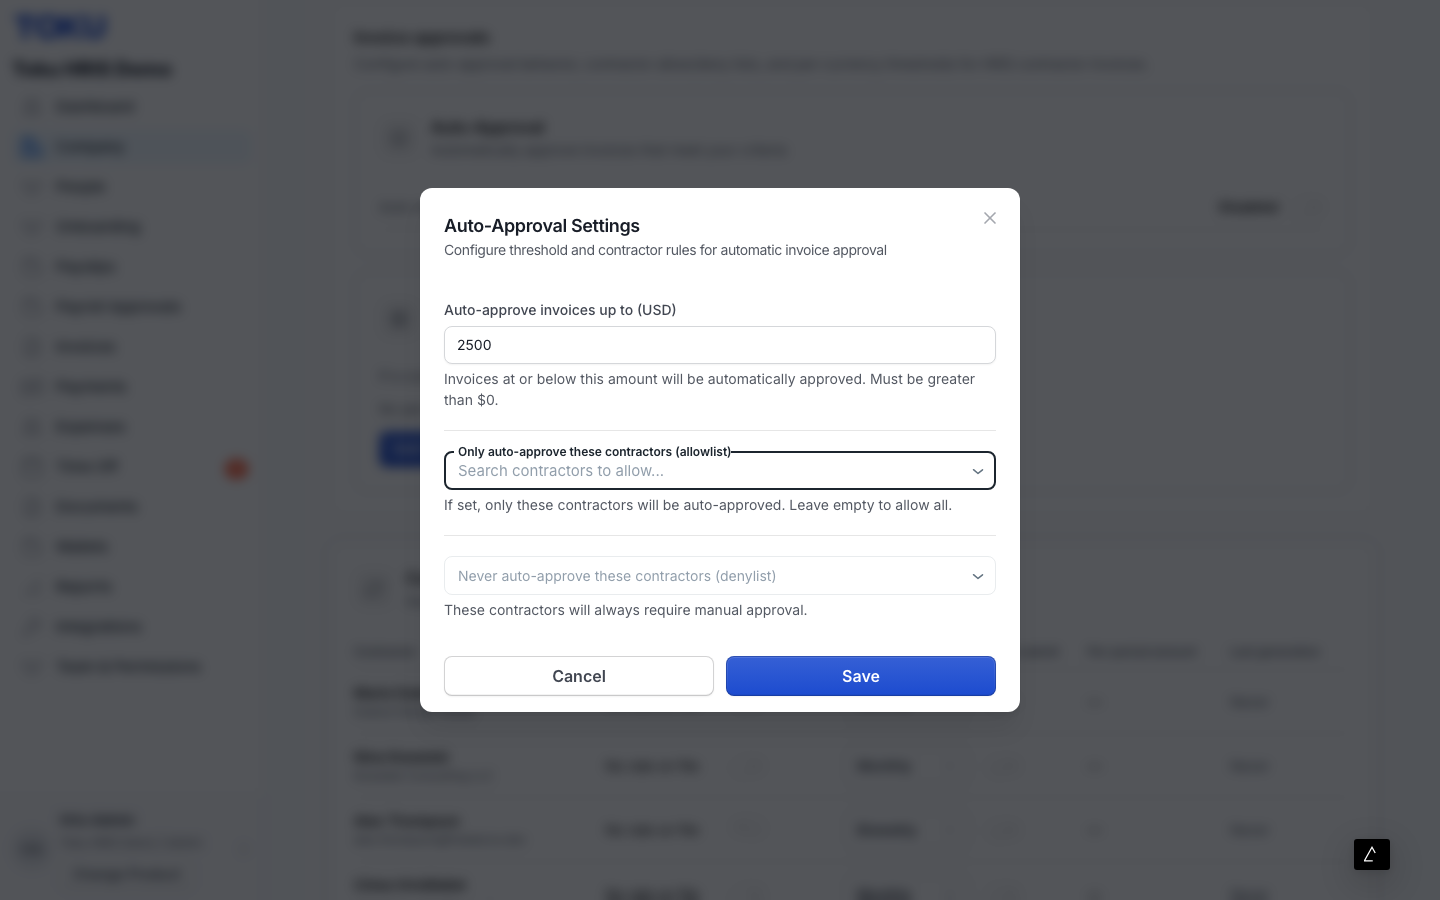
Click the switch in the Auto-Approval row. The first time you turn it on, a window titled Auto-Approval Settings opens, because auto-approval cannot run without a limit. Type the largest invoice you are willing to approve without looking at it into Auto-approve invoices up to (USD) — it must be greater than 0 - then click Save.
After saving, the card shows Enabled, the Max Amount you set, and a summary of your contractor rules. Use the Edit button on either row to reopen the same window later.
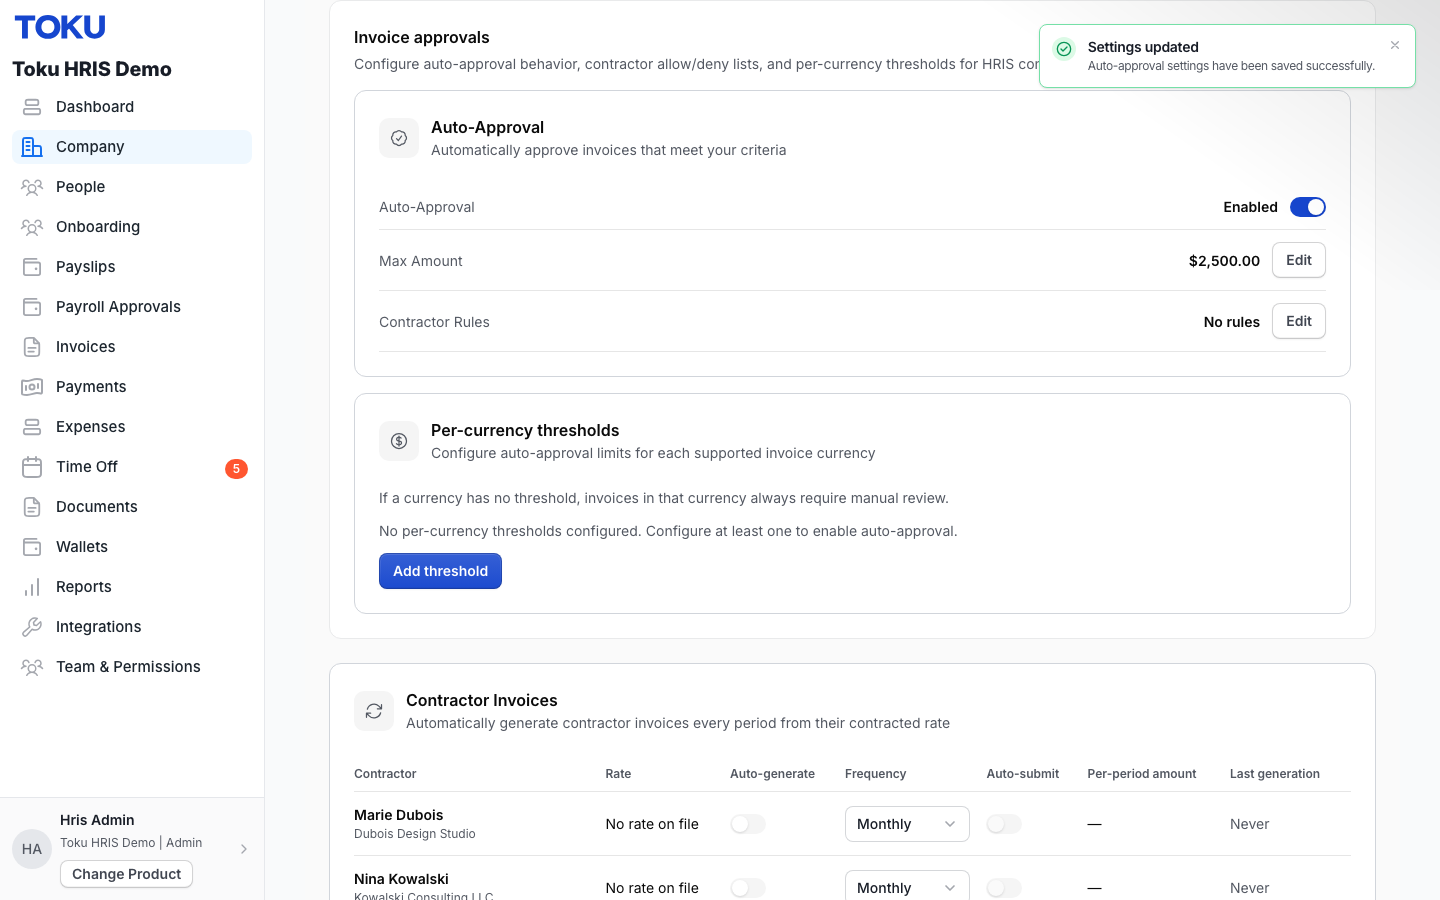
This Max Amount applies to US dollar invoices only, and only while you have no USD row in Per-currency thresholds. As soon as you add a USD row, that row is the one that counts. Invoices in any other currency are not covered by it at all - see below.
2. Contractor rules: an allowlist and a denylist
In the same Auto-Approval Settings window, below the limit, are two contractor pickers:
- Only auto-approve these contractors (allowlist) — if you name anyone here, they are the only contractors who can be auto-approved. Leave it empty to allow everyone.
- Never auto-approve these contractors (denylist) — anyone here always waits for manual approval, whatever the amount.
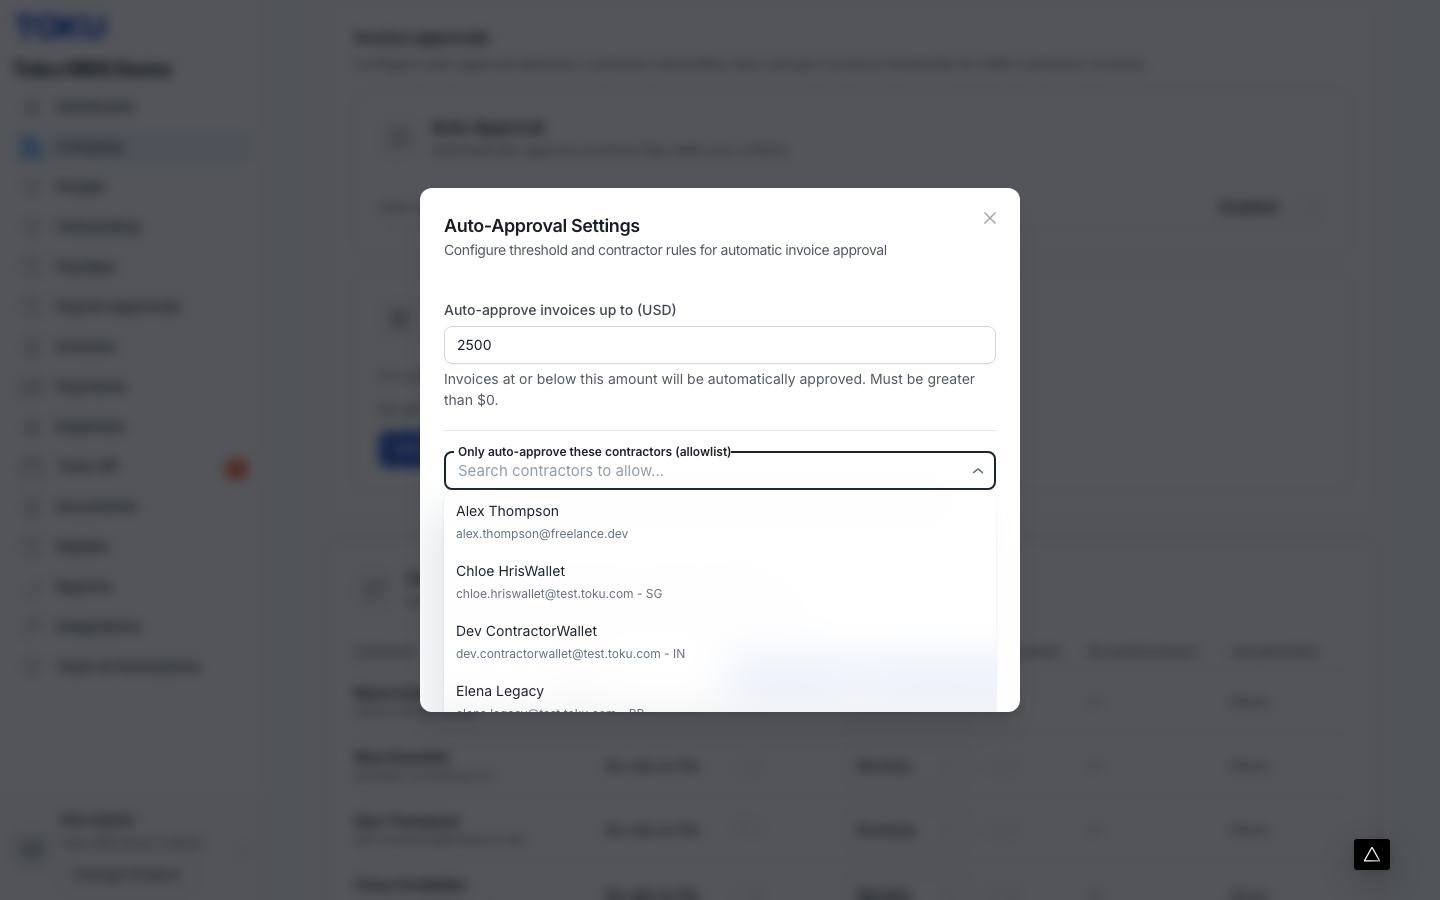
If a contractor somehow ends up on both lists, the denylist wins - they are not auto-approved.
3. Per-currency thresholds
The Per-currency thresholds card sets a separate limit for each currency you invoice in. Click Add threshold, choose the currency, type the most you will auto-approve in that currency, and click Save.
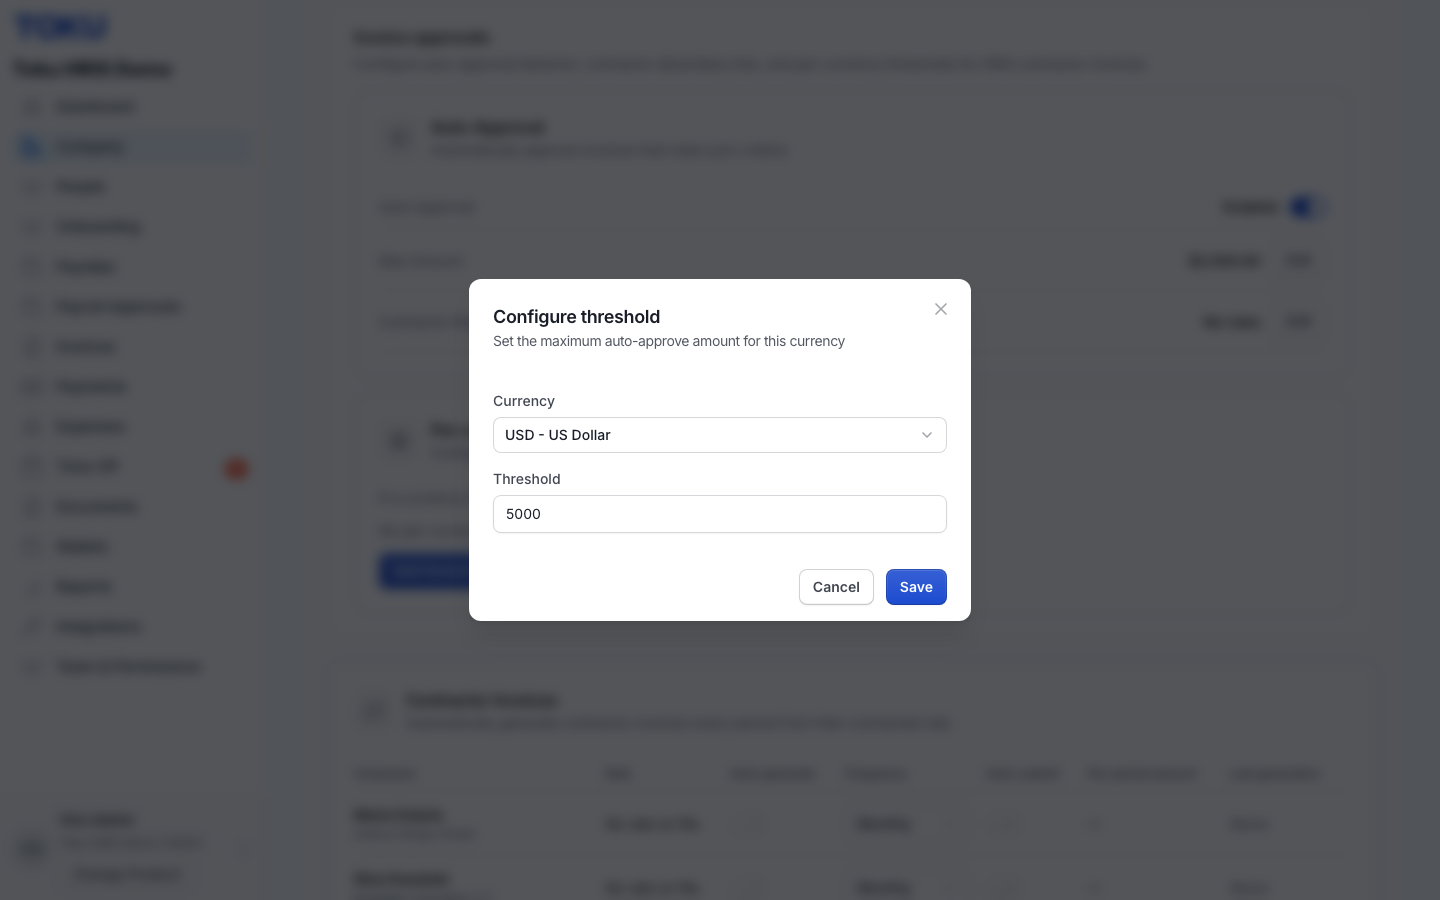
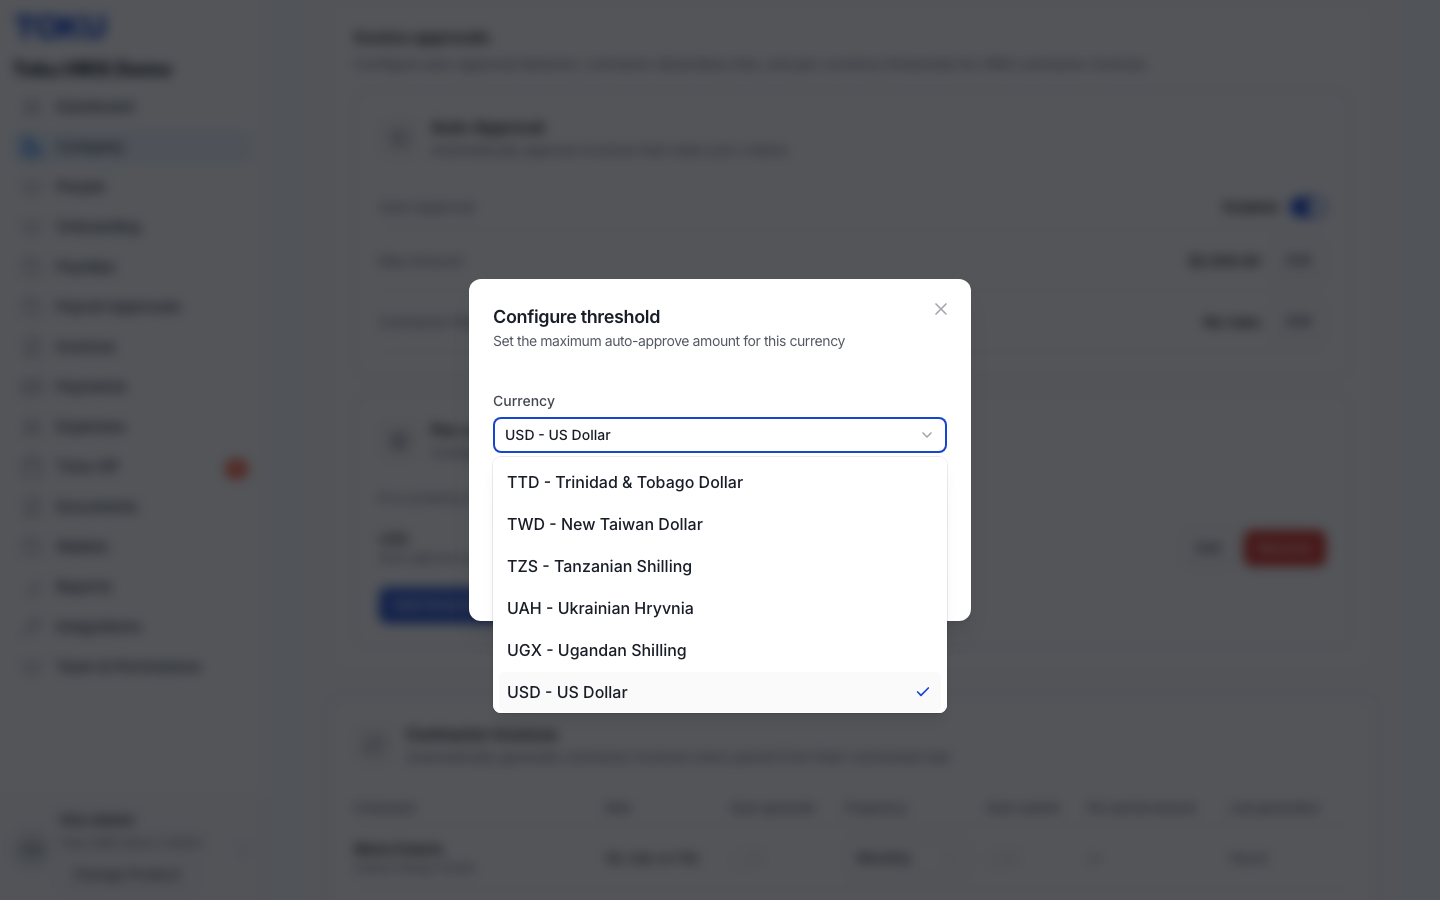
The currency list covers every currency Toku can invoice a contractor in, listed by code and name.
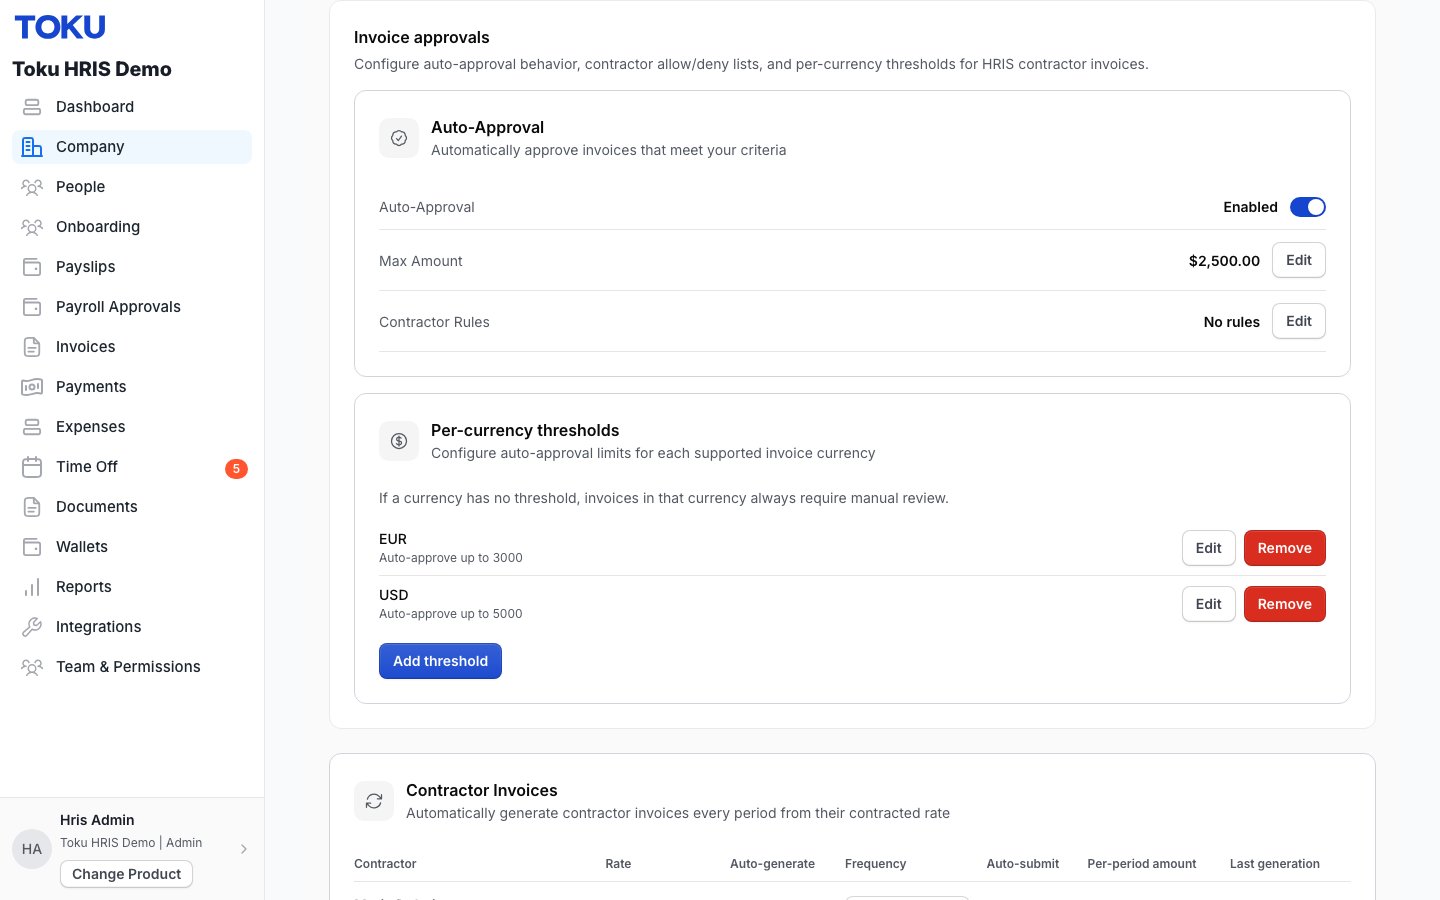
Each currency you add gets its own row, showing the limit with Edit and Remove buttons. Removing a row does not break anything - it simply sends that currency back to manual review.
Two things are worth knowing here:
- No threshold means no auto-approval. Toku never converts between currencies to decide this. If an invoice arrives in a currency you have not given a threshold, it always goes to manual review - even if the amount would be small in your own currency.
- A currency row overrides the Max Amount. In the screenshots above, Max Amount is USD 2,500 but the USD row is 5,000, so USD invoices are auto-approved up to 5,000. If you have used auto-approval since before per-currency thresholds existed, the card may offer a Migrate legacy threshold to USD button, which copies your old Max Amount into a proper USD row. Clicking it is the tidiest way to remove the ambiguity.
What happens when an invoice arrives
When a contractor invoice is submitted - whether a contractor submitted it or auto-invoicing generated it - Toku checks, in order:
- Is Auto-Approval enabled? If not, the invoice goes to Pending Review.
- Is there a threshold for that invoice's own currency (a per-currency row, or the Max Amount for USD when no USD row exists)? If not, Pending Review.
- Is the invoice total at or below that threshold? If not, Pending Review.
- Is the contractor on the denylist? If so, Pending Review.
- If you have an allowlist, is the contractor on it? If not, Pending Review. An invoice that clears all five is set to Approved on the Invoices page without anyone touching it. Anything else lands in Pending Review, exactly as it would with auto-approval switched off. Auto-approval is never applied retroactively - changing these settings affects invoices submitted from that point on, not ones already sitting in your queue.
Turn auto-invoicing on for a contractor
Step 1. Open your web browser, type https://app.toku.com into the address bar, and press Enter. The screen says Welcome back and asks only for your email address - there are no product tabs to pick from, and no password box yet. Enter your work email and click the black Continue button.
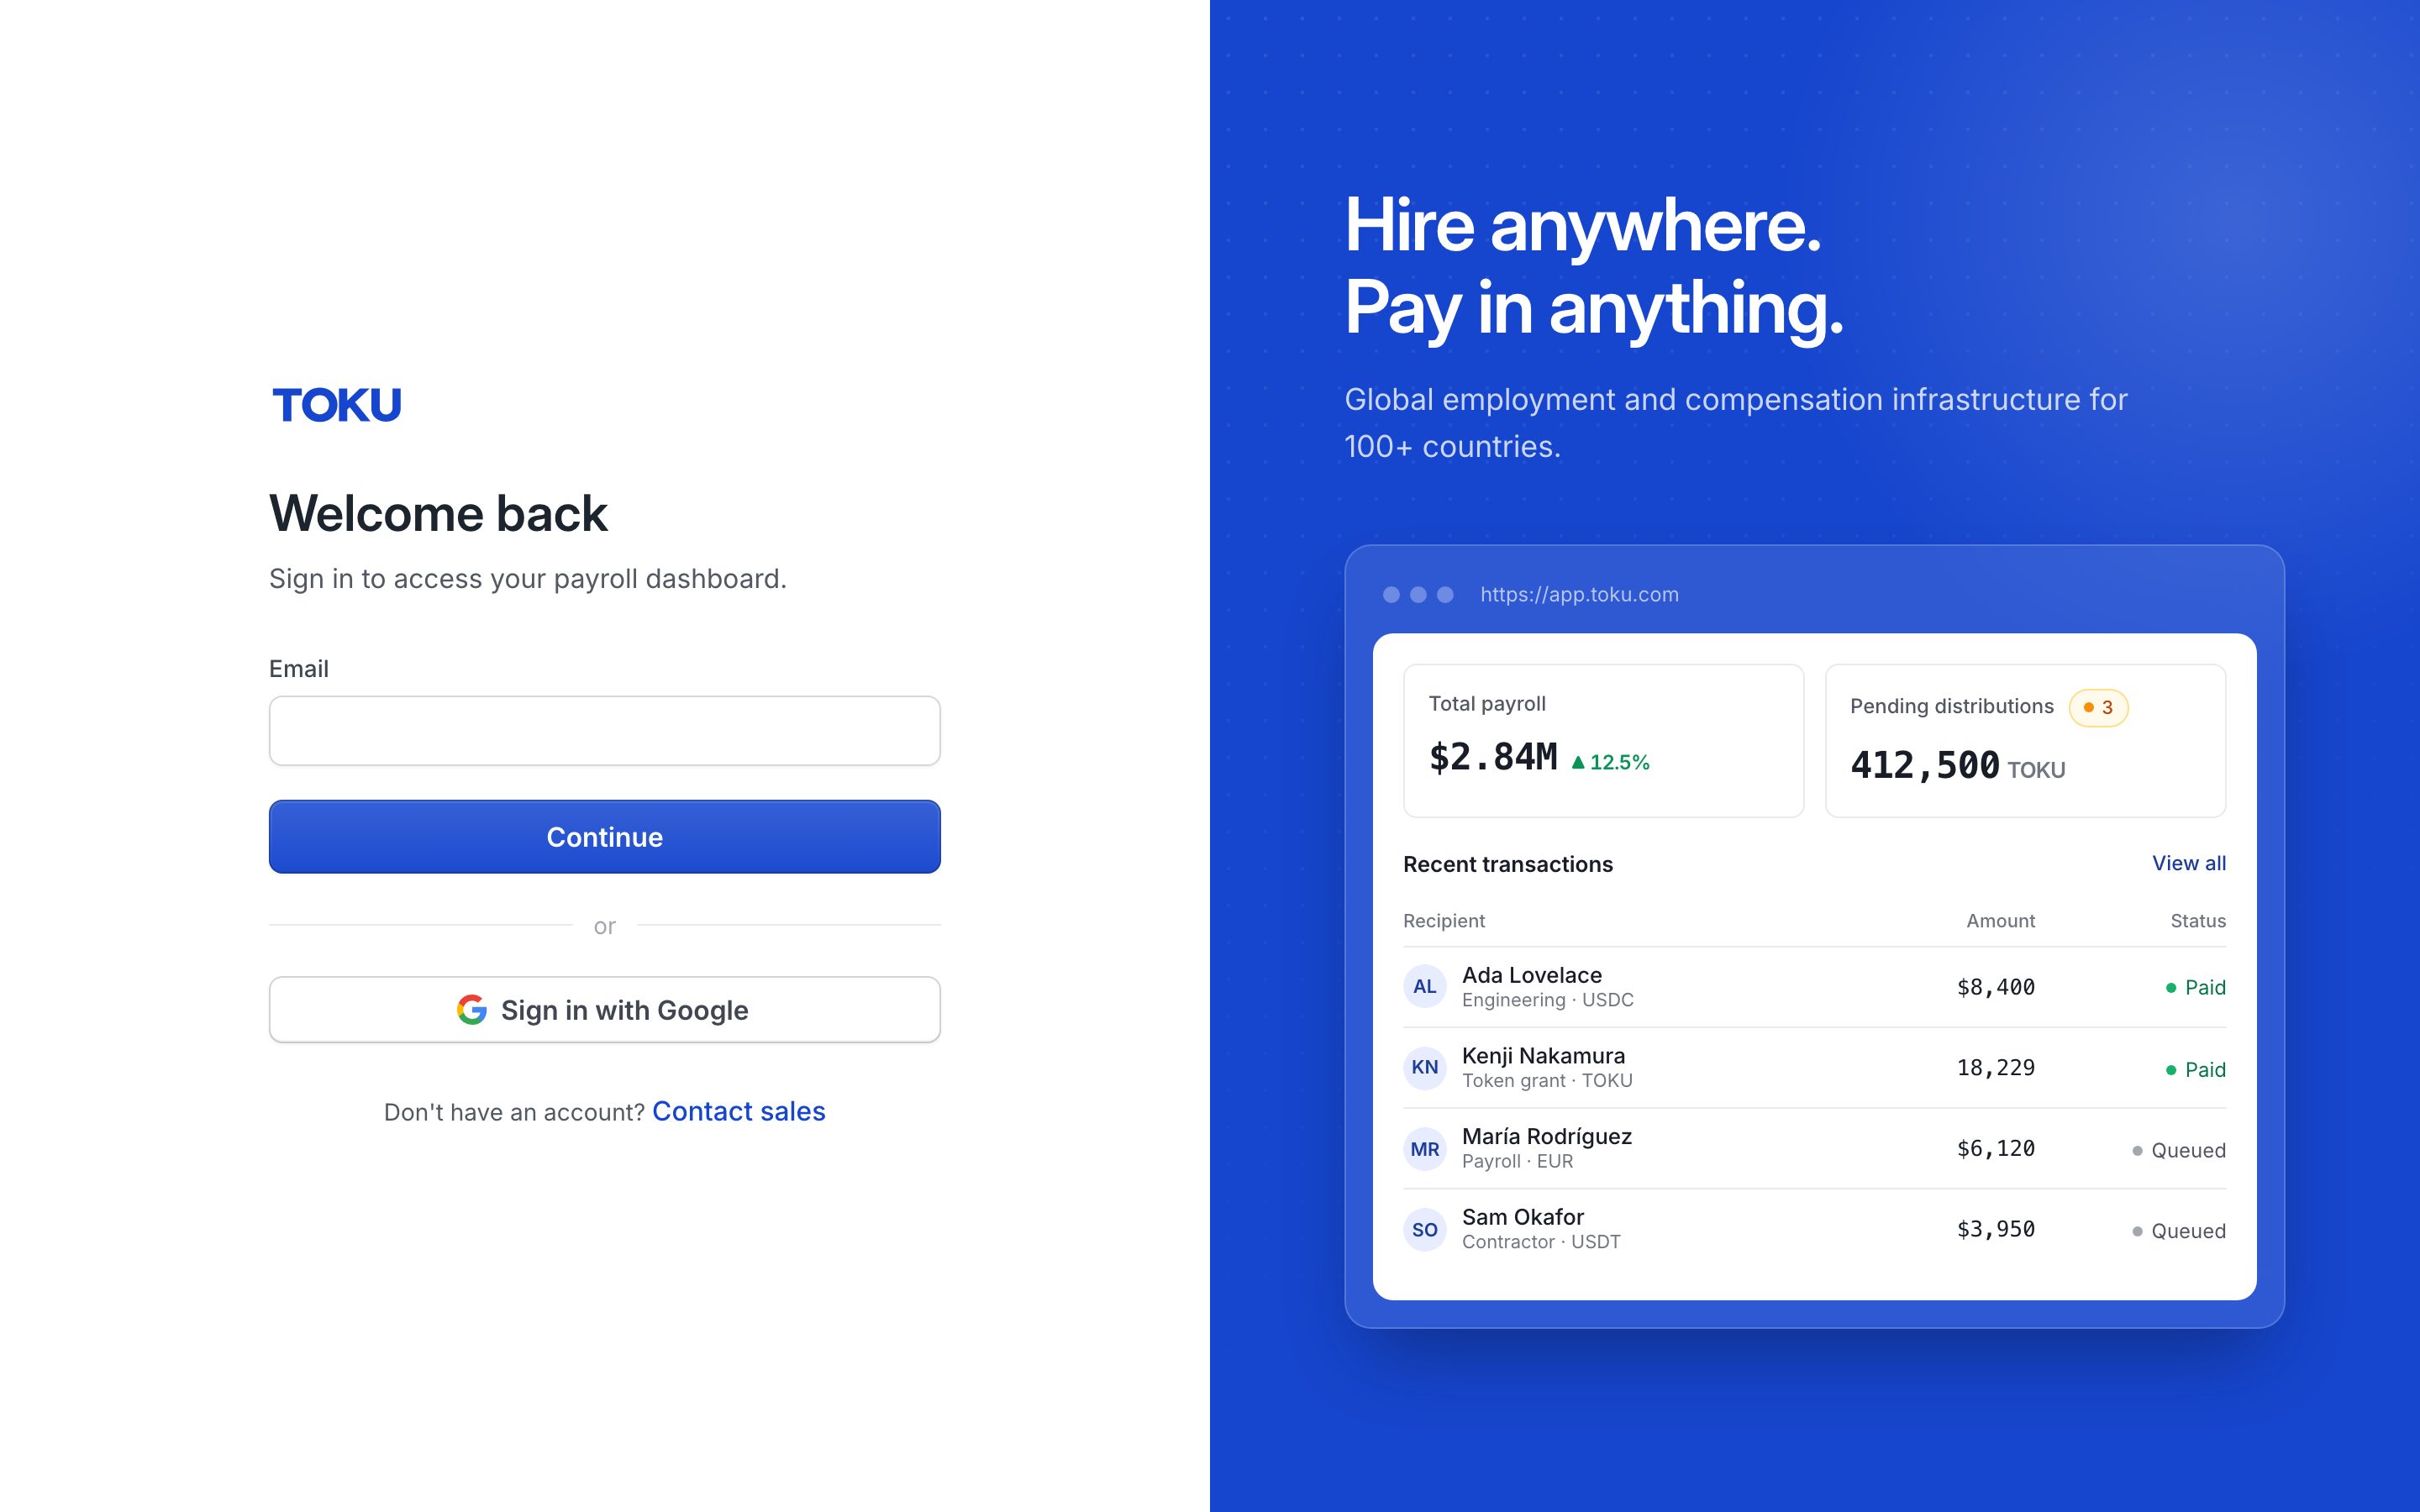
Enter your email on the Welcome back screen and click Continue.
Then enter your password on the next screen and click Sign in. (You can also click Sign in with Google, or Email me a sign-in link to sign in without a password - the link works once and expires after an hour.) Success looks like: your organization's dashboard opens, with your organization's name at the top of the left sidebar. If a screen appears first asking which account to continue with, choose the option labeled ADMIN. If a message says your email or password is not recognized, click Forgot password?, enter your email, and click Send reset link.
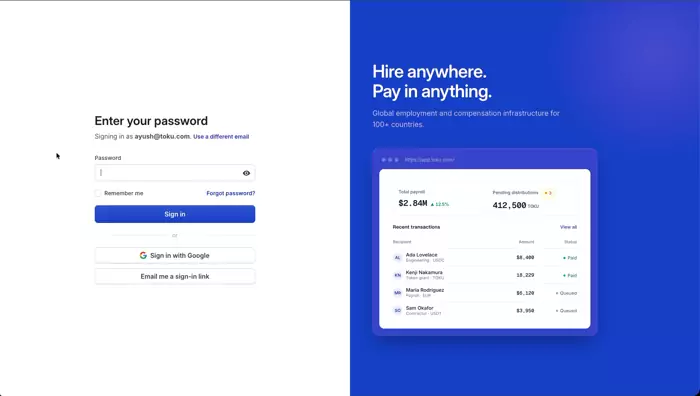
Enter your password and click Sign in.
Step 2. Type https://app.toku.com/settings into the address bar and press Enter. The Settings page opens with your company profile at the top. Scroll down until you see the section titled Contractor Invoices, described as "Automatically generate contractor invoices every period from their contracted rate". It is a table with one row per contractor and seven columns: Contractor, Rate, Auto-generate, Frequency, Auto-submit, Per-period amount, and Last generation. The page can take a few seconds to fill in - if sections appear one by one, wait for it to finish. If the Contractor Invoices section never appears, auto-invoicing is not switched on for your organization; see "Still stuck?" below.
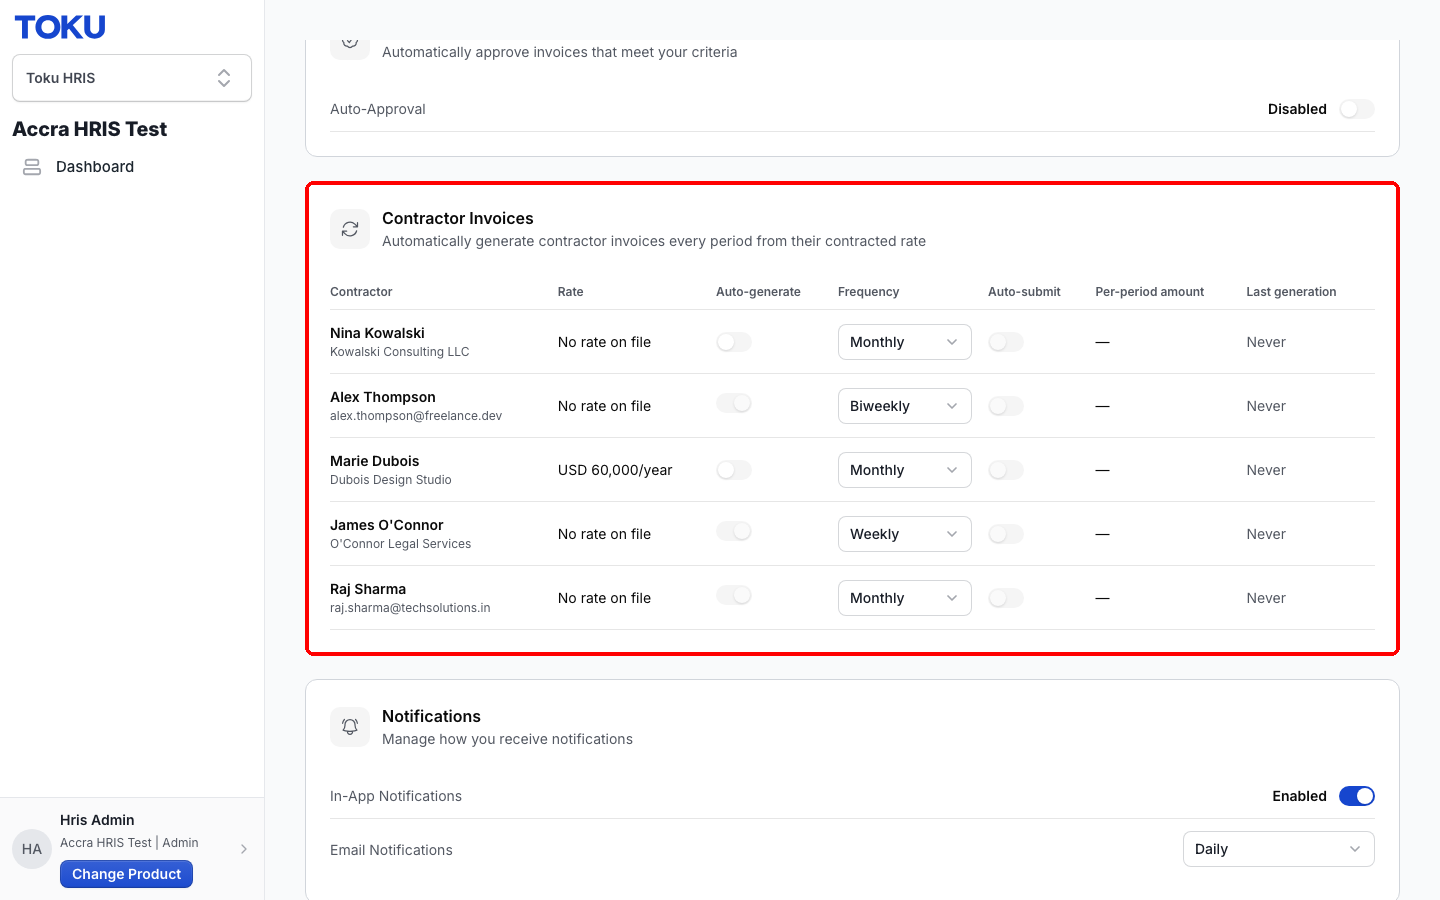
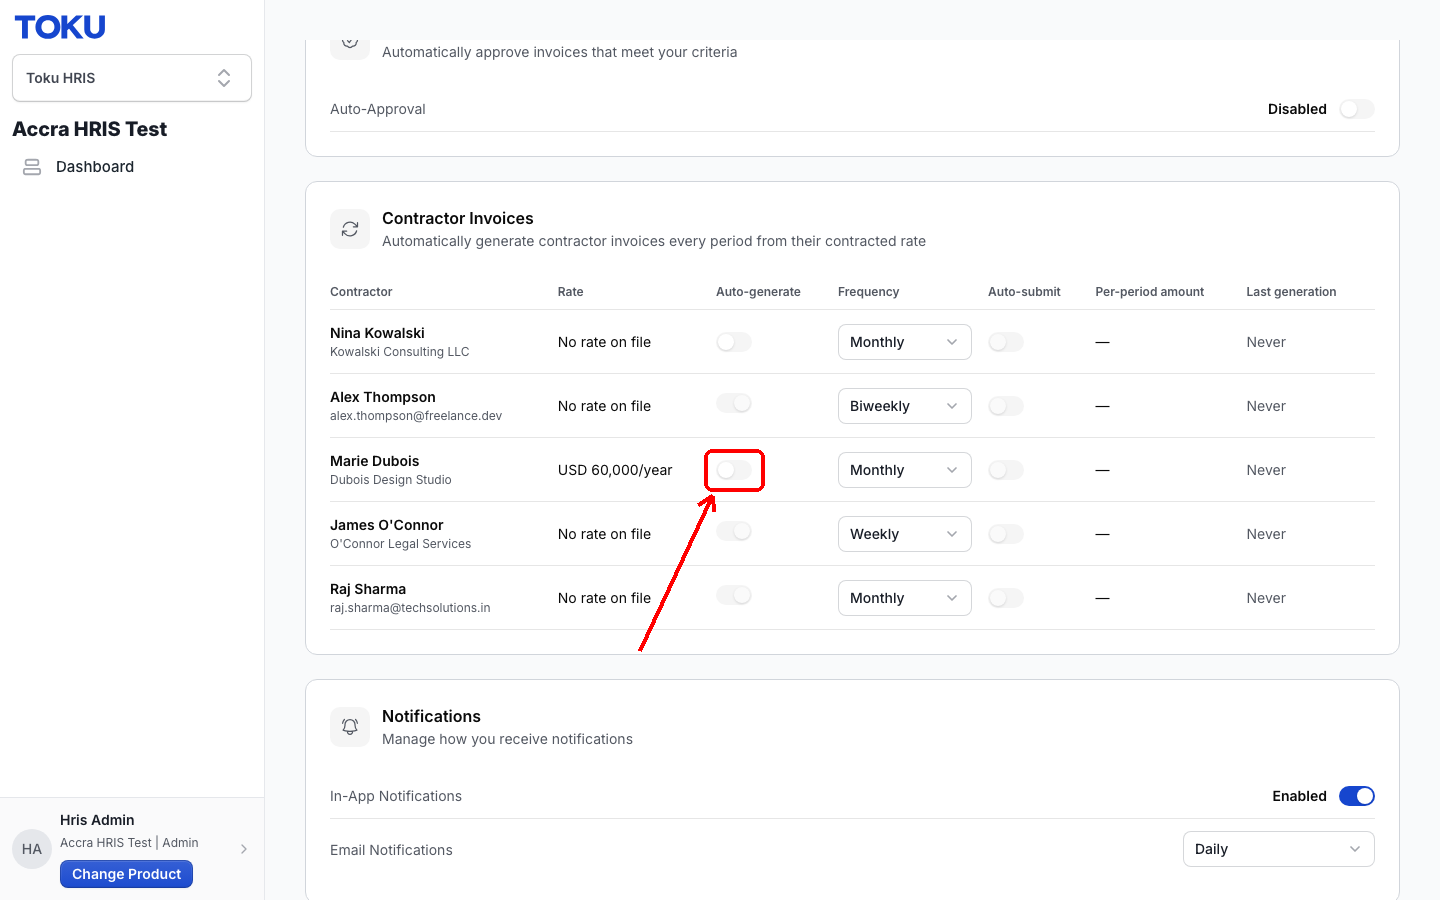
Step 3. Find the row for the contractor you want to pay automatically and click the small oval switch in the Auto-generate column of their row. The switch is grey (off) for every contractor until someone turns it on - it never starts on by itself. If the switch looks pale and nothing happens when you click it, rest your mouse pointer on it: a short message explains why it is unavailable, most often "This contractor has no rate on file", which means a rate must be added to their contract details first.
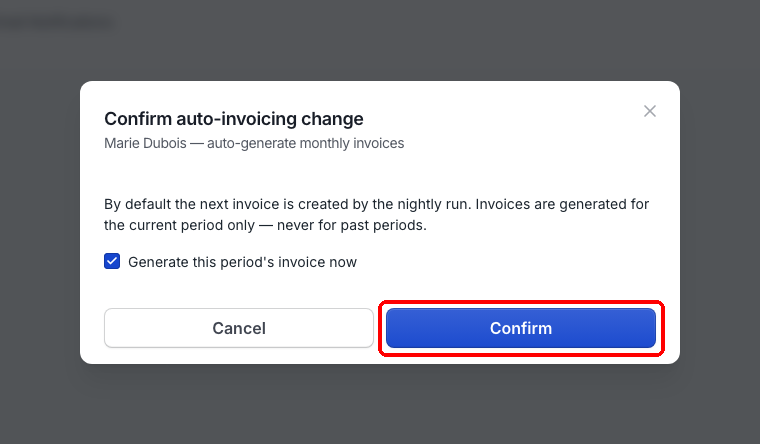
Step 4. A window titled Confirm auto-invoicing change opens in the middle of the screen, showing the contractor's name and the schedule you are about to turn on. Read the note in the window: by default the next invoice is created by the overnight run, and invoices are only ever generated for the current period - never for past periods. If you want this period's invoice created immediately, click the small square checkbox next to Generate this period's invoice now so it turns blue with a white tick. If you would rather wait for the overnight run, leave the box unticked.
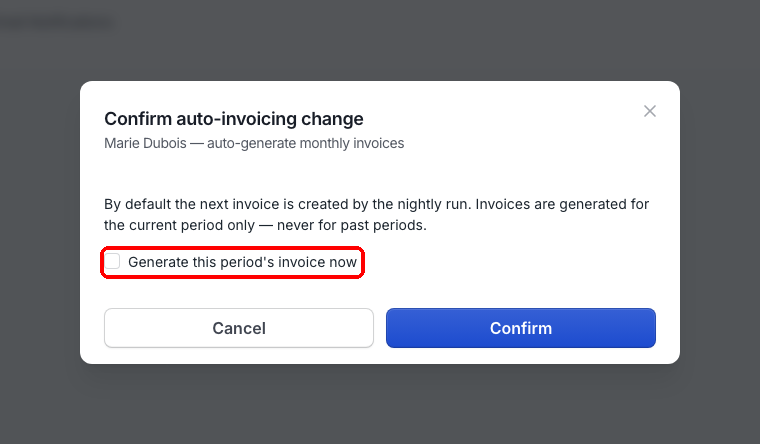
Step 5. Click the blue Confirm button at the bottom right of the window. Saving takes a few seconds. Success looks like: the window closes and a green message appears briefly confirming the settings were saved. If a red error message appears instead, the change was not saved - note the exact wording, try once more, and contact support if it happens again.
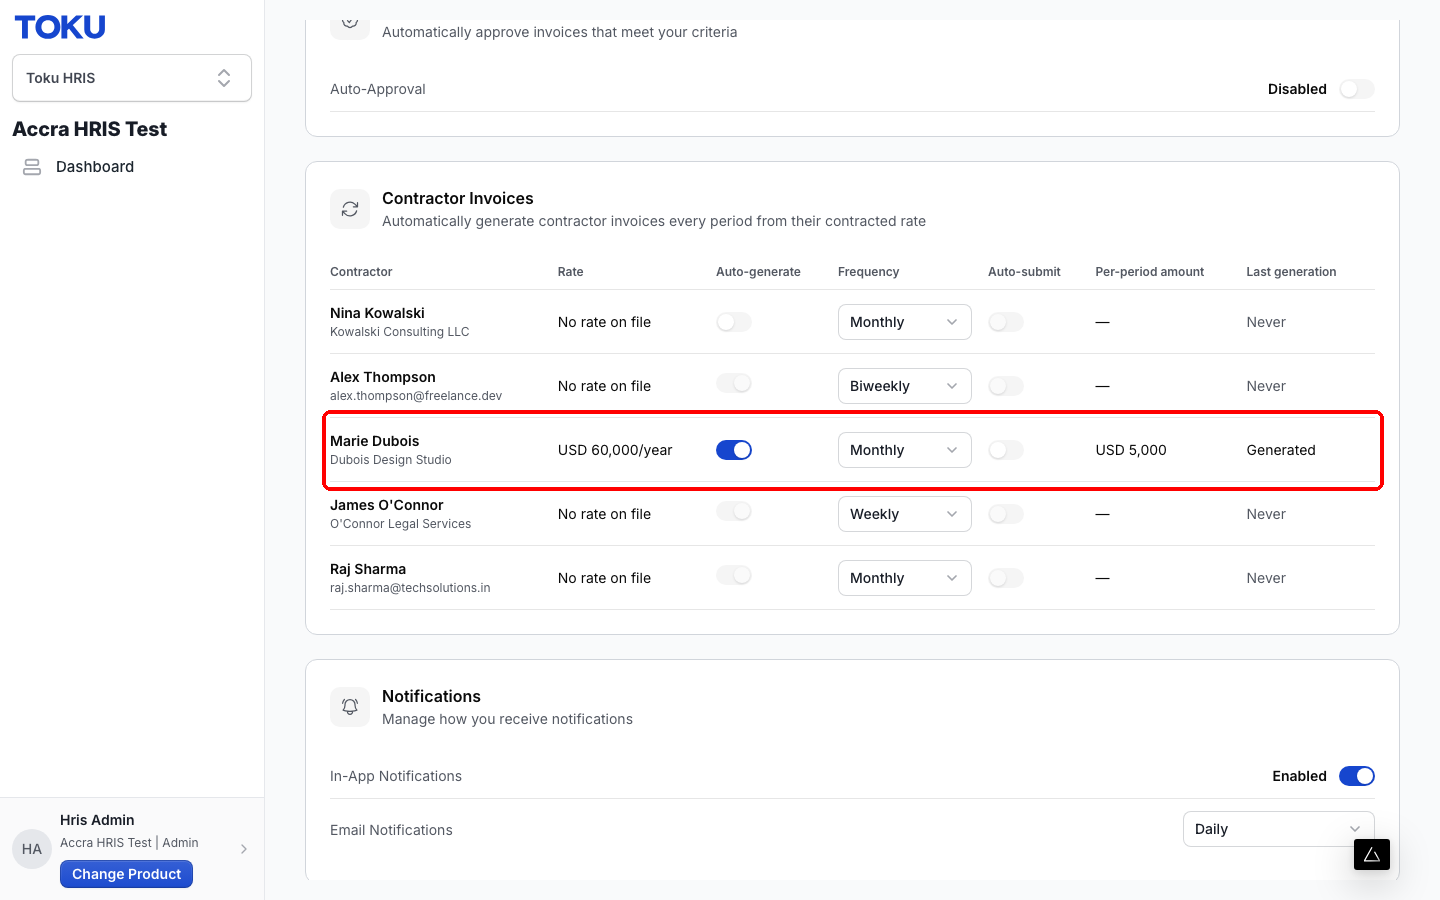
Step 6. Look at the contractor's row again. The Auto-generate switch is now blue (on). If you ticked "Generate this period's invoice now", the Per-period amount column shows the invoice amount (for example, USD 5,000 per month for a contractor with a USD 60,000/year rate invoiced monthly) and Last generation reads "Generated". If you left the box unticked, Last generation stays "Never" until the overnight run creates the first invoice - turning the switch on does not create an invoice at the instant you flip it.
Check whether auto-invoicing is on
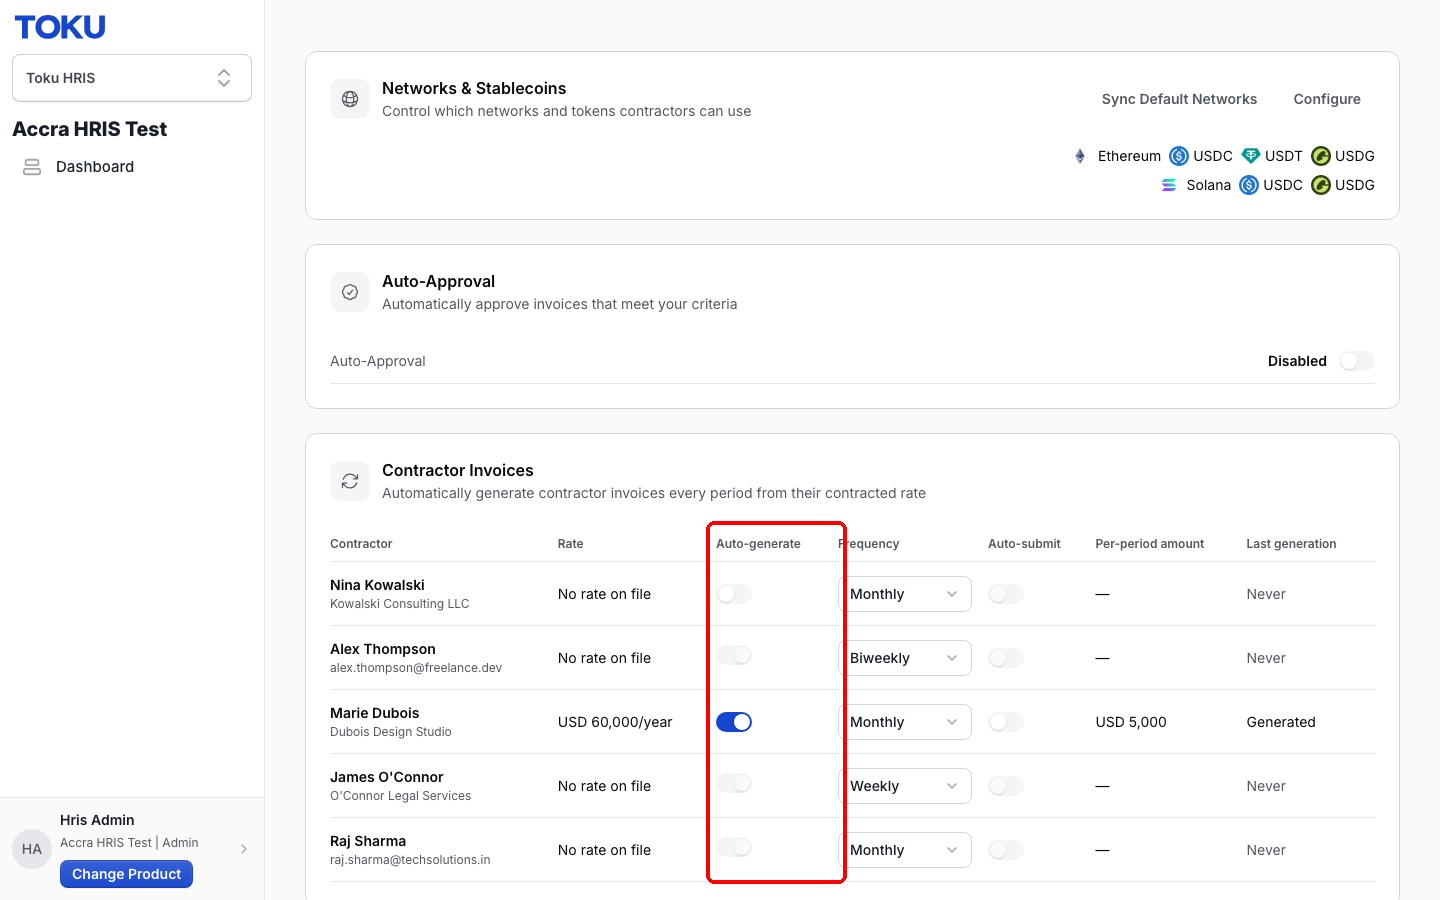
Step 7. Go to https://app.toku.com/settings and scroll to the Contractor Invoices section. Read the Auto-generate column: a blue switch means auto-invoicing is on for that contractor; a grey switch means it is off. The Frequency column shows how often their invoice is created (Weekly, Biweekly, or Monthly), and the Last generation column shows the most recent outcome for that contractor: "Generated" (an invoice was created), "Skipped" with a short reason, "Failed", or "Never" (no invoice has ever been attempted).
Why is there no invoice for my contractor?
If you expected an invoice and cannot find one, check these two causes in order - nearly all missing invoices come down to one of them.
Cause 1 - the contractor has not finished onboarding
A contractor who is still onboarding is skipped when invoices are generated, even when their Auto-generate switch is on. If the person shows as in progress or not started on your Onboarding page, Toku does not create invoices for them yet. To check, open the contractor's profile from your organization's people list and confirm their status is Active with no outstanding onboarding tasks waiting on them. You can also look at their row in the Contractor Invoices table: if Last generation reads "Skipped", Toku intentionally did not create their invoice on the last run, and the small note under "Skipped" tells you why. For someone who is still onboarding, the reason reads "not onboarded". What to do: ask the contractor to finish their outstanding onboarding steps. The next run picks them up automatically once they are done, and no invoices are created for the periods that were skipped.
Cause 2 - the auto-invoicing switch is off for them
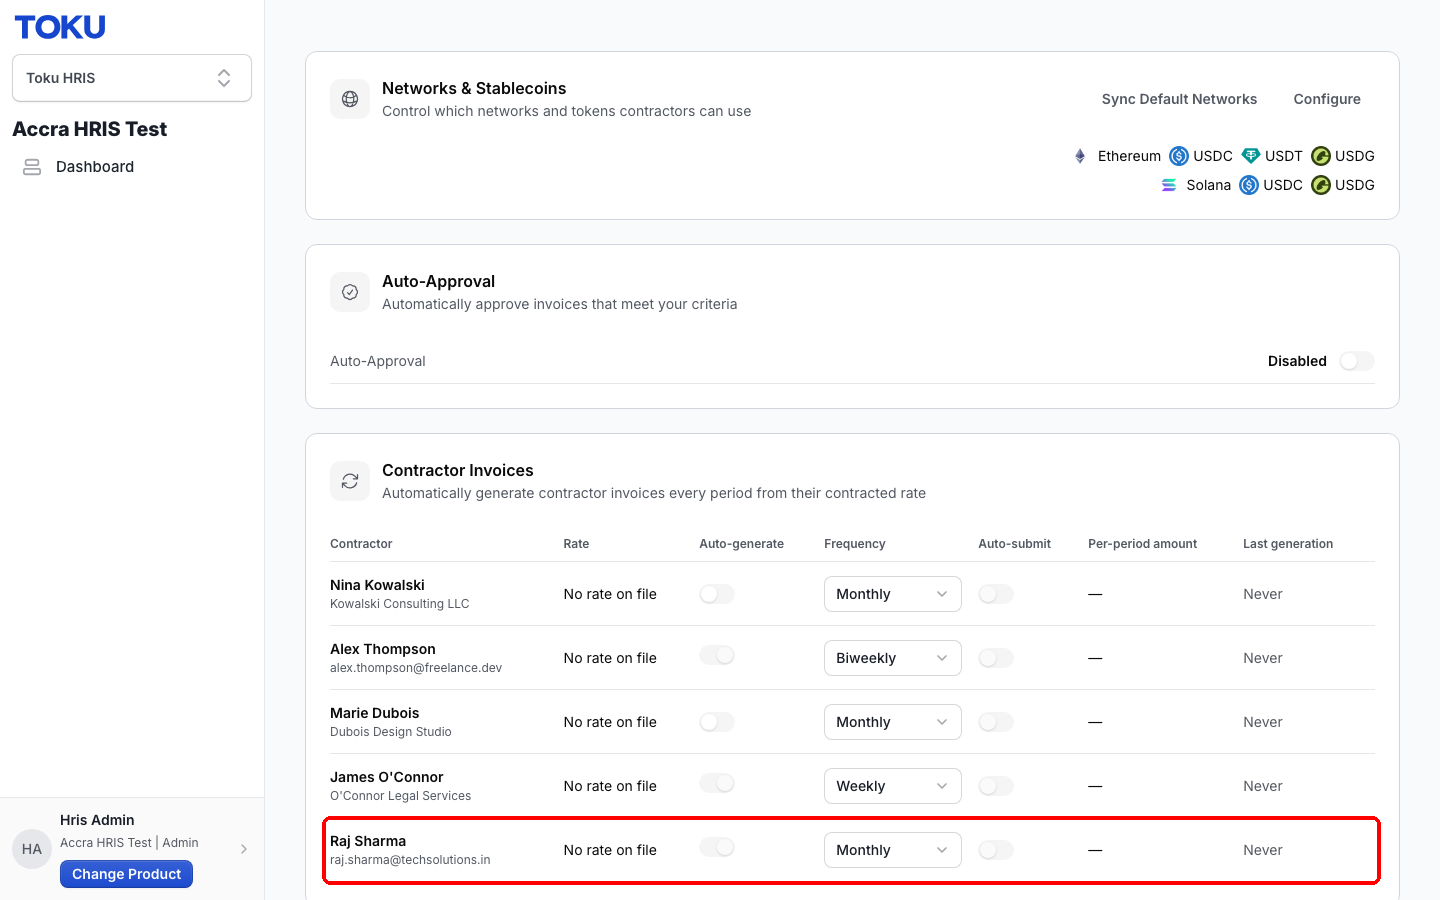
Step 8. Every contractor's switch starts off, so a contractor nobody has switched on has never had an invoice generated. On the Settings page, scroll to Contractor Invoices and look at the contractor's row: if the Auto-generate switch is grey and Last generation reads "Never", auto-invoicing has never run for them and no invoice exists. Turn it on by following "Turn auto-invoicing on for a contractor" above. Remember: the invoice appears when generation next runs (overnight), or immediately only if you tick "Generate this period's invoice now" while turning it on.
How to confirm it worked
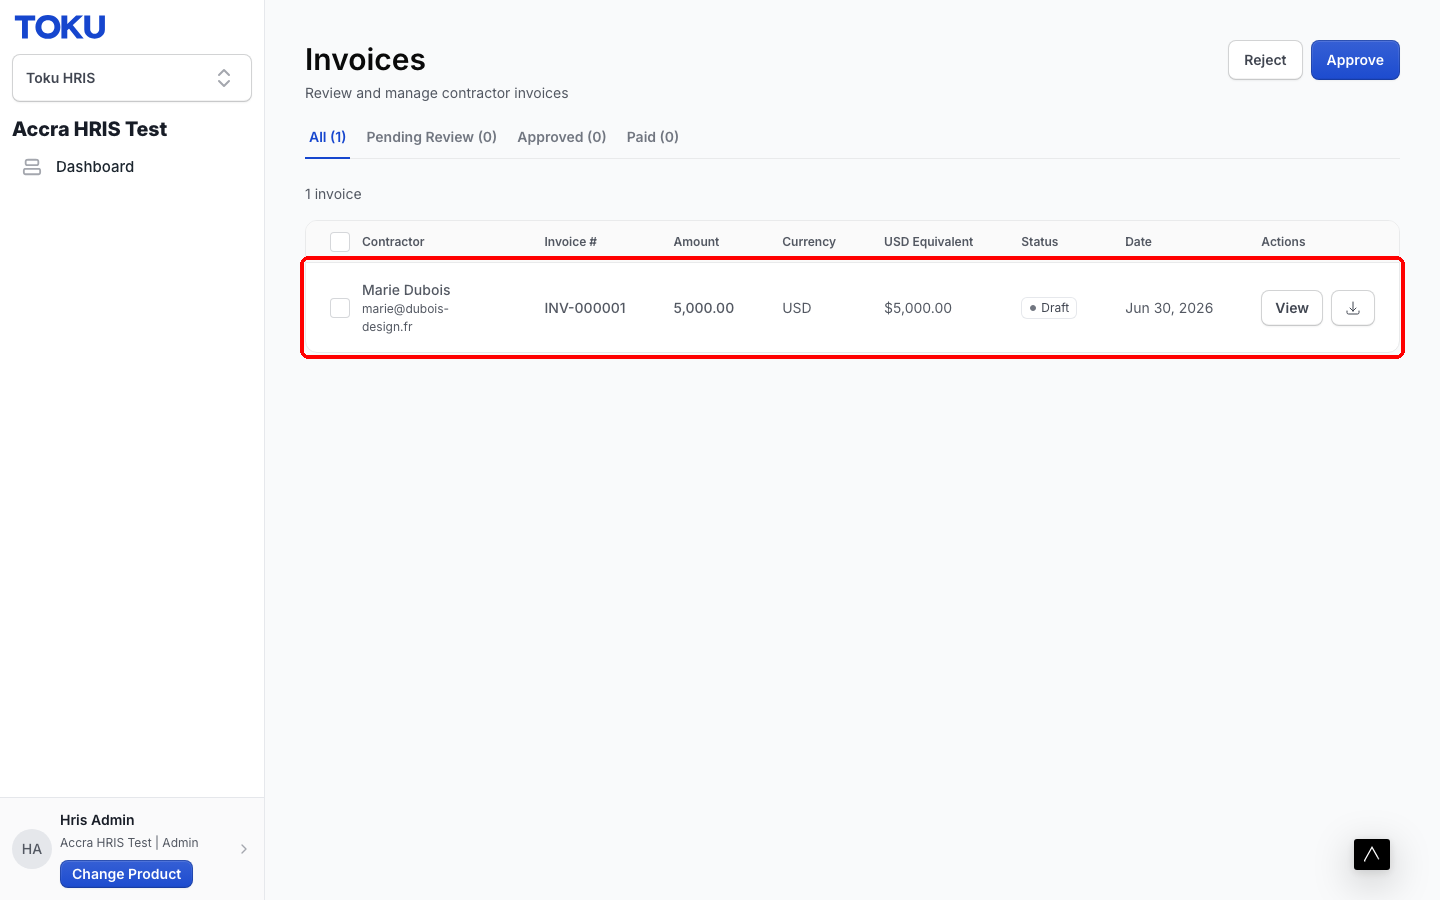
Step 9. Type https://app.toku.com/invoices into the address bar and press Enter. The Invoices page opens, titled "Review and manage contractor invoices", with tabs All, Pending Review, Approved, and Paid. A newly generated invoice appears as a row showing the contractor's name and email, an invoice number (for example INV-000001), the amount and currency, the status Draft, and the invoice date. Click View at the right of the row to open the full invoice. Success looks like: the invoice you expected is in the list. If the list is empty or the invoice is missing, work through the two causes above; if both checks pass and there is still no invoice, contact support as described next.
Still stuck?
If the contractor's switch is on, their onboarding is complete, and there is still no invoice on the Invoices page, send your Toku support contact the following so they can investigate quickly:
- Your organization's name.
- The contractor's full name and email address.
- A screenshot of the contractor's row in the Contractor Invoices section of the Settings page (so support can see the switch, frequency, and Last generation columns).
- A screenshot of the Invoices page.
- The date you expected the invoice and the invoice frequency (weekly, biweekly, or monthly).
- Whether you ticked "Generate this period's invoice now" when turning the switch on. Related articles: Toku: Contractor Invoicing: Setup & Management Guide for Org Admins, Toku: How to Submit Your Contractor Invoice as a contractor, and Toku: Managing Client-Managed Contractors.
+++Notes for the Toku docs team (internal)
- 2026-08-19 - login migration pass. Step 1 was rewritten for the app.toku.com sign-in (two-step PropelAuth flow: email → Continue → password, plus Sign in with Google and the emailed one-time sign-in link). The old "click the Employment tab" instruction and its login screenshot are gone - there are no product tabs on the new page - and the two sign-in images are the shared reusable captures used across the Employment hub. Every
tga.app.toku.comURL (login, /settings ×2, /invoices) now points atapp.toku.com. All other screenshots are the original July/August 2026 captures, re-uploaded unchanged. - Verified live on July 22, 2026 against the latest platform build (test organization "Accra HRIS Test", contractor Marie Dubois, invoice INV-000001). All screenshots are seeded test data.
- Product-vs-brief differences: the auto-invoicing settings section is titled "Contractor Invoices" on the Settings page (the brief called it "the auto-invoicing section"). The per-contractor switch is labeled "Auto-generate", defaults to off, and is disabled with a tooltip when the contractor is structurally ineligible (for example "no rate on file"). The section only renders when auto-invoicing is enabled for the organization.
- TODO: Cause 1 (contractor has not finished onboarding) has no screenshot. The people view (…/hris/people) would not load in the verification environment after three attempts (renderer error), and the admin dashboard stayed on its loading state, so the not-yet-onboarded contractor status screenshot could not be captured. Capture it and confirm the exact status wording once the people view is reachable.
- TODO: The sign-in step describes the account-picker ("choose ADMIN") conditionally; during verification the test session went straight to the dashboard, so that screen was not observed live this run (it is described in the environment brief).
- Observed oddity worth confirming with engineering: the invoice generated on July 22, 2026 for the current monthly period shows "Jun 30, 2026" in the Invoices page Date column.
- Superseded candidates (do not modify; listed for merge review): "Toku: How To Enable The Auto Invoice Feature" (https://app.notion.com/p/2160b95a751d80e89868fcc50f5106f9 — internal-only flow using the old admin backend and feature flags; outdated for the current product) and "Toku: Contractor Invoicing: Setup & Management Guide for Org Admins" (https://app.notion.com/p/2030b95a751d80de96c8fa016669d7e0, plus client-facing draft https://app.notion.com/p/3a40b95a751d8091bc01e6c98958a202) which overlap the enable/check sections of this article.
- Existing assets: the Jam by PK (admin invoice creation) was skimmed via its metadata - no transcript available (microphone off). The Loom by Shubham (checking status) could not be played from this environment; cross-check the "Check whether auto-invoicing is on" section against it when possible.
- Added August 18, 2026 - "Settings: auto-approval and per-currency thresholds". Verified live against a local instance built from
developat commit5db181bca4f9d2aafa681f6e1a676e2ff5201257, org "Toku HRIS Demo", admin[email protected]. All seven screenshots are new and unique (no reuse), captured at 1440×900 in one session with seeded test data. Behaviour was cross-checked againstsrc/server/operations/selfServe/auto-approval-eligibility.ts(checkAutoApprovalEligibilityV2) andapply-auto-approval.ts, which is where the five-check order in the article comes from. - Location discrepancy worth resolving. The full set of auto-approval controls renders only on Company → Settings tab → "Invoice approvals" (
/hris/company), which is where the new section points. The/settingspage this article already uses for Steps 2 and 7 renders the Auto-Approval card but not Per-currency thresholds (src/pages/settings/index.tsximportsApprovalSettingsSectiononly;HRISCompanyPage.tsxrenders both inside the "Invoice approvals" wrapper). So an admin following Step 2 to/settingscan enable auto-approval but cannot set a currency threshold - and without a currency threshold, auto-approval approves nothing. Worth asking product whether/settingsshould also renderPerCurrencyThresholdsSection; if it does, simplify the new section to a single location. - The new section deliberately uses its own sub-headings instead of "Step N" labels, so the existing Step 1 - 9 numbering did not have to be renumbered.
- Product subtlety captured in the article: the modal's "Auto-approve invoices up to (USD)" is the legacy single
Organization.autoApprovalThresholdscalar, shown in the card as Max Amount. It is consulted only for USD invoices and only when no USD per-currency row exists (resolveThresholdForCurrency). The screenshots show Max Amount USD 2,500 alongside a USD row of 5,000 precisely to illustrate that the row wins; if the docs team prefers a non-conflicting example, re-capture with matching values. - Not captured: the Migrate legacy threshold to USD banner. It renders only for an org that has a legacy scalar and no USD row, which a freshly seeded org does not have. It is described in prose but has no screenshot - capture it against an org in that state if one is available.
- No product bugs were hit while capturing this section. +++