
 10 MIN READ
 UPDATED OCT 30, 2026
⚠️ Contractor invoice and payment deadlines: late action means late payment
- Contractors: submit invoices by the 19th of each month. A saved draft is not a submitted invoice.
- Admins: approve invoices by the 21st of each month. Submission alone does not authorize payment.
- Funding: Toku must receive cleared funds 4 - 5 business days before payout. Initiating a transfer or sending proof of payment does not meet the deadline.
- Standard monthly payout: the last day of the month, provided submission, approval, and funding deadlines are met. Late submission, approval, or funding will delay payment. Every day of delay pushes payment back by at least one day. A missed payment cycle can cause a longer delay; the invoice due date is not a guarantee of payment.
Automation does not remove these deadlines. Earlier published holiday deadlines take precedence; see Toku: 2026 End-of-Year Payroll & Payment Guide.
📘 Audience: contributors receiving crypto payouts · Customer-facing · Last updated October 30, 2026.
Who this is for and what you'll accomplish
This guide is for contributors - contractors and other individual earners - who want part or all of their pay sent to a crypto wallet. By the end, you will have added your wallet address to Toku so payouts can be sent to it, and you will know how the verification step that follows works. No prior crypto experience is needed; every click is shown with a screenshot.
What adding a wallet does (and does not) do
Adding a wallet to Toku means one thing: you paste in your wallet address — a long string of letters and numbers that works like an account number - so Toku knows where to send your money.
- Toku never connects to your wallet, never controls it, and can never take anything out of it. A wallet address is public information and is safe to share.
- You will never be asked for your password, private key, seed phrase, or recovery phrase. If anything ever asks you for those, stop and contact support.
- This is why the option in the product is called Add External Wallet: you are only telling Toku an address, not linking or "connecting" the wallet itself.
Before you start (2FA required)
Have these ready before you begin:
- Your login: you sign in at https://app.toku.com with the email and password you used when your organization invited you. (This replaced tga.app.toku.com in August 2026.) You need your own contributor login - this guide is written for the contributor view, not the administrator view.
- Your wallet address: open your wallet app (for example MetaMask, Coinbase Wallet, or an exchange account) and use its Copy address button. Never type an address by hand.
- The right network: a network is the blockchain your money travels on (for example Ethereum, Solana, or Polygon). Your wallet address must belong to the network you pick in Toku. If you are not sure which network your wallet uses, check in your wallet app before starting.
- Two-factor authentication (2FA): when your organization has two-factor authentication turned on, Toku asks for a 6-digit code from your authenticator app before it saves a new wallet. If you have not set 2FA up yet, do that first in your account security settings - otherwise the wallet flow will stop and ask you to (see "Common blocks" below).
Add your wallet
Step 1 - Open the sign-in page. In your browser, go to https://app.toku.com. You will see a page headed Welcome back with a single Email box. There are no product tabs to choose any more - if you do see three tabs, you have landed on an old cached page or bookmark, so retype the address in full. If you land somewhere else entirely, you may already be signed in - skip to Step 3.
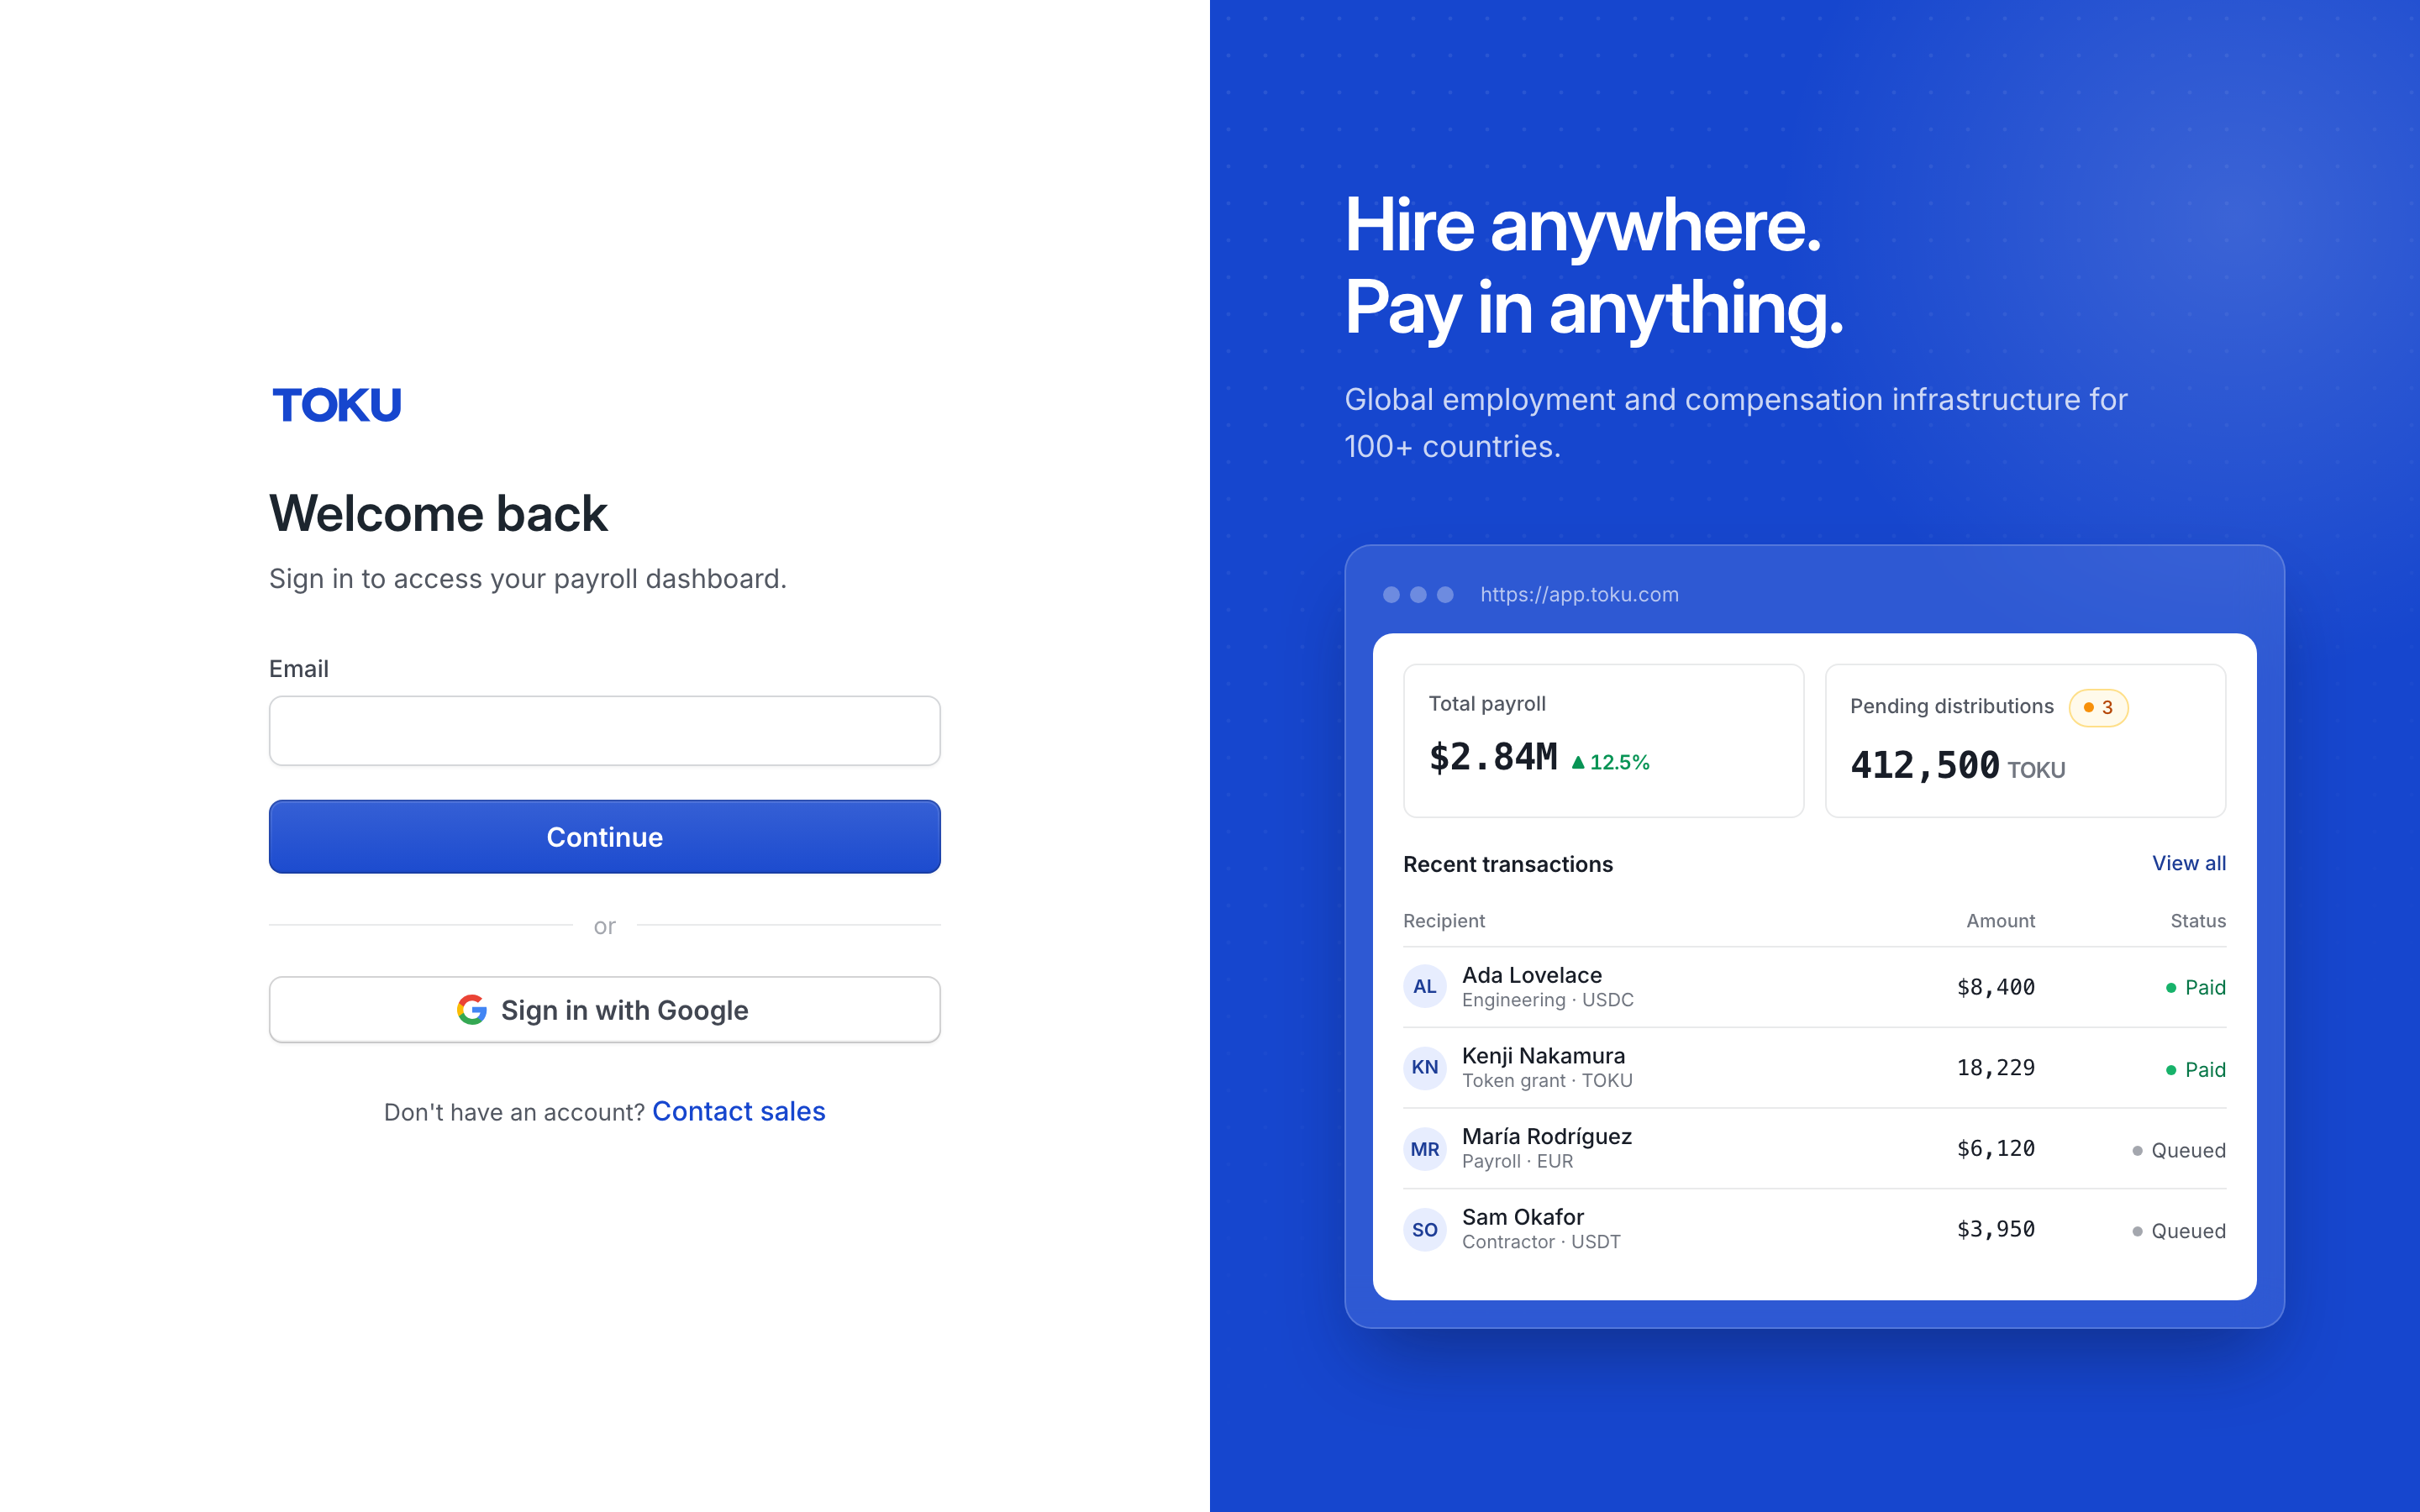
The sign-in page at app.toku.com.
Step 2 - Enter your email, then your password. Type the email address your organization invited you with into the Email field and click Continue. The page then asks for your password: type it and click the blue Sign in button. Signing in normally takes a few seconds. If a screen asks how you would like to continue, click the row for your organization and role, then the Continue as button. If your password is rejected, use Forgot password?. You can also use Sign in with Google, or ask Toku to email you a one-time sign-in link, instead of a password.
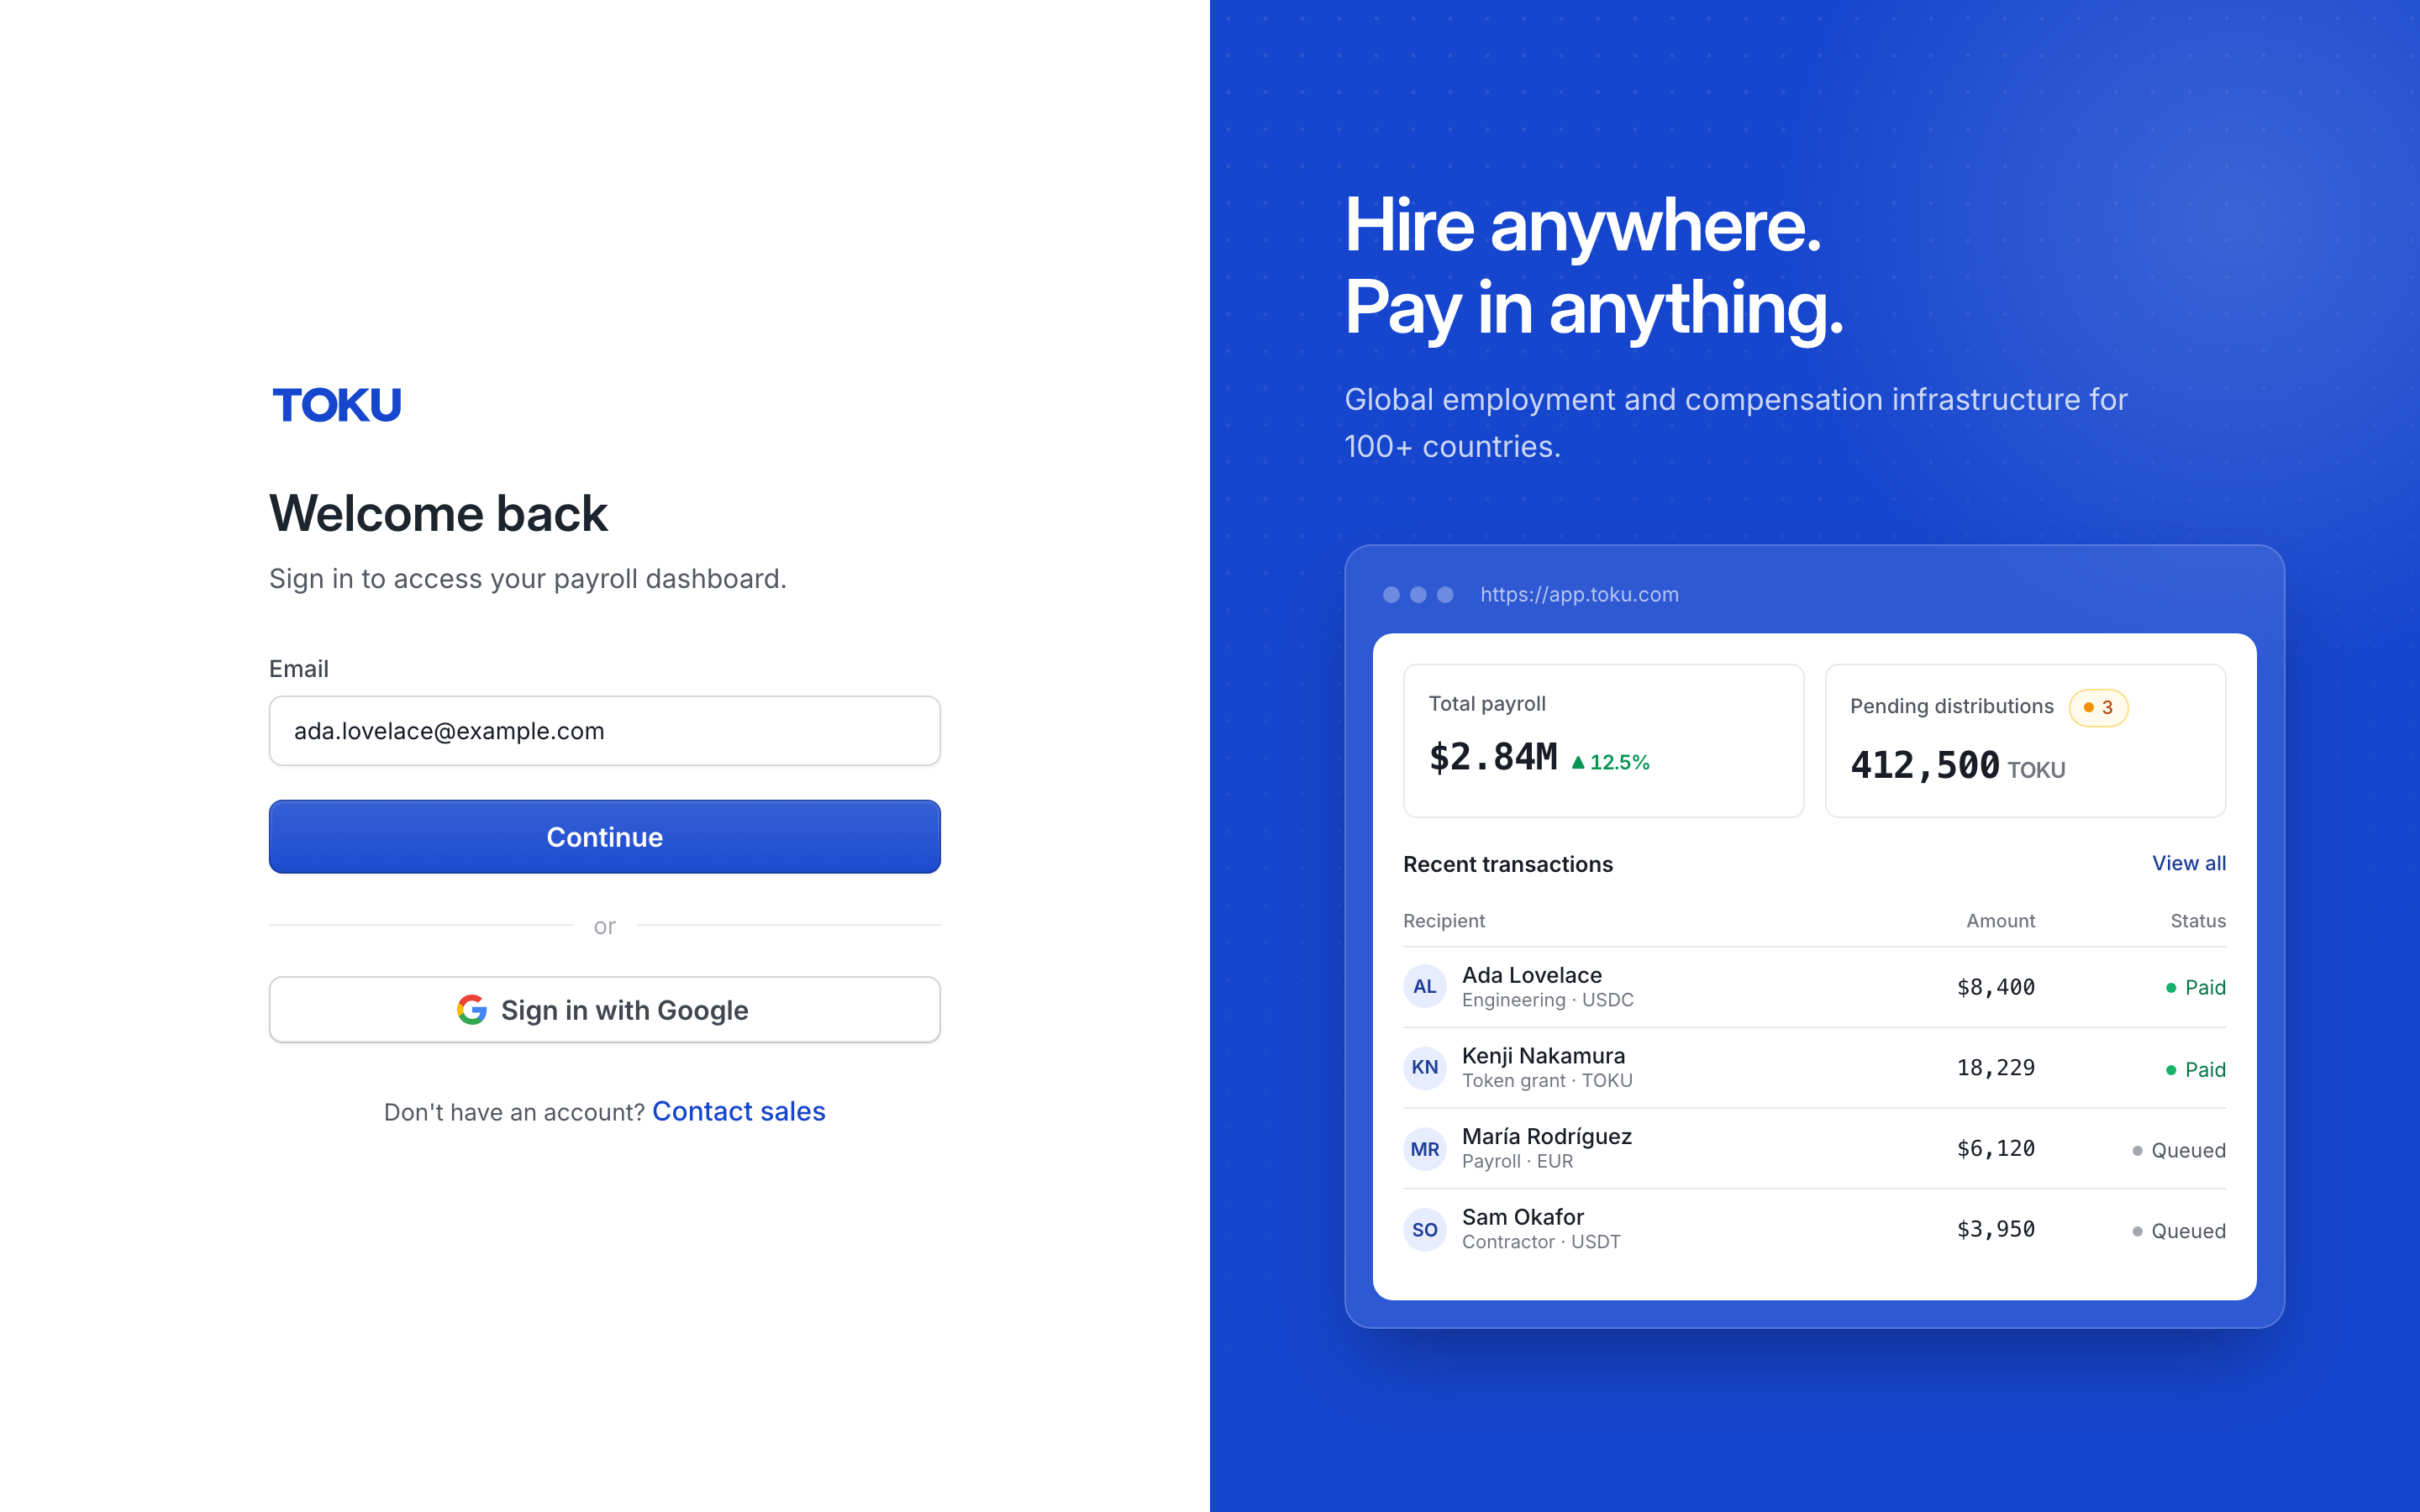
Enter your email and select Continue.
Step 3 - Click Payment Methods in the left menu. After signing in you land on your home screen, with a menu down the left side of the page (Overview, Invoices, Documents, Profile, and so on). Click Payment Methods under FINANCE in that menu. If you do not see a Payment Methods item, your organization may not have crypto payouts turned on for your role - contact them to confirm.
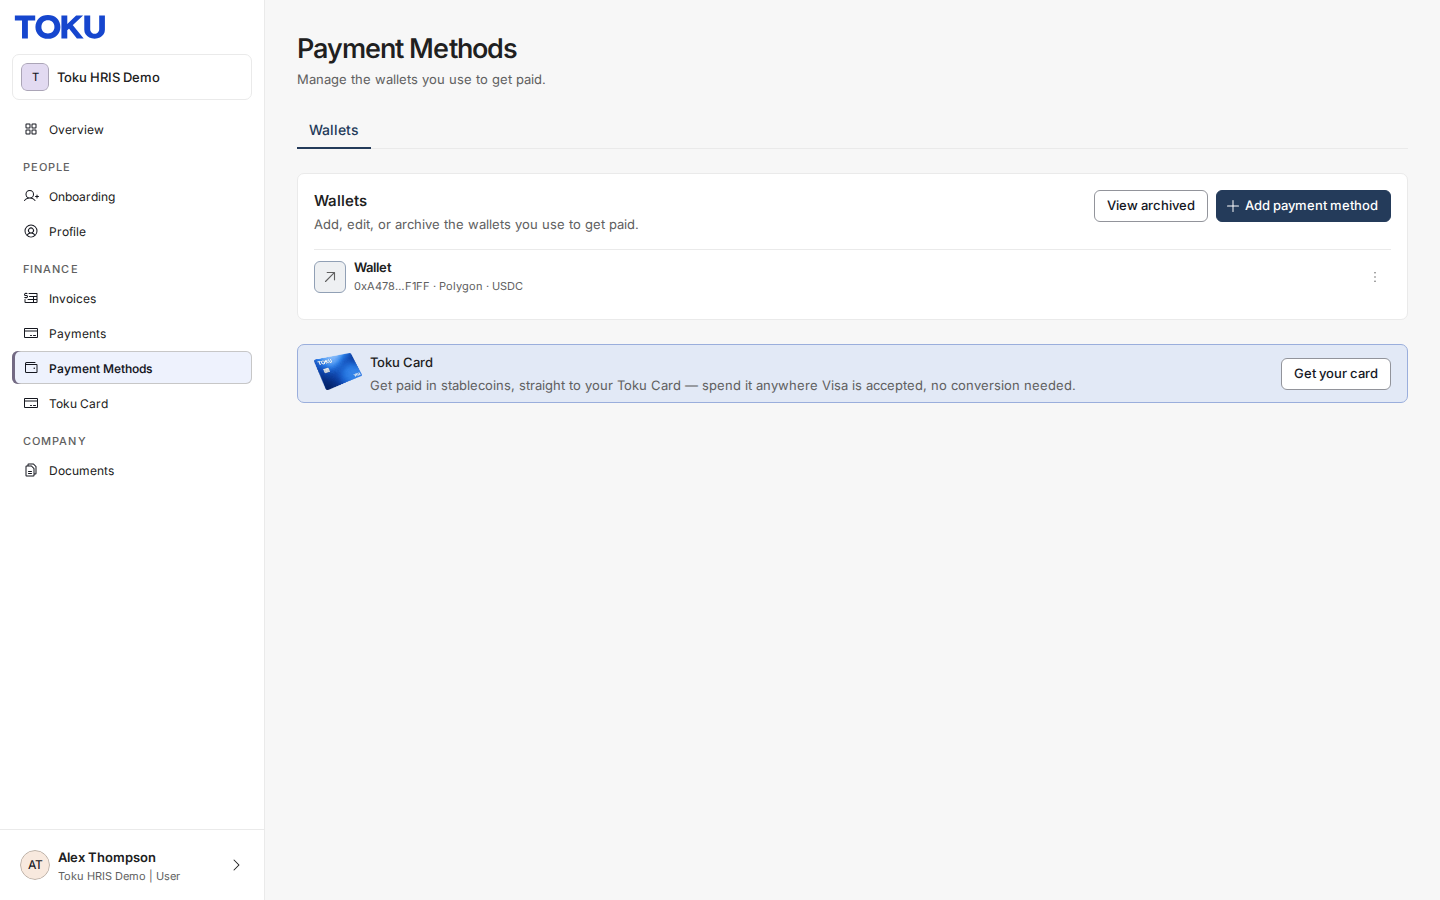
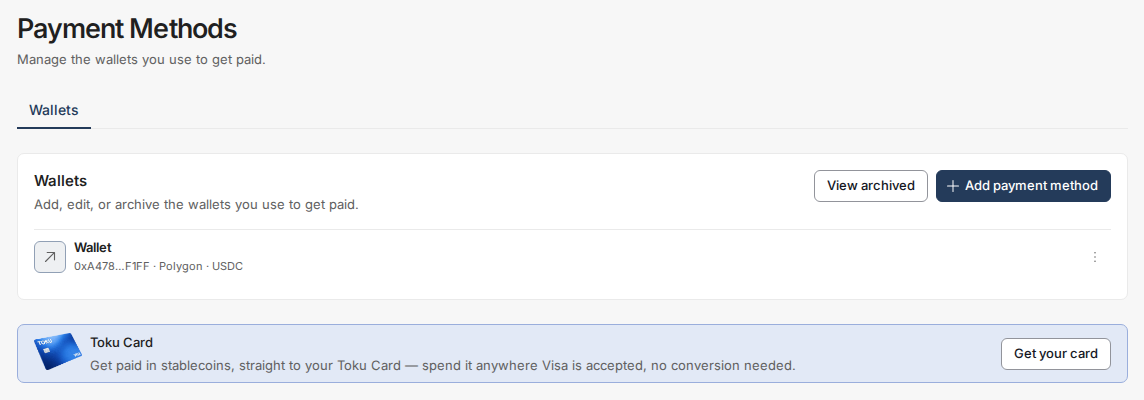
Step 4 - Click Add payment method. The Payment Methods page opens, showing a Wallets card that lists any wallets already on file. In the top-right corner of that card, click the Add payment method button. A window titled "Add Payment Method" opens in the middle of the screen within a few seconds.
Step 5 - Select Add External Wallet. In the "Add Payment Method" window you will see choices such as Create a New Wallet and Add External Wallet (employees also see Add checking or savings account). Click Add External Wallet ("Enter a wallet address manually"). A blue outline and shading show it is selected. Remember: this only records your address - nothing connects to your wallet.
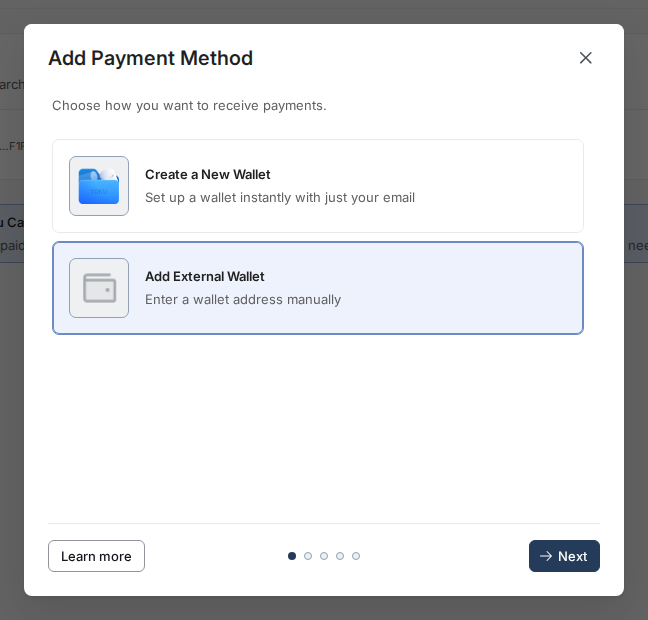
Step 6 - Click Next. With Add External Wallet selected, click the Next button in the bottom-right corner of the window. The window changes to "Select Payment Type". If nothing happens, make sure one of the options is actually selected first.
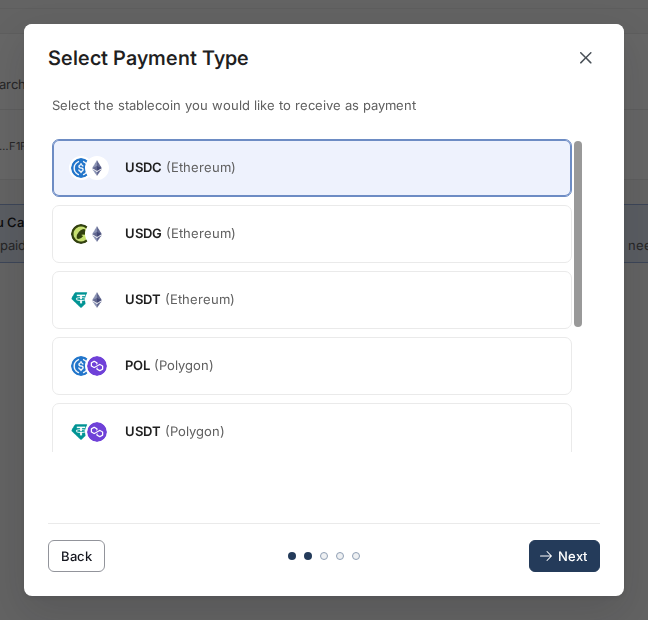
Step 7 - Select the stablecoin and network you want to be paid in. The "Select Payment Type" window lists each currency-and-network combination your organization has turned on - for example "USDC (Ethereum)", "USDT (Ethereum)", or "USDC (Polygon)". The name in parentheses is the network. Click the row that matches both the coin you want and the network your wallet uses; it gets a blue outline when selected. The list can take a few seconds to load. If the network you need is not listed, see "Common blocks" below.
Step 8 - Click Next. Click the Next button in the bottom-right corner of the window. The window changes to "Add External Wallet" with a "Wallet Address" field and a "You'll Receive" tag showing the coin and network you chose.
Step 9 - Paste your wallet address and double-check it. Click into the Wallet Address field and paste the address you copied from your wallet app. Before moving on, compare the first 6 and last 6 characters of what you pasted against your wallet app - payouts sent to a wrong address on a real network generally cannot be recovered, and the form will accept whatever you paste, so this check is on you. When you are sure it matches, click Next. The button shows a spinner for a few seconds while your wallet is saved. If your organization requires two-factor authentication, a step asking for your 6-digit authenticator code appears here first - enter the code to continue.
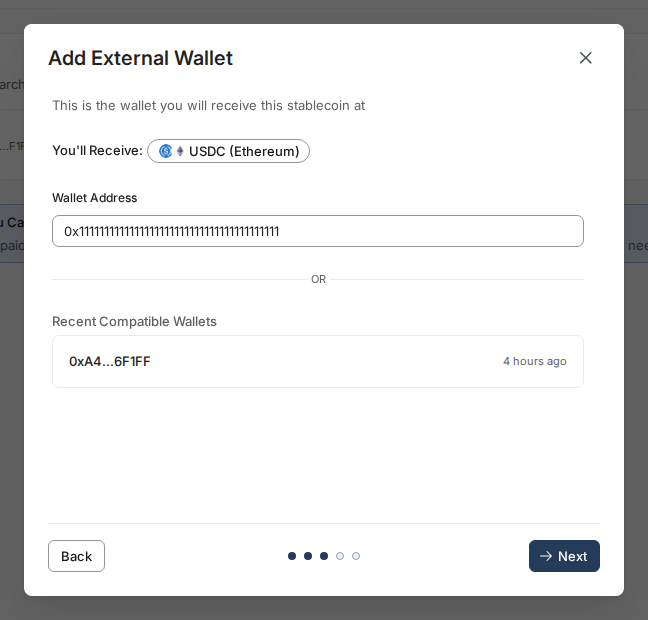
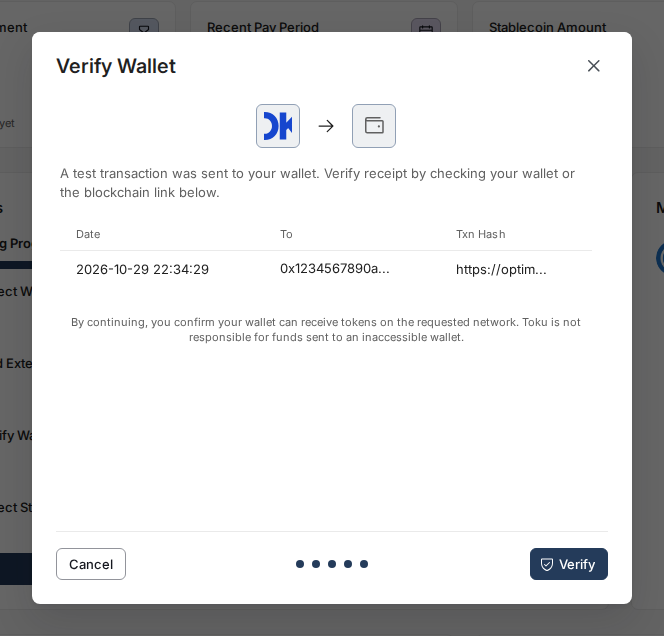
Step 10 - Finish on the Verify Wallet screen. After the wallet is saved, the window changes to Verify Wallet. It either shows the details of a small test transaction Toku is sending to your address, or the message "Your wallet was created but the test transaction is still being processed" if that transfer has not gone out yet - both are normal. Close the window with Cancel or the X (while the test is still on its way, the button on the right reads Waiting for transaction); you can finish verification later from the wallet list.
One active wallet per network
Toku keeps one active wallet per network-and-token combination. What that means in practice:
- If you already have an active wallet for, say, USDC on Ethereum and you want to switch, open the ⋯ menu on that wallet's row and choose Archive (for a wallet still awaiting verification, the option is Cancel Request). Then add the new wallet following the steps above.
- Once your new wallet is added and verified, it becomes the payout destination for that coin and network. Archived wallets stop receiving payouts; you can bring one back later with Restore in the View archived list.
- Avoid changing wallets right before a payday; make the switch after a payout lands, and tell your organization you changed it.
What happens next: verification
Back on the Payment Methods page, your new wallet appears in the Wallets list with a Pending badge and its shortened address, network, and coin. Toku sends a small test transaction to your address to prove the address really is yours; the small amount is yours to keep. When the test transaction is ready to confirm, you will get an email - then you return to this page and select Verify on the wallet row (or Verify Wallet in its ⋯ menu). The full verification walkthrough is in the guide Wallet verification: the test transaction, explained. Until verification is complete, the wallet stays Pending and is not used for payouts.

Common blocks
"User does not have 2FA enabled" / a panel titled "Set up two-factor authentication". If your organization requires two-factor authentication and your account does not have it set up, the wallet flow stops after the address step and shows: "Your organization requires two-factor authentication, but it isn't set up on your account yet. Please enable 2FA in your account security settings, then come back here to add your wallet." Set up 2FA in your account security settings (you will scan a QR code with an authenticator app such as Google Authenticator), then restart the steps above. The full walkthrough is in Setting up and troubleshooting two-factor authentication (2FA).
The network you need is not in the list. The "Select Payment Type" list only shows what your organization has turned on. A missing network is a configuration choice, not an error on your side - ask your organization's administrator to enable the network, then try again.
Worried about picking the wrong network. Money sent on the wrong network can be lost permanently. The address form accepts what you paste without warning you, so the safety checks are yours: copy the address straight from your wallet app, confirm the network in your wallet matches the one in parentheses in Toku, and compare the first and last 6 characters before clicking Next. If you realize you chose wrongly after saving, open the wallet row's ⋯ menu and choose Cancel Request immediately, then add the wallet again with the correct network.
Still stuck?
Email [email protected] with:
- Your full name and the name of your organization
- The page you are on (for example "Payment Methods") and the step number from this guide where you are stuck
- A screenshot of what you see, including any error message
- If it concerns a specific wallet: the first 6 and last 6 characters of the address (never send private keys or seed phrases - support will never ask for them) Related guides in this collection: Wallet verification: the test transaction, explained, Setting up and troubleshooting two-factor authentication (2FA), Logging in to Toku: which website and which password to use, and Adding your bank account for payouts.