
 14 MIN READ
 UPDATED OCT 30, 2026
📘 For organization administrators on Toku. Last updated October 30, 2026.
Who this is for and what you'll accomplish
This guide is for organization administrators adding or managing bonuses, stipends, overtime, correction payments, and additional final pay. For base salary changes, use Toku: How to Submit Salary and Employment Changes instead.
Before you start
Make sure you have all of the following before you begin:
- [ ] Your login: open your web browser, type
app.toku.comin the address bar, and press Enter. The screen says Welcome back and asks only for your email address - there are no product tabs to choose any more. Enter your administrator email, select Continue, then enter your password on the next screen and select Sign in. (On that password screen you can instead select Sign in with Google, or Sign in with email to have Toku email you a one-time sign-in link instead of using a password.) If a screen then asks how you would like to continue, choose the row for your organization that is labelled ADMIN, then select Continue as ADMIN. The oldtga.app.toku.comaddress is no longer the way in. - [ ] An administrator account for your organization. If you can sign in but do not see the options described below, you are likely signed in as a regular user - sign out and back in, choosing Continue as ADMIN.
- [ ] The team member already added to your organization. You cannot enter pay changes for someone who has not been added yet.
- [ ] The details of the additional compensation: gross amount, currency or token denomination, type, schedule, effective date, and an explanatory note when needed. Sign-on bonuses use a separate Sign-On Bonus field when the person is first added to your organization, either in the Add People window or through a bulk import. The value then appears read-only beside Base Salary in Compensation, so do not add it again as Additional compensation. Historical sign-on bonuses and other non-salary pay from the previous HRIS are migrated into Additional compensation. If a historical row was missed, recovery adds a single one-time Bonus only when that row is not already present; repeating the recovery does not create a duplicate.
Add a bonus or one-time payment
Step 1. In the left-hand menu, select People. The People list opens, showing everyone in your organization - employees and contractors.
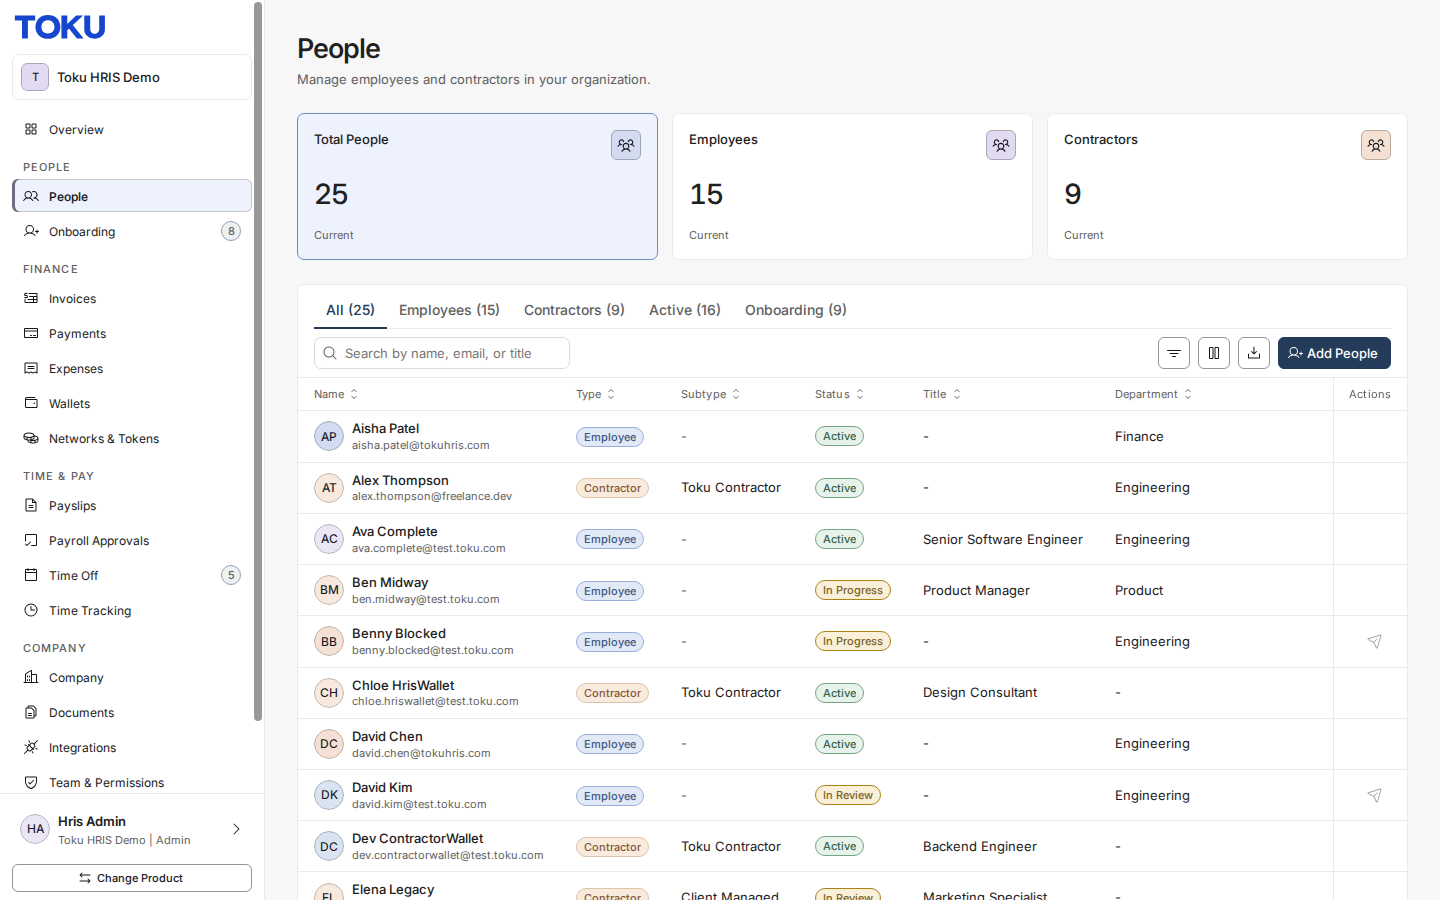
Select People in the left-hand menu.
Step 2. Find the person you are paying - scroll the list, or use Search by name, email, or title — and select their name. Their profile opens on the Overview tab; scroll down to the Compensation section.
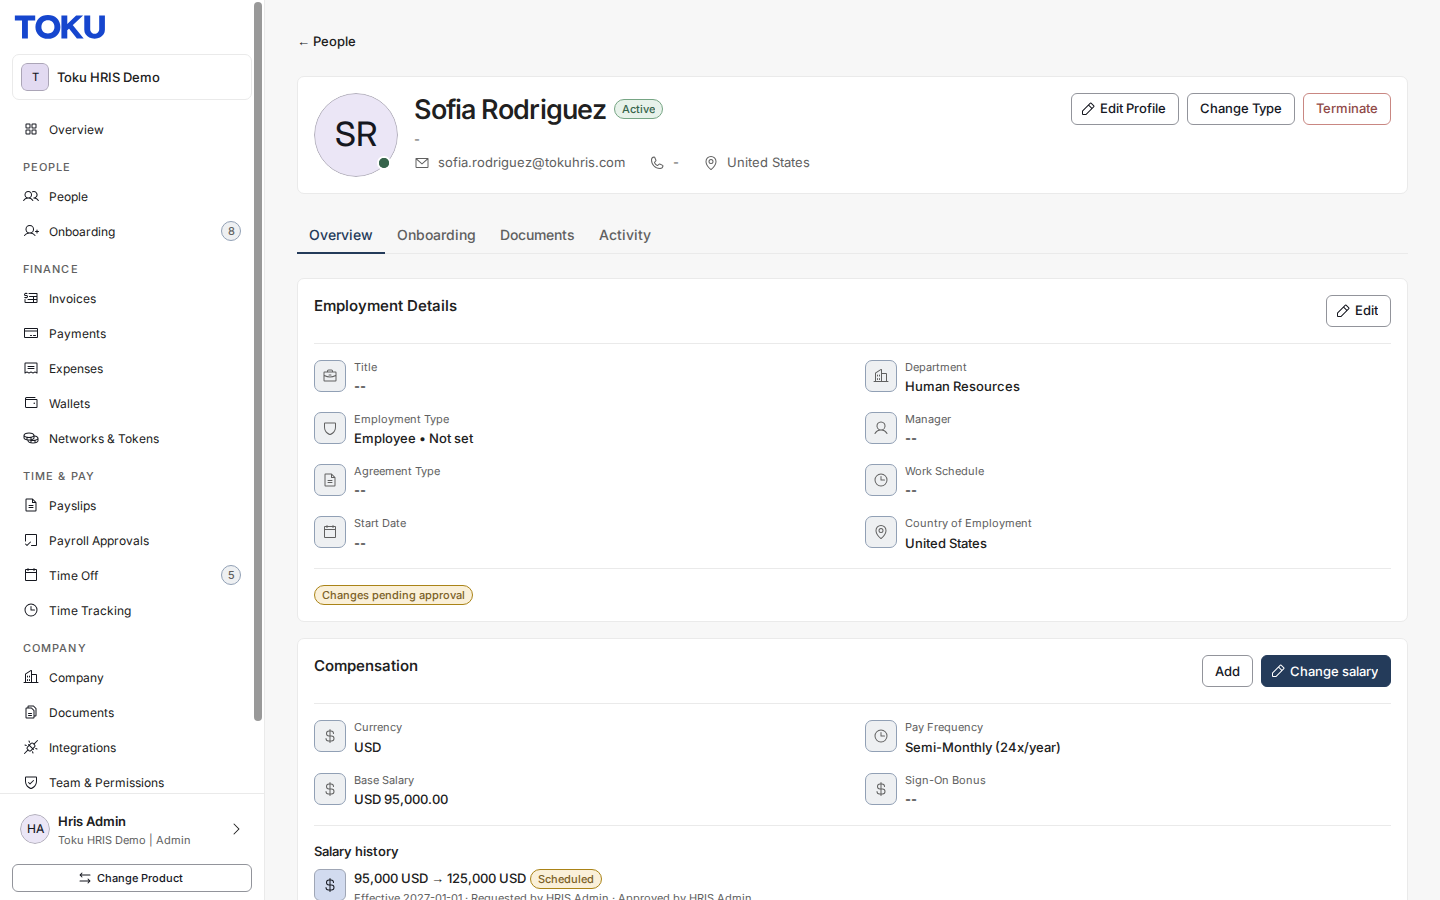
Select the person’s name to open their profile, then scroll down to Compensation.
Step 3. In the Compensation section of the person’s profile, select the Add button beside Change salary. A window titled Add Additional Compensation opens.
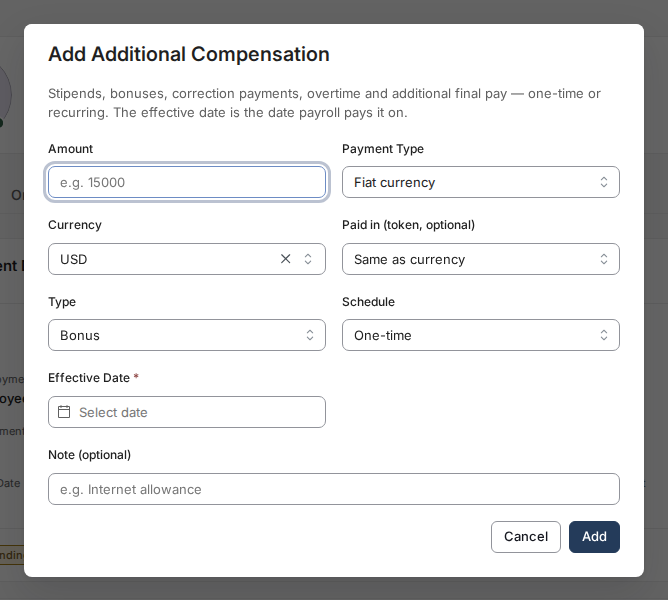
Select the Add button in the Compensation section.
Step 4. In the Amount box, type a positive number - for example, 1500 or 1500.50. Decimals are allowed; do not include commas, spaces, or a currency symbol. If you see “Enter an amount greater than zero.” in red, the box is empty or the value cannot be read as a number above zero. Retype the amount and try again.
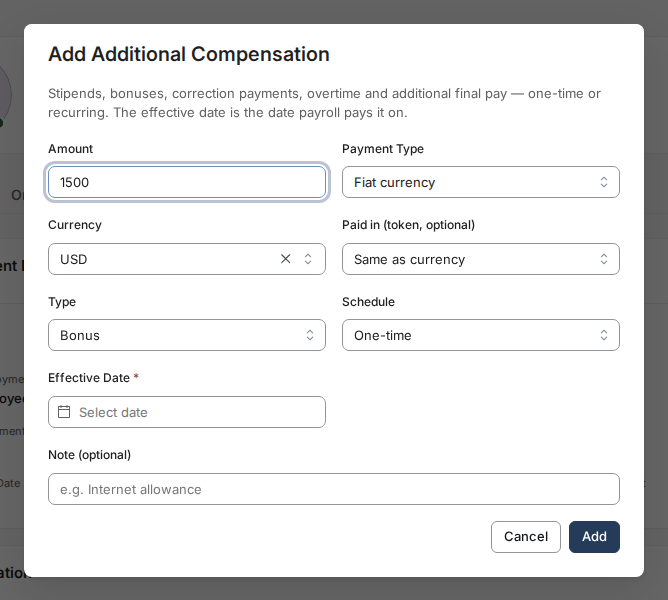
Type a positive payment amount into the Amount box; decimals use a period.
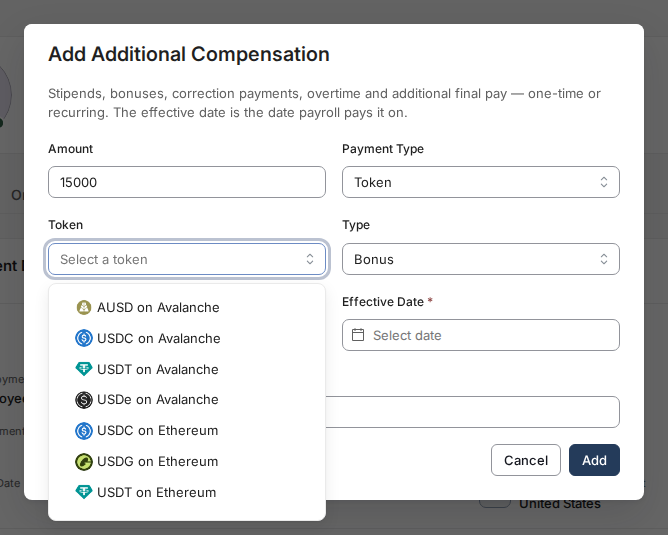
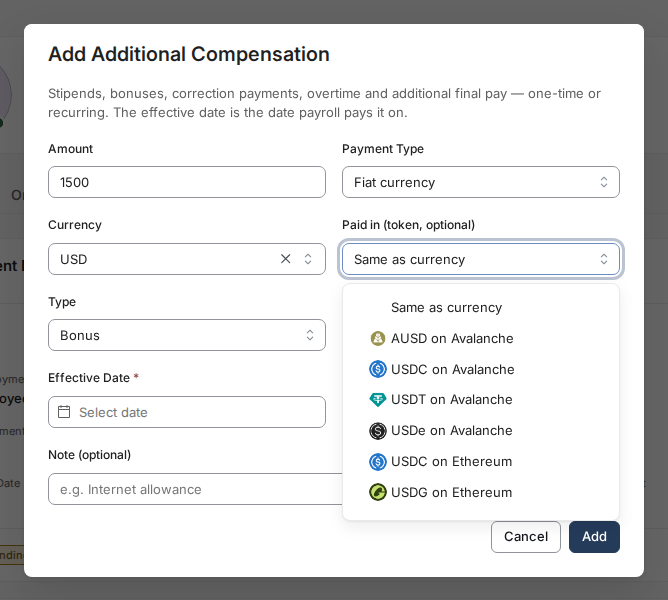
Step 5. The box to the right of the amount is Payment Type. It offers two options - Fiat currency and Token - and decides what the box below the amount asks for. Leave it on Fiat currency and the box below is Currency. This list is fiat only: the USDC and USDT stablecoins were removed from it, so do not look for a stablecoin here. Pick the currency written in the person's employment contract unless Toku has told you otherwise in writing. Choose Token and the box below is Token instead, listing the tokens your organization has enabled, each shown with the network it settles on - for example, USDC on Base. If your organization has no tokens enabled yet, an amber note says so and tells you where to enable one; if the list could not be loaded, a different note asks you to refresh the page and try again. An entry with Payment Type set to Token always goes to Toku for review, whatever the amount - see “Approvals and pending changes” below.
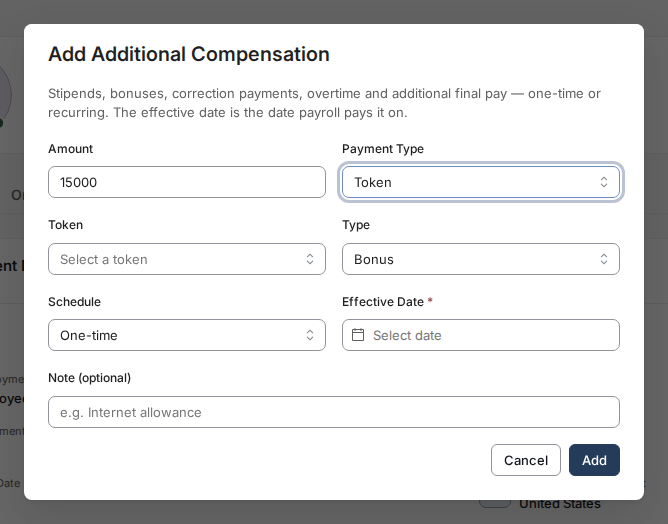
Pick the contract currency from the Currency list, or - if Payment Type is set to Token - the token from the Token list.
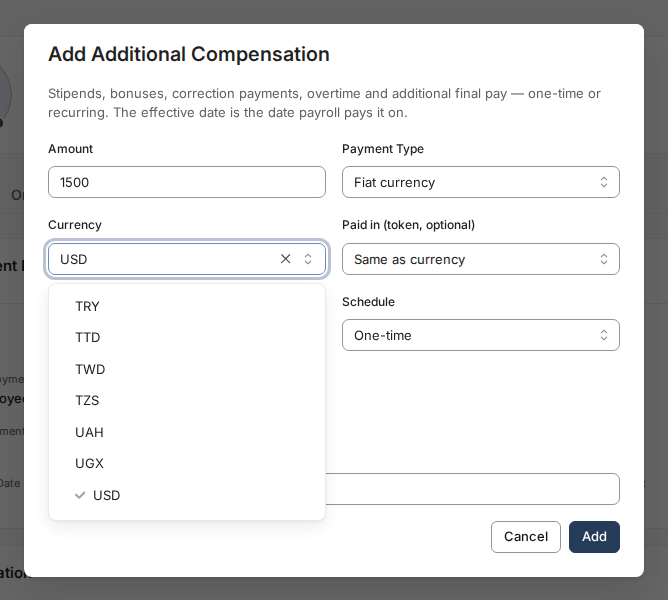
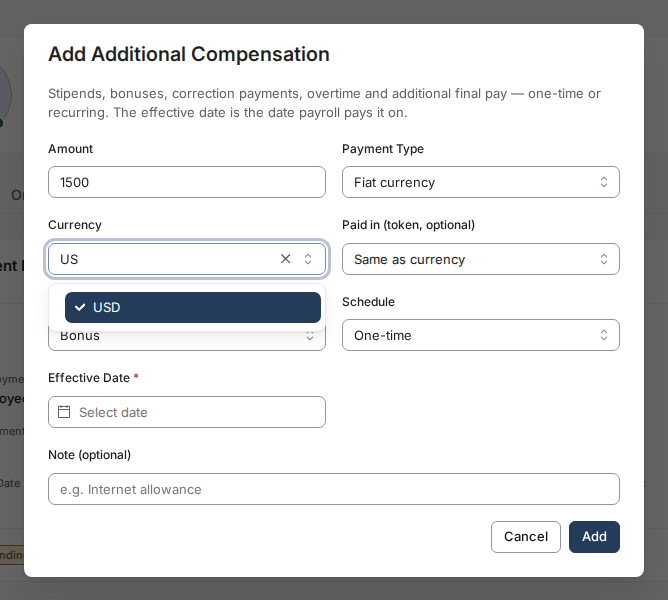
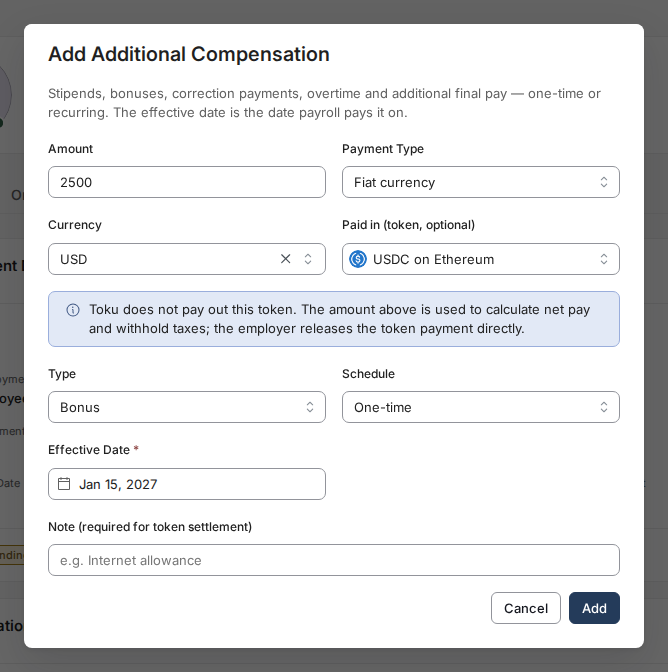
On a fiat entry only, one more box appears: Paid in (token, optional). Leave it on the default so the payment settles in the currency you chose. If you pick a token here, a grey note appears reading “Toku does not pay out this token. The amount above is used to calculate net pay and withhold taxes; the employer releases the token payment directly.” Picking one also makes the Note box at the bottom of the window required - its label changes to Note (required for token settlement), and saving without a note shows “Add a note explaining the token settlement - it is required when an amount is paid in a token.”
Step 6. Select the Type box and choose what kind of payment this is. There are five options: Stipend, Bonus, Correction Payment, Overtime, and Additional Final Pay. If you are fixing an earlier payment mistake, choose Correction Payment so the record is clear. Choose Additional Final Pay only for money owed on top of a final payment that has already been approved - it is not the regular last paycheck, which is not recorded here at all. The Type you pick is the one the Compensation Summary report uses, so a final-pay top-up recorded as a Bonus is reported as a bonus.

Choose the entry’s Type - Stipend, Bonus, Correction Payment, Overtime, or Additional Final Pay.
Step 7. Select the Schedule box and choose One-time for a single payment or Recurring for a repeating one. Choosing Recurring makes a new Frequency box appear where you pick how often it repeats - Weekly, Bi-Weekly, Semi-Monthly, Monthly, Quarterly, or Annually.

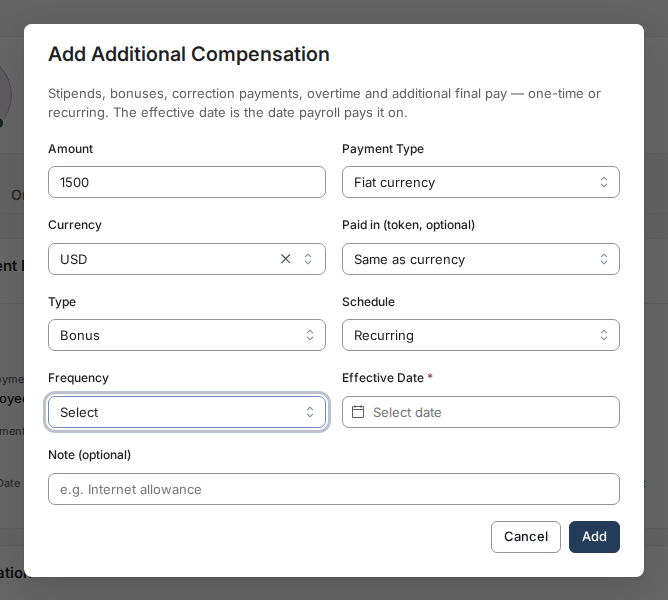
Choose One-time for a single payment or Recurring for a repeating one.
Step 8. Select the Effective Date box and pick a date from the calendar. This box is required - Toku will not save a payment without a date. The date records when the entry should take effect: today or a past date makes it eligible once processed, and a future date keeps it scheduled until then. If the entry needs review, it must also be approved before it can take effect. Payroll cutoffs can move the actual payment into the next eligible cycle, so the effective date is not a guaranteed settlement date. If you try to save without one, a red message reads “Enter the date this payment takes effect.”
Step 9. Type a short description in the Note box if it is useful - for example, “Team offsite bonus”. The note is optional unless you selected a token in Paid in (token, optional); in that settlement flow, the note is required. Then select the blue Add button. The window closes and a green “Additional compensation added” confirmation appears. This confirms submission; use the next step to tell whether the entry is active, scheduled, or pending review. If red text appears inside the window instead, the entry was not saved - fix the field it mentions and select Add again.
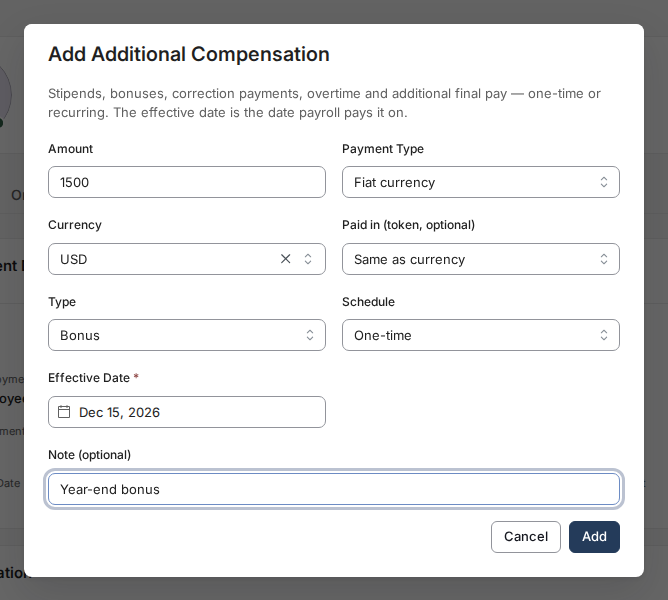
Select Add to save the payment.
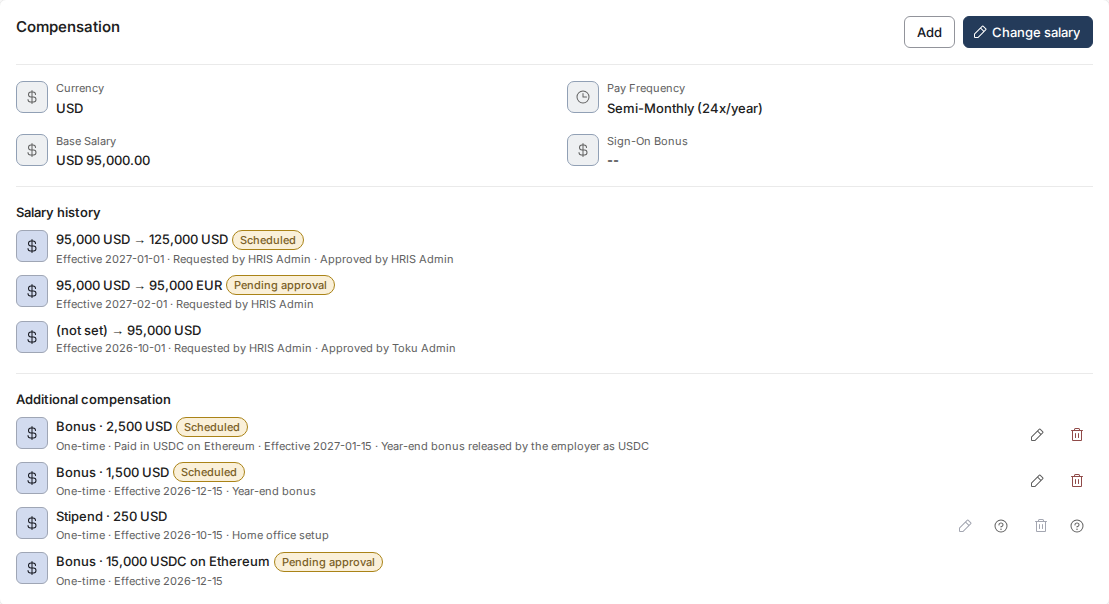
Step 10. Check the Compensation section after submission. A successfully auto-approved entry appears as a normal row under Additional compensation - for example, “Bonus · 1,500 USD”; a future-dated row also carries an amber Scheduled tag. An entry that needs review appears instead as a row with an amber Pending approval badge and no Edit or Remove buttons, or as a plain Changes pending approval pill if Toku cannot render the preview. If neither state appears after you refresh, contact Toku support rather than submitting the entry again.
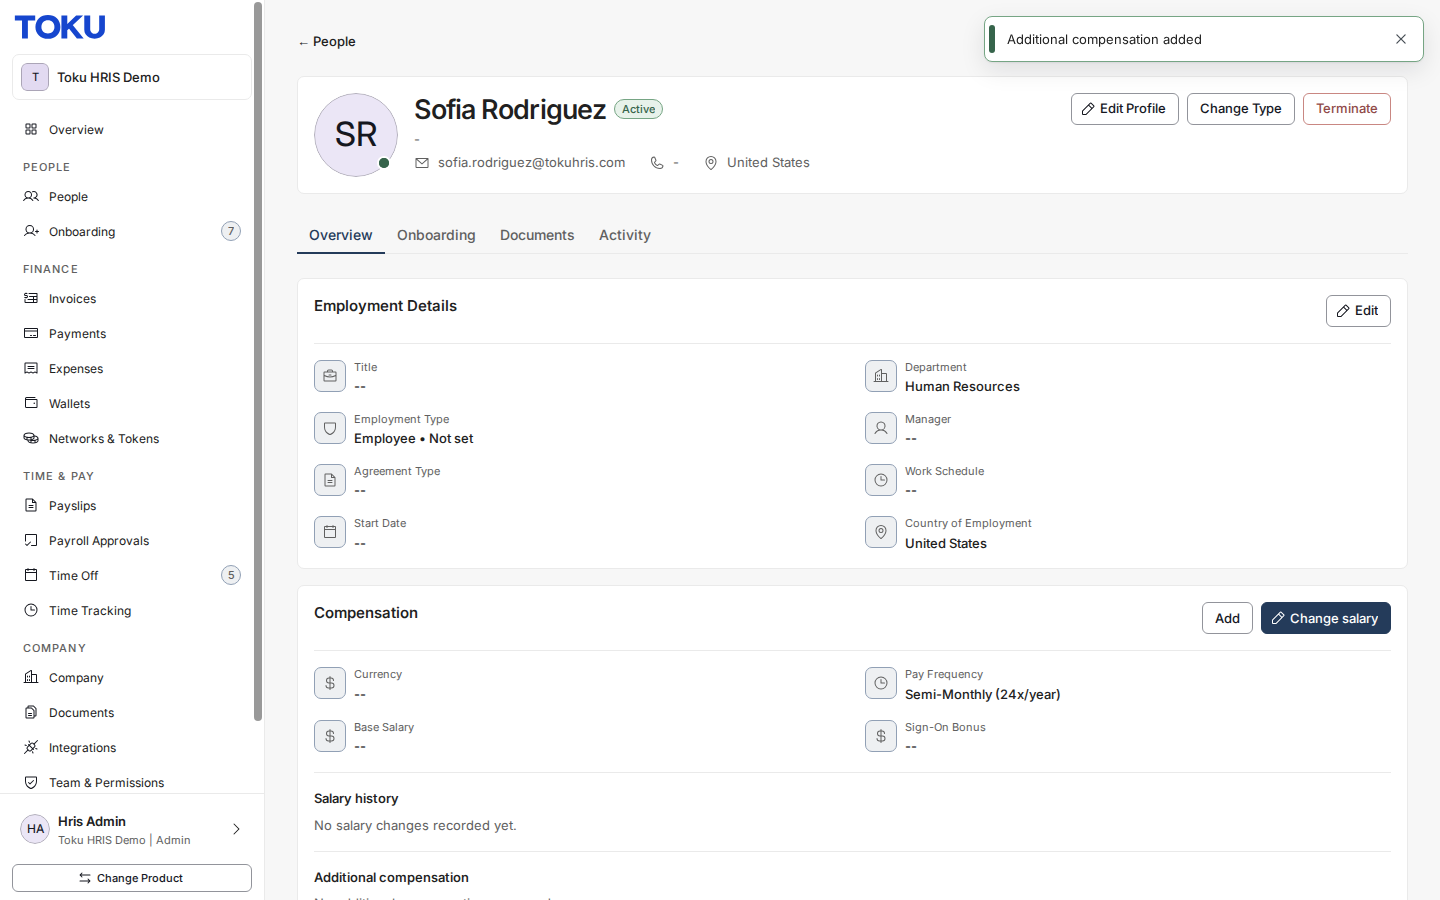
Check that the new payment appears as a row, with a Scheduled tag if future-dated.
Remove or edit an additional compensation entry
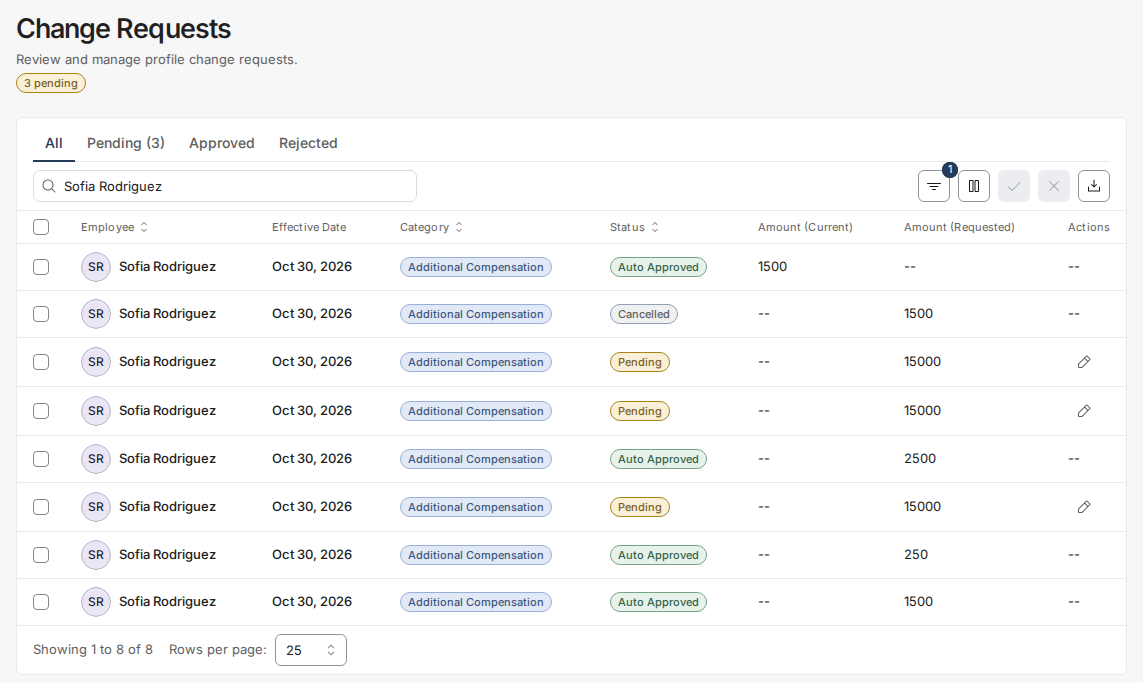
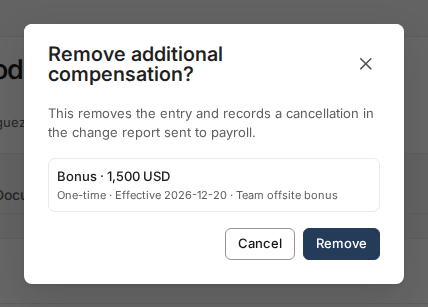
On an unlocked row whose payroll cutoff has not passed, select Remove (the bin icon). The Remove additional compensation? window shows the entry’s type, amount, schedule, and effective date. Select Remove again to confirm, or Cancel to leave the entry unchanged. After confirmation, Toku's Change Requests view shows a new Additional Compensation cancellation record and marks the earlier add or edit request Cancelled with the note “Superseded by removal.” The cancellation keeps a snapshot of the removed entry, while requested values are blank. In an exported CSV, those snapshot details appear in the Current Value columns and the Requested Value columns stay blank. The cancellation record’s Effective Date is the date you requested removal; the entry’s original effective date remains in the snapshot details.
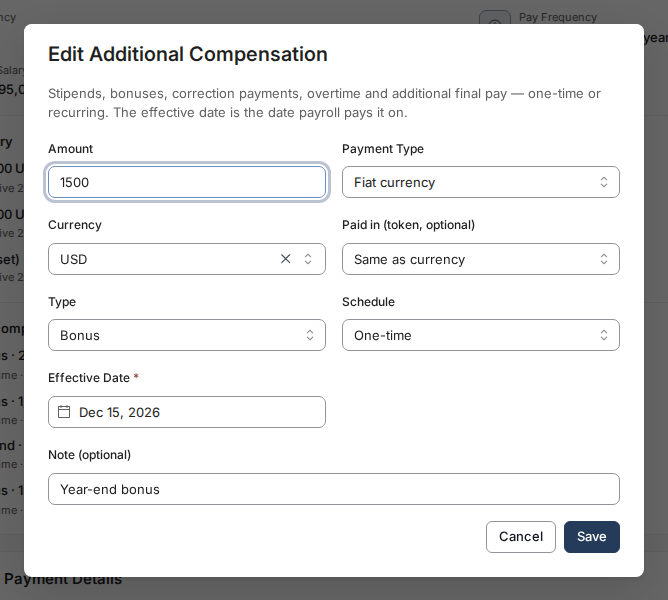
Select Edit (the pencil icon) on an unlocked row before its payroll cutoff to change its amount, currency or token, type, schedule, effective date, or note. This opens the same window used to add the entry, now titled Edit Additional Compensation and pre-filled with its current details.
Once the payroll cut-off for an entry's effective month has passed, both Edit and Remove grey out, with a small help icon beside them. Hover over the icon to read why: the entry can no longer be edited or removed because the payroll cut-off for its effective month has passed, so contact [email protected] if it still needs to be corrected or reversed. This protects a payment that may already have been sent to payroll.
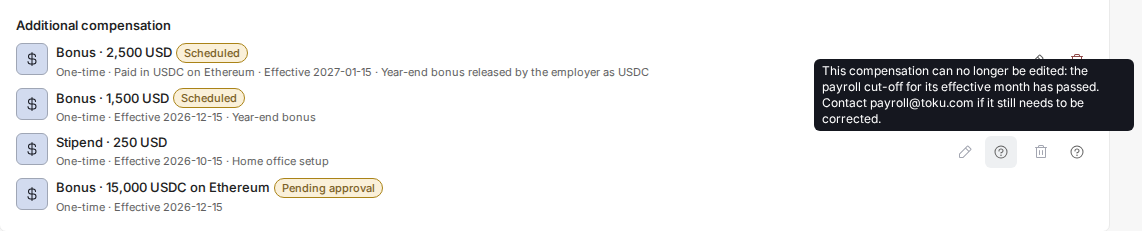
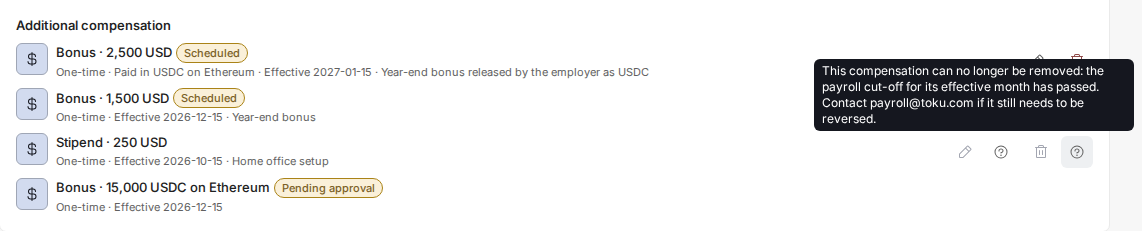
Fixing mistakes after the cutoff: once an entry’s payroll cutoff has passed, it remains a locked payroll record and an organization administrator cannot edit or remove it. Contact payroll for the correct reversal or off-cycle process. If money was actually paid incorrectly and payroll instructs you to record the difference, add a new entry with Type set to Correction Payment and add a Note that explains the correction; do not rewrite the locked row.
Effective dates and payroll cutoffs
Every payroll cycle has a cutoff date - the last day an additional-compensation entry can be included in that run. An entry submitted after the cutoff normally moves to the next eligible run; confirm the actual handling with payroll before promising a date. Outside the US and Canada, payroll runs once a month with last-day pay and a cutoff on the 10th. In the US and Canada, payroll runs twice monthly, with separate cutoffs for the mid-month and end-of-month runs. If a payment must land on a specific payday, enter it early and ask Toku to confirm the cutoff for the person's country.
Approvals and pending changes
Whether an additional-compensation entry applies without review or waits for Toku is decided per entry, not by an organization-level setting. A fiat entry below USD 5,000 goes through without review. A fiat entry worth USD 5,000 or more is held for review; amounts in other currencies are converted to USD for that comparison, and an amount that cannot be valued in USD is held rather than applied. An entry with Payment Type set to Token is always held for review, whatever the amount. A waiting entry normally appears in Compensation with an amber Pending approval badge, its submitted amount, schedule, and effective date, and no Edit or Remove controls. If the submitted entry appears nowhere, contact Toku rather than submitting it again.
Pre-funding for large amounts
Employee pre-funding: For EOR, PEO, and payroll-only employees, additional payments over $5,000 USD require pre-funding. Whenever pre-funding is required, including termination or severance payments, submit complete changes and payment details in Toku by the 10th. Toku reviews those submissions and sends invoices on the 11th or next business day. Full funds must be received and cleared by the 14th for that month's payroll consideration. Funding received after the 14th moves the additional payment to the next eligible regular payroll cycle. Earlier cycle cutoffs still apply. Contractor deadlines are separate. See Additional Compensation Changes Over $5,000: Prefunding Approval.
Billing notification and review are related but not identical. A fiat bonus, stipend, or other additional-compensation entry valued at USD 5,000 or more is held for prefunding review. Token-denominated entries and entries that cannot be valued safely are also held and notify billing. A recurring entry puts finance in the loop because it raises ongoing cost, even when it is below the review threshold. If the payment must arrive on a specific payday, enter it well before the payroll cutoff and confirm the funding timeline with Toku.
What your employee sees
Your employee signs in at app.toku.com with their own account and selects Profile. The Compensation section is view-only: employees do not have Change salary, Add, Edit, or Remove controls. A pending additional-compensation change request can still appear there before approval with a Pending approval state; that pending row is not yet active compensation.
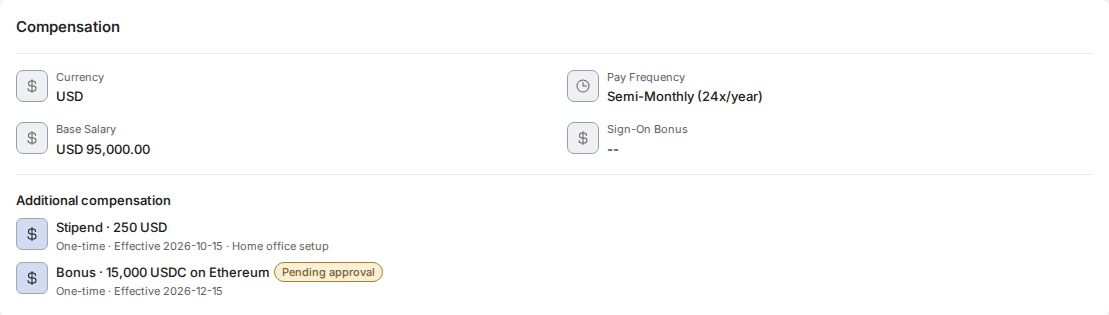
The employee’s own profile shows the Compensation section without any editing buttons.
Future scheduling and review are separate states. A future-dated persisted additional-compensation row is hidden from the employee until its effective date. A pending additional-compensation change request can be visible before approval; after any required review is complete and its effective date has arrived, the active entry appears as a normal view-only row in Compensation.
Still stuck?
Contact your usual Toku support contact or account manager and include all of the following, so they can find the issue quickly:
- Your full name and your organization's name.
- The employee's full name.
- The page you were on (People, then the person's name, Overview tab).
- Exactly what you entered: amount, currency, type, schedule, and effective date.
- A screenshot of the Compensation section, including any red error text that appeared.