
 9 MIN READ
 UPDATED OCT 30, 2026
How your organization connects its own Fireblocks workspace to Toku and pays crypto payment batches directly from its Fireblocks vaults. Setup takes a few minutes in Toku plus an approval step in Fireblocks.
What this integration does
Connecting Fireblocks lets an organization fund crypto payment batches straight from its own Fireblocks vault accounts. Key properties of the design:
- One integration covers the whole workspace. Payment batches automatically match each payment's token and network against the Fireblocks workspace, so every network and asset enabled in the workspace is usable - there is no per-network setup.
- The org keeps custody. Toku never holds the org's funds or workspace credentials beyond an API user the org itself creates - and can disable at any time from the Fireblocks Console.
- Split credentials. Toku generates an RSA signing key that never leaves Toku's server; only the public CSR is shared with Fireblocks. The API key alone is useless without the private signing key, and the private key is useless without the API key.
- Verified before saved. Toku makes a live authenticated call to Fireblocks before storing anything. A bad credential is never persisted.
Before you start
| Requirement | Details |
|---|---|
| Toku access | A user with the Client Org Admin or Finance Admin role. If nobody on your team has one of these roles, ask your Toku contact to grant it. |
| Fireblocks access | A workspace Owner/Admin who can create API users and approve them (approval happens in the Fireblocks mobile app). |
| A funded vault account | At least one vault account holding the payout asset and the native asset for gas (e.g. ETH for ERC-20 payouts). |
| Matching environment | Toku connects to your production Fireblocks workspace (console.fireblocks.io). A key created in a Fireblocks sandbox workspace (sandbox.fireblocks.io) will not verify - sandbox is only used when testing against a Toku test environment. |
Where to find it in Toku: open Admin Integrations → Payment Integrations → Fireblocks card. The card opens the Fireblocks setup window used throughout this guide.
Step 1 - Generate the signing key and download the CSR (in Toku)
- In the Fireblocks setup window in Toku, click Generate signing key.
- Toku generates an RSA key pair server-side. The private key is stored on the server and never leaves it — what you see is only the CSR (Certificate Signing Request), which is public and safe to share with Fireblocks.
- Click Download CSR (saves
fireblocks.csr) or Copy CSR.
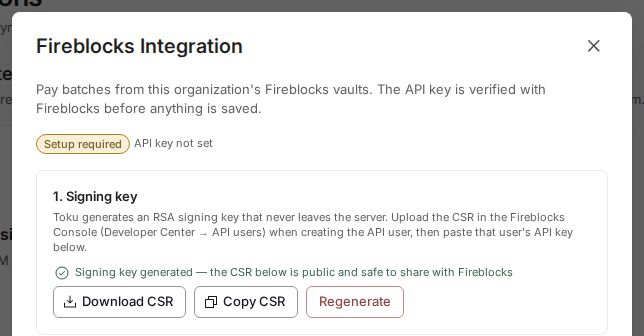
⚠️ Do not press Regenerate casually. Regenerating creates a brand-new signing key and CSR - the existing API user pairing stops working immediately, and payouts are down until you upload the new CSR to Fireblocks, create a new API user, and save its API key in Toku.
Step 2 - Create the API user in the Fireblocks Console
- Open the Fireblocks Console → Developer Center → API users:
- Production: https://console.fireblocks.io/v2/developer/api-users
- Sandbox (only when testing against a Toku test environment): https://sandbox.fireblocks.io/v2/developer/api-users
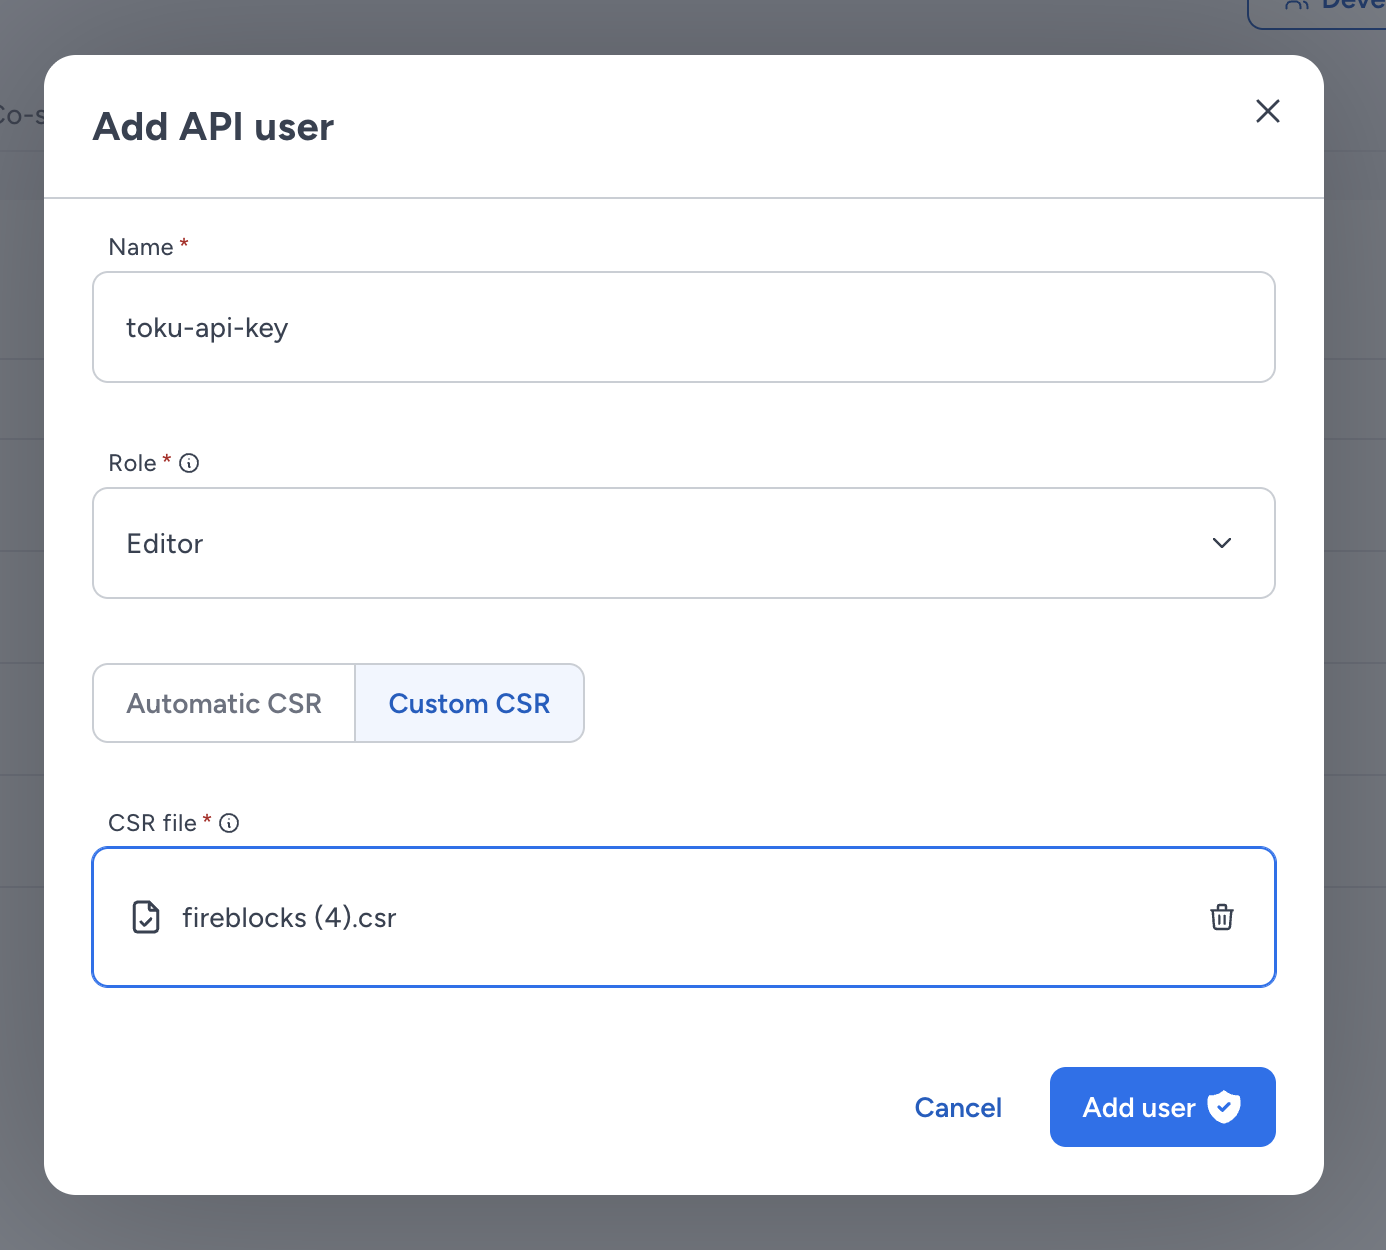
- Click Add API user and fill in:
- Name: something recognizable, e.g.
toku-api-key. - Role: Editor — this lets the API user initiate transactions but not change workspace settings.
- Switch the CSR tab to Custom CSR and upload the
fireblocks.csryou downloaded in Step 1. (Do not use Automatic CSR - that would generate a key pair Toku doesn't hold.)
- Click Add user.
- Approve the new API user. A workspace Owner must approve the pending API user (typically in the Fireblocks mobile app). Until it shows as active in the API users list, Toku's verification in Step 3 will fail.
- Copy the API key (a UUID) from the API users list - the copy icon next to the key column.

🔐 The API key is not a secret on its own - every API request must also be signed with the private signing key that only Toku's server holds. Still, treat it like a credential: paste it into Toku and don't leave it lying around in chats or docs.
Step 3 - Paste and verify the API key (in Toku)
- Back in Toku, paste the API key into Fireblocks API key.
- Click Verify & save API key.
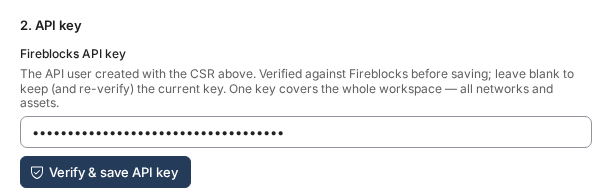
What happens when you click the button:
- Toku makes a live authenticated call to Fireblocks using your API key plus the server-held signing key.
- The key is only persisted if Fireblocks accepts the credentials. On failure nothing is saved, and the failure is audit-logged.
- Once saved, the key is never displayed again — Toku shows only a masked version (last 4 characters). Leaving the field blank on later saves keeps (and re-verifies) the stored key.
- One key covers the whole workspace - all networks and assets. When verification succeeds the integration badge flips to Active.
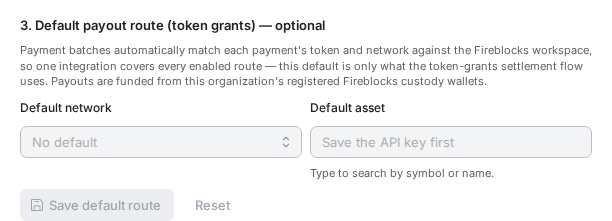
Step 4 - (Optional) Set a default payout route for token grants
This step only matters if the org uses the token-grants settlement flow. Regular payment batches ignore this default - they resolve each payment's token and network against the Fireblocks workspace dynamically.
- Pick a Default network (the list shows the org's enabled networks).
- Search for a Default asset by symbol or name - the list comes live from your Fireblocks workspace catalog and shows each asset's Fireblocks API ID.
- Click Save default route. (Reset clears both.)
Step 5 - Link payout vault wallets
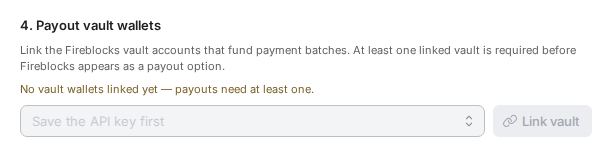
Payouts are funded from the vault accounts you link here. At least one linked vault is required before Fireblocks appears as a payout option when creating payment batches.
- The dropdown lists the vault accounts in your Fireblocks workspace (already-linked vaults are hidden).
- Select the vault that should fund payouts and click Link vault.
- Linked vaults appear above the dropdown with their vault ID and address. Link as many as you need.
Confirm it's live
- [ ] The Fireblocks card under Payment Integrations shows Connected, and the setup window badge shows Active.
- [ ] At least one vault wallet is listed under Payout vault wallets.
- [ ] Fireblocks appears as a payout option when creating a payment batch.
- [ ] Run a small test payout end-to-end before the first real batch - this proves vault funding, gas, and the workspace policy in one go.
Fireblocks workspace settings that affect payouts
These live entirely in the Fireblocks Console and are the most common reason a connected integration still can't pay:
- Transaction Authorization Policy (TAP). Transfers initiated by the API user follow the workspace's TAP. If the matching rule requires approval, every payout sits in pending approval until a designated approver signs it in the Fireblocks mobile app. Decide up front whether API-initiated payouts should auto-approve or who approves them - and know that a stuck transaction can be cancelled from the Fireblocks Console, after which the batch can be retried.
- One-time (non-whitelisted) addresses. Payouts go to recipients' wallet addresses, which are usually not whitelisted in the workspace. The workspace must allow transfers to one-time addresses, or the destination addresses must be whitelisted first.
- Vault funding. The linked vault needs the payout asset and enough of the network's native asset for transaction fees.
Maintenance: rotation, regeneration, deletion
| Action | Effect |
|---|---|
| Rotate the API key | Create a new API user in Fireblocks (Step 2) and save its key in Toku (Step 3). The old API user can then be deleted in the Fireblocks Console. |
| Regenerate signing key | Destructive: new key pair + CSR, the existing API key stops working immediately. You must redo Steps 2 - 3 before payouts work again. |
| Delete integration | Permanently removes the org's API key and signing key from Toku. Payment batches can no longer pay via Fireblocks until the whole setup is redone. Cannot be undone. |
| Leave API key field blank | Keeps the stored key; clicking Verify & save changes re-verifies it against Fireblocks. |
Troubleshooting
| Symptom | Likely cause → fix |
|---|---|
| “Unable to connect to Fireblocks API, please check your credentials” on save | The API user is still pending approval or was disabled → approve it in Fireblocks. Or the key was pasted wrong, the signing key was regenerated after the API user was created (CSR mismatch → redo Step 2), or the key belongs to the wrong environment (sandbox key against production, or vice versa). |
| Asset field says “Save the API key first” | Step 3 hasn't completed successfully - the workspace catalog and vault list only load with a verified key. |
| Fireblocks doesn't show up as a payout option in payment batches | No vault wallet is linked → complete Step 5. |
| Vault dropdown says “All vault accounts are linked” | Every vault in the workspace is already linked - nothing to do. |
| Payout stays in progress for a long time | Check pending approvals in the Fireblocks Console (TAP rule requires a signer). Approve it, or cancel it Fireblocks-side and retry the batch. |
| Verification fails with no obvious reason | Every failed attempt is logged with the exact reason Fireblocks gave - contact Toku support and they can tell you what was rejected. |
Questions or a step that doesn't match what you see? Contact your Toku account manager or support - we're happy to walk through the setup together.